Finished!
The design is from Edyta Sitar's book, Hop to It.
The first block I completed was the bunny block, and somehow, my family just started calling it "The Bunny Quilt", as in, "Mama, are you working on the bunny quilt again?"
It is all hand appliqued. After a lot of vacillating and fear (I was so afraid of messing it up!), I worked out a quilting plan: stabilizing quilting with walking foot (straight lines through the sashing, and in-the-ditch along the inner border); quilt each block; quilt the sashing and cornerstones; quilt the border.
For the quilting, I decided on McTavishing for all of the applique blocks. Since it is a dense filler with a lot of traveling back on itself stitch-wise, I used Aurifil 50/2 for all of the quilting. I'm really pleased with how it came out! But boy, it was not fast. Each block took a little more than an hour to quilt. It was scary at first, but the design really is easy to work with and flows so nicely.
I went with curvy lines in the sashing diamonds. Then I found a design I liked in Keep on Quilting Pattern Pack #3 by Keryn Emmerson, and used it in the cornerstones.
The inner border was inspired by a border treatment I saw in passing at the Thimble Pleasures blog (which I saved to my pinboard so I wouldn't forget where I found it!). I just thought it was so pretty, and it looked like something I could do. I think it ended up working really nicely.
For the outer border, I did feathers. Woo!!! Did you hear that? I DID FEATHERS! (*feeling mighty proud*) I spent a lot of time practicing first. I practiced at every opportunity-- with crayons while the boys colored, with sidewalk chalk on the driveway, in my notepad while taking minutes at the preschool board meeting, on my husband's whiteboard, in the sandbox at school (tracing the design with my finger)-- if I had a free moment, I was feathering. After about a week of that, I finally sat at the machine to try. And I was able to do it. And it didn't look too bad! I am so happy with how it came out.
The feathers are even more visible when one looks at the back.
The backing was pieced from my border fabric rejects/leftovers as well as a little bit of stash (those birds have been in my stash since 1999!). I really love how it came together! Scrappy and happy.
And, of course, the label.
Now I just need to find the perfect place to hang it!
Showing posts with label Hop to It. Show all posts
Thursday, April 19, 2012
Thursday, February 16, 2012
Hoppin' along with Hop to It
After all of the excitement of testing out border options for my Hop to It quilt, I realize that I never actually shared the final picks. Doh! So, here is the top with borders and all:
I ended up going shopping and chose an inner border that actually looks pretty similar to my previous options, but it is cooler-toned and more blue/green than brown. Then I decided to bring the lightness I was craving into the outer border. I'm so happy with how they work together and with how the quilt looks as a whole. Huzzah!
This week, I managed to sit down and plan out my backing and get it pieced together. And then...
Basting! That's me in the picture above, keepin' it real with my crazy hair and surrounded by toys. I have to say, there is nothing like basting a quilt on the floor for making one feel old and decrepit. My back was killing me after this. But, the basting is done. Woo!
I took the plunge and entered this into my quilt guild's April show. Here's hoping they decide to hang it; based on my entry picture (of just 12 blocks hanging on a wall), they might decide I'm a lost cause and say no. LOL! Regardless, I'm motivated to get it quilted. I have a plan. Now I just have to get up the gumption to do it.
I won't mess up my quilt; I won't mess up my quilt...
I ended up going shopping and chose an inner border that actually looks pretty similar to my previous options, but it is cooler-toned and more blue/green than brown. Then I decided to bring the lightness I was craving into the outer border. I'm so happy with how they work together and with how the quilt looks as a whole. Huzzah!
This week, I managed to sit down and plan out my backing and get it pieced together. And then...
Basting! That's me in the picture above, keepin' it real with my crazy hair and surrounded by toys. I have to say, there is nothing like basting a quilt on the floor for making one feel old and decrepit. My back was killing me after this. But, the basting is done. Woo!
I took the plunge and entered this into my quilt guild's April show. Here's hoping they decide to hang it; based on my entry picture (of just 12 blocks hanging on a wall), they might decide I'm a lost cause and say no. LOL! Regardless, I'm motivated to get it quilted. I have a plan. Now I just have to get up the gumption to do it.
I won't mess up my quilt; I won't mess up my quilt...
Saturday, January 21, 2012
Snowed in, stalled out
This week I spent a fair amount of time working on my Hop to It quilt, piecing the sashing. I finished all of the pieced sashing bits (yay!) and started to lay the quilt out on my design wall to get the placement just right.
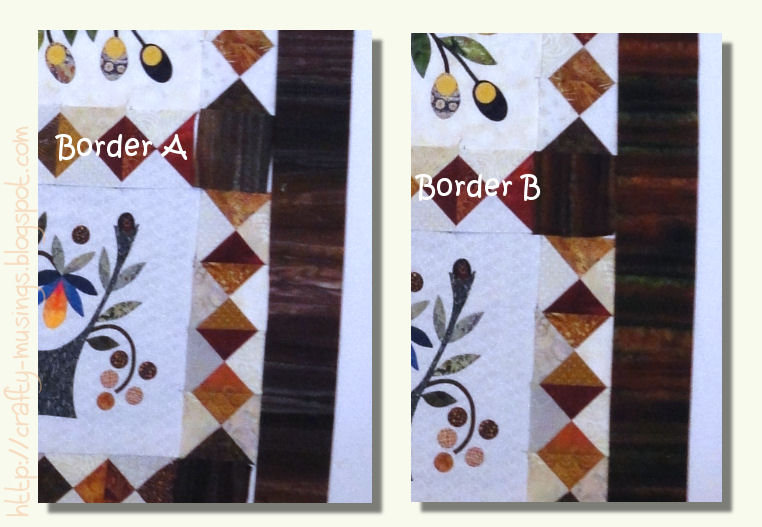
It was then that I realized that the seemingly happy border fabric that I chose a few weeks ago just wasn't working for me. It just felt too cool and pinky for my taste.
So I moved on to plan B and shopped the stash. I found a potentially awesome candidate-- similar to the first, but in warmer colors. Maybe the best option wasn't to chop it up right away, but I was feeling confident and went ahead and did it. The warmer tones did work much better, but it still wasn't quite right.
Above is a comparison of the two border options. What do you think? A or B?
I called in my husband for another perspective. As he thought they both looked pretty much the same, he ended up being no help at all! Though, to be honest (and I do strive to be honest!), he's kind of right. They really do look remarkably similar unless one is standing very close. Hmmmm...
So then I spent awhile gazing at my wall and then at the pictures I took. Looking at them kind of shrunk-up in the computer helped me figure it out: the real problem is that they're just too dark. I need something lighter. I must find an option C.
On the down side-- I have to go shopping for the perfect fabric. Again. Which means I can't finish NOW.
On the bright side-- I get to go fabric shopping! And really, after having been snowed in for the last four days, any excuse to go out and about is a good one in my mind at this point! :)
It was then that I realized that the seemingly happy border fabric that I chose a few weeks ago just wasn't working for me. It just felt too cool and pinky for my taste.
So I moved on to plan B and shopped the stash. I found a potentially awesome candidate-- similar to the first, but in warmer colors. Maybe the best option wasn't to chop it up right away, but I was feeling confident and went ahead and did it. The warmer tones did work much better, but it still wasn't quite right.
Above is a comparison of the two border options. What do you think? A or B?
I called in my husband for another perspective. As he thought they both looked pretty much the same, he ended up being no help at all! Though, to be honest (and I do strive to be honest!), he's kind of right. They really do look remarkably similar unless one is standing very close. Hmmmm...
So then I spent awhile gazing at my wall and then at the pictures I took. Looking at them kind of shrunk-up in the computer helped me figure it out: the real problem is that they're just too dark. I need something lighter. I must find an option C.
On the down side-- I have to go shopping for the perfect fabric. Again. Which means I can't finish NOW.
On the bright side-- I get to go fabric shopping! And really, after having been snowed in for the last four days, any excuse to go out and about is a good one in my mind at this point! :)
Friday, January 6, 2012
This week in the quilt mines...
There was a lot of cutting and a even a little bit of sewing as I started in on quarter-square triangles for the sashing in my Hop to It quilt.
I got my glue on making some fun nametags for a quilt guild event.
And I even dug out the grandmother's flower garden and built a little more of the path (with kitty in my lap!).
Variety is the spice of life!
I got my glue on making some fun nametags for a quilt guild event.
And I even dug out the grandmother's flower garden and built a little more of the path (with kitty in my lap!).
Variety is the spice of life!
Tuesday, December 13, 2011
Hop to It: "Garden Grace"
I couldn't help myself. I've been on such a roll lately with these Hop to It blocks that I just had to keep going and finish up the last one.
Block 9, "Garden Grace":

Techniques used:

All the blocks are complete! Woo hoo!!! Now I just need to figure out sashing. Here's hoping I don't fall into my recent pattern of finishing the applique and then stalling out on putting it all together (ahem... I'm talking about you, Greenpiece!).
Block 9, "Garden Grace":

Techniques used:
- Bias bars for the stems;
- Karen Kay Buckley's Perfect Circles for the berries;
- Needleturn with freezer paper on top for everything else.

All the blocks are complete! Woo hoo!!! Now I just need to figure out sashing. Here's hoping I don't fall into my recent pattern of finishing the applique and then stalling out on putting it all together (ahem... I'm talking about you, Greenpiece!).
Monday, December 12, 2011
Hop to It: "Rose Hip Wreath"
Block 12 of Edyta Sitar's Hop to It quilt, "Rose Hip Wreath":

Techniques used:

Techniques used:
- Bias bars for the stems;
- Needleturn with freezer paper on top for the leaves and buds;
- Freezer paper on bottom and starch for the ovals;
- Karen Kay Buckley's Perfect Circles for the flower centers.
Tuesday, December 6, 2011
Hop to It: "Enchanted Garden"
Another Hop to It block:

This is block ten, "Enchanted Garden." I think this one turned out really beautifully. I love the background fabric; so much so that I bought some in another colorway to make a skirt (not made yet, but it's on the list!).
Techniques used:

This is block ten, "Enchanted Garden." I think this one turned out really beautifully. I love the background fabric; so much so that I bought some in another colorway to make a skirt (not made yet, but it's on the list!).
Techniques used:
- Bias bars for the stems;
- Karen Kay Buckley's Perfect Circles for the flowers;
- Needleturn with freezer paper on top for everything else.
Saturday, December 3, 2011
Hop to It: "Batik Beauty"
October was so busy that I once again fell behind on my Hop to It project. So I've been trying to take some time for applique in the evenings and finally finished block seven, "Batik Beauty."

Techniques used:
I'm loving this project! *happy sigh*

Techniques used:
- Bias bars for the stems;
- Karen Kay Buckley's Perfect Circles for the flower centers;
- Needleturn with freezer paper on top for everything else.
I'm loving this project! *happy sigh*
Friday, September 16, 2011
Hop to It: "Buds in Bloom"
Oh, my! Long time, no post. Time just slipped away. It has been a busy couple of weeks, what with the boys (yes, both of them!) starting preschool and getting used to the new routine. Crafting has slid a little by the wayside, but I've managed to eek out a little bit of applique in the evenings and have another Hop to It block completed. Yay! This is block six, "Buds in Bloom."
It feels kind of mellow to me. But I do like the purple/yellow combo. I used a variety of techniques on this one:
- Bias bars for the stems
- Needleturn with freezer paper on top for the leaves
- Freezer paper on bottom and starch for the ovals (I don't use this technique very often-- but I really wanted my ovals to be consistently oval-shaped, so I thought the additional prep this required was worth it)
- Karen Kay Buckley's Perfect Circles for the flower centers
Sunday, August 14, 2011
Hop to It: "Spring Breezes"
Since I'm not really going in any order, I skipped along to block 11 for this month. This might be my favorite Hop to It block thus far:
I just love the weaving vines and leaves, the flowing design, the lovely background, and the colors... oh, the colors! Somehow, I just lucked out on this one in picking fabrics. Happy!
All of the usual techniques prevailed in this one... bias bars for the stems, Perfect Circles for the berries, and needleturn with freezer paper on top for everything else. I had a few problems with placement of the dark green leaves (they should have been placed a little further down on their respective stems), but I managed to make it work without having to tear anything out. So I count that as a success.
I'm now caught back up to where I'm supposed to be block-wise on this project. Woo hoo!
I just love the weaving vines and leaves, the flowing design, the lovely background, and the colors... oh, the colors! Somehow, I just lucked out on this one in picking fabrics. Happy!
All of the usual techniques prevailed in this one... bias bars for the stems, Perfect Circles for the berries, and needleturn with freezer paper on top for everything else. I had a few problems with placement of the dark green leaves (they should have been placed a little further down on their respective stems), but I managed to make it work without having to tear anything out. So I count that as a success.
I'm now caught back up to where I'm supposed to be block-wise on this project. Woo hoo!
Monday, August 8, 2011
Hop to It: Lily Dreams
Slowly but surely, I'm getting caught up on my Edyta Sitar Hop to It blocks. Here is block 8, "Lily Dreams":
The big challenges in this one were getting the overlapping designs placed correctly as well as appliqueing the skinny stems that had leaves at the end (the dark stems). On those stems, I initially tried using the bias bars on the long part, leaving a larger piece of fabric for the leaves which I thought I could needleturn. But that approach just didn't work at all. It ended up being a wonky mess. So I just did plain ol' needleturn with freezer paper on top for the entirety of those pieces, stem to leaf. Frankly, I was a little surprised when it worked. But I'll take it!
Overall, another happy block. I'm really enjoying this project so far.
The big challenges in this one were getting the overlapping designs placed correctly as well as appliqueing the skinny stems that had leaves at the end (the dark stems). On those stems, I initially tried using the bias bars on the long part, leaving a larger piece of fabric for the leaves which I thought I could needleturn. But that approach just didn't work at all. It ended up being a wonky mess. So I just did plain ol' needleturn with freezer paper on top for the entirety of those pieces, stem to leaf. Frankly, I was a little surprised when it worked. But I'll take it!
Overall, another happy block. I'm really enjoying this project so far.
Wednesday, July 27, 2011
Hop to It: "Spring Reel"
It has been a busy couple of weeks! My husband had three weeks off from work and so we've been getting to spend lots of family time together. We did some hiking, took a family vacation to the peninsula (visiting the beautiful town of Sequim), celebrated my husband's birthday, and generally just had a great time being together. The boys have been in heaven getting to spend so much time with papa!
There hasn't been much crafting during this time, but I'm starting to get back into some evening stitching and I finally have another Hop to It block to share. Yay!
This is block four, "Spring Reel":

It was pretty straightforward. I needleturned everything but the little circle in the center (go, go Perfect Circles-- LOVE that tool!). It's taken a couple of years, but I'm finally feeling more confident about my pointy-points. I'm definitely managing to make them more consistent and more pointy these days. Just so long as they don't need to be too pointy-- then they kind of stress me out still.
It feels good to be getting back into the saddle on this project and do a little bit of catch up. With this block is complete, I'm now only two behind schedule.
There hasn't been much crafting during this time, but I'm starting to get back into some evening stitching and I finally have another Hop to It block to share. Yay!
This is block four, "Spring Reel":

It was pretty straightforward. I needleturned everything but the little circle in the center (go, go Perfect Circles-- LOVE that tool!). It's taken a couple of years, but I'm finally feeling more confident about my pointy-points. I'm definitely managing to make them more consistent and more pointy these days. Just so long as they don't need to be too pointy-- then they kind of stress me out still.
It feels good to be getting back into the saddle on this project and do a little bit of catch up. With this block is complete, I'm now only two behind schedule.
Thursday, June 16, 2011
Hop to It: "Rose of Sharon Wreath"
I'm a little bit behind on my Hop to It project, so it feels extra good to actually finish a block. Hopefully next month I'll have time to make two blocks and get myself caught up again.

It's so strange... whenever I'm picking fabrics for my blocks, I feel like I'm picking a nice array (varying scales, a range of light to dark, different colors)-- but then I finish the blocks and they end up feeling kind of dark. Don't get me wrong. I still think they are very pretty, just darker than I expected. That's okay though. At least I'm consistent so the blocks all go well together. It was just a kind of weird realization.
Anyway, this was a fun block to work on. I was a little worried about getting the curves to all work together and look similar, but tracing a very light line on my background fabric in pencil to use as a placement guide worked well.
I also came to a decision on this block. This quilt has a number of blocks wherein there are a number of symmetrical elements. This block kind of had that in the repeating motif around the wreath, but in other blocks it is even more pronounced. With this in mind, I was kind of thinking it would be good to do some prep work to make sure all of the like pieces stayed exactly alike. This put me in a dilemma because what I really enjoy doing is needleturn, which I've learned, for me, is not conducive to exactitude. Then while working on this block, it occurred to me that there is nothing wrong with imperfect symmetry. It is okay to have a more organic look to my blocks if that's what I'm into. And I am into that. So that's what I'm going to do.
It's cheesy, but I kind of felt like a little weight had been lifted off my shoulders concerning this project and that made working on this block even more fun. Now I'm really looking forward to tackling the next block and seeing how it comes together.

It's so strange... whenever I'm picking fabrics for my blocks, I feel like I'm picking a nice array (varying scales, a range of light to dark, different colors)-- but then I finish the blocks and they end up feeling kind of dark. Don't get me wrong. I still think they are very pretty, just darker than I expected. That's okay though. At least I'm consistent so the blocks all go well together. It was just a kind of weird realization.
Anyway, this was a fun block to work on. I was a little worried about getting the curves to all work together and look similar, but tracing a very light line on my background fabric in pencil to use as a placement guide worked well.
I also came to a decision on this block. This quilt has a number of blocks wherein there are a number of symmetrical elements. This block kind of had that in the repeating motif around the wreath, but in other blocks it is even more pronounced. With this in mind, I was kind of thinking it would be good to do some prep work to make sure all of the like pieces stayed exactly alike. This put me in a dilemma because what I really enjoy doing is needleturn, which I've learned, for me, is not conducive to exactitude. Then while working on this block, it occurred to me that there is nothing wrong with imperfect symmetry. It is okay to have a more organic look to my blocks if that's what I'm into. And I am into that. So that's what I'm going to do.
It's cheesy, but I kind of felt like a little weight had been lifted off my shoulders concerning this project and that made working on this block even more fun. Now I'm really looking forward to tackling the next block and seeing how it comes together.
Wednesday, April 20, 2011
Hop to It: "Fleur Delight"
It took a couple weeks, but I finally finished appliqueing my next block in Edyta Sitar's Hop to It quilt.
Block 2: Fleur Delight

Notes on this block:
Now I have to figure out what block I want to do next!
Block 2: Fleur Delight

Notes on this block:
- The background I used in this one is actually the wrong side of a printed fabric. I loved the look of the basket-weave, but didn't like how dark the design was on the right side of the fabric. So I flipped it over and it ended up being just what I wanted. Woo hoo! I flipped down the upper right corner of my block in the picture above so you can see what the right side looks like.
- I used plastic bias bars to create the stems.
- Karen Kay Buckley's Perfect Circles were employed for the pink "flowers."
- Needleturn applique with freezer paper on top was used for everything else.
Now I have to figure out what block I want to do next!
Saturday, April 9, 2011
Easily distracted...
...or what I've been working on this week:
My next Hop to It block:

I got it all prepped and have started appliqueing.
A little bit of embroidery:

This is going to be the front pocket on some overalls for Little Bear.
A spring wallhanging:

Now I'm waiting on some buttons before I can go on to the next step. Maybe I'll even finish it before Easter!
Block exchange blocks:

Nice and simple... she even had the strips pre-cut and ready to sew.
Sometimes, I feel like I must have crafting A.D.D.
My next Hop to It block:

I got it all prepped and have started appliqueing.
A little bit of embroidery:

This is going to be the front pocket on some overalls for Little Bear.
A spring wallhanging:

Now I'm waiting on some buttons before I can go on to the next step. Maybe I'll even finish it before Easter!
Block exchange blocks:

Nice and simple... she even had the strips pre-cut and ready to sew.
Sometimes, I feel like I must have crafting A.D.D.
Tuesday, March 1, 2011
Hop to It: "Rose Hip Heart"
The group I'm in that is working through Edyta Sitar's Hop to It quilt decided last meeting that we weren't going to focus on specific blocks each month. Rather, it will be up to each individual as to what block to work on. So for this month, I decided to focus on block 1 of the quilt, "Rose Hip Heart."

Overall, I'm pleased with how it came out. I made a couple of mistakes with my flower placement, but I don't think it's noticeable unless compared to the original design. There was also a little bit of drama in the making of this block. As I went to stitch down the very last piece, I realized it was missing! Gah! After 10 minutes of focused searching (including an exploration of the couch crevices that revealed a number of toys, coins, and pins and resulted in an impromptu late-night vacuuming session), my eagle-eyed husband found it in the middle of the floor. Huzzah! I really didn't want to have to prep another one of those circles.
I used needleturn applique with freezer paper on top for the majority of the block, bias bars to make the stems, and Karen Kay Buckley's Perfect Circles for all of the circular pieces. But the most fun part of this block for me was choosing the fabrics. I'm really loving how this quilt mixes both batiks and prints. For a totally different take on the block, you should definitely check out Carrie P.'s beautiful version, done all in Martinique by 3 Sisters for Moda. Gorgeous!

Overall, I'm pleased with how it came out. I made a couple of mistakes with my flower placement, but I don't think it's noticeable unless compared to the original design. There was also a little bit of drama in the making of this block. As I went to stitch down the very last piece, I realized it was missing! Gah! After 10 minutes of focused searching (including an exploration of the couch crevices that revealed a number of toys, coins, and pins and resulted in an impromptu late-night vacuuming session), my eagle-eyed husband found it in the middle of the floor. Huzzah! I really didn't want to have to prep another one of those circles.
I used needleturn applique with freezer paper on top for the majority of the block, bias bars to make the stems, and Karen Kay Buckley's Perfect Circles for all of the circular pieces. But the most fun part of this block for me was choosing the fabrics. I'm really loving how this quilt mixes both batiks and prints. For a totally different take on the block, you should definitely check out Carrie P.'s beautiful version, done all in Martinique by 3 Sisters for Moda. Gorgeous!
Tuesday, February 8, 2011
Hop to It: "Garden Guest"
Applique!!! Oh, my gosh. It feels so good to be doing applique again. I think my last applique-focused block was back in August or September (not counting Jane blocks... but they're so tiny, they just aren't the same). Hand applique is just a happy thing for me.

The BOM group I'm in decided to start with block 5 of Edyta Sitar's Hop to It quilt, "Garden Guest," because it looked to be the easiest of the twelve-- a good warm-up block.
Techniques used:
I'm excited to find out what block we'll be doing next!

The BOM group I'm in decided to start with block 5 of Edyta Sitar's Hop to It quilt, "Garden Guest," because it looked to be the easiest of the twelve-- a good warm-up block.
Techniques used:
- Plastic bias bars to create the stems. I tried using the Clover bias maker, but was just having too many problems getting my bias strips even and happy. Though using the bias bars involved more prep work, in the end they were definitely easier to manage, particularly since there is a seam in the long stem (silly me decided to create bias with only a fat eighth of fabric... but I just couldn't not use what I had already determined to be the "perfect" stem fabric).
- Karen Kay Buckley's Perfect Circles for the "flowers." They work so well!
- Needleturn applique with freezer paper on top for everything else.
I'm excited to find out what block we'll be doing next!
Friday, February 4, 2011
A bit slow around here
Sickness has definitely bogged down this blogger. Ugh! I spent most of my evening stitching time last week either sleeping or on the couch doing nothing. And with all that tiredness, blogging fell by the wayside as well.
But-- now that I'm recovered and after attending my monthly quilt guild meeting last night, I'm feeling reinvigorated and full of quilty inspiration again. Woo! The meeting was really great because our featured speakers were from Camp Korey, one of the charities that my guild supports. They came and talked to us about what they do at camp and how they use the quilts we make for them. It was really cool and inspiring. Hopefully I'll be able to make time for some more charity quilting soon!
Another bit of inspiration for me came from Carrie P., of A Passion for Applique. She recently wrote about how she was having a tough time finding time to sit down and craft for any length of time. So she started an experiment: how much would she be able to accomplish if she could just sit down for 30 minutes? Frankly, to me that sounded like not enough time to do anything. But she was able to accomplish a lot in that time. It was pretty cool! So, I tried it the other day.
While Little Bear napped and Big Bear played some Angry Birds (his new favorite game), I sat for 30 minutes to see what I could accomplish.

I made some happy progress on my first "Hop to It" block! I had the pieces prepped already, so I was able to sit down and start appliqueing. I managed to get the ear and then half of the bunny body sewn down. Not too bad-- and definitely more than I thought I'd be able to do!
This was a good reminder that I don't always need to have big chunks of time to get things done. Those little bits add up too. It's a freeing thought for me.
But-- now that I'm recovered and after attending my monthly quilt guild meeting last night, I'm feeling reinvigorated and full of quilty inspiration again. Woo! The meeting was really great because our featured speakers were from Camp Korey, one of the charities that my guild supports. They came and talked to us about what they do at camp and how they use the quilts we make for them. It was really cool and inspiring. Hopefully I'll be able to make time for some more charity quilting soon!
Another bit of inspiration for me came from Carrie P., of A Passion for Applique. She recently wrote about how she was having a tough time finding time to sit down and craft for any length of time. So she started an experiment: how much would she be able to accomplish if she could just sit down for 30 minutes? Frankly, to me that sounded like not enough time to do anything. But she was able to accomplish a lot in that time. It was pretty cool! So, I tried it the other day.
While Little Bear napped and Big Bear played some Angry Birds (his new favorite game), I sat for 30 minutes to see what I could accomplish.

I made some happy progress on my first "Hop to It" block! I had the pieces prepped already, so I was able to sit down and start appliqueing. I managed to get the ear and then half of the bunny body sewn down. Not too bad-- and definitely more than I thought I'd be able to do!
This was a good reminder that I don't always need to have big chunks of time to get things done. Those little bits add up too. It's a freeing thought for me.
Friday, December 31, 2010
Gift to self
As a gift to myself, I have decided to join another block-of-the-month club. This one is through a local quilt shop, Gathering Fabric. They are going to be working on a gorgeous applique quilt from Edyta Sitar of Laundry Basket Quilts called "Hop to It."

The cool thing about this group is that there is no requirement to purchase any fabrics-- the shop is very supportive of those who want to use their stash. But, for those who want it, they created some beautiful kits. And the kit was too pretty for me to pass up. But no doubt I'll be supplementing with stash fabrics as well.
What I really love about this program is that I get to go once a month and meet with other people working on the same project. I found that to be so inspiring and motivating for me as I worked on my "Greenpiece" quilt last year. I'm looking forward to our first meeting in mid-January!

The cool thing about this group is that there is no requirement to purchase any fabrics-- the shop is very supportive of those who want to use their stash. But, for those who want it, they created some beautiful kits. And the kit was too pretty for me to pass up. But no doubt I'll be supplementing with stash fabrics as well.
What I really love about this program is that I get to go once a month and meet with other people working on the same project. I found that to be so inspiring and motivating for me as I worked on my "Greenpiece" quilt last year. I'm looking forward to our first meeting in mid-January!
Subscribe to:
Posts (Atom)