It took a couple of years, but I have finally completed my Edyta Sitar wallhanging, from her book, Seasonal Silhouettes.
This is the April design. Hand applique, with a bit of embroidery (the centers of the purple flowers) and one bead (for the robin's eye). My only other change to the pattern was to piece the background. The completed wallhanging is about 18" x 22".
I really need to find myself another applique project. I do love applique.
I machine quilted it using Aurifil thread in a couple different colors... I can't remember which ones though. Doh! (The perils of waiting so long to blog about a project!)
I finished quilting and binding it last fall. The label reflects that date. I put it on before I realized I forgot the hanging tabs. Oops!
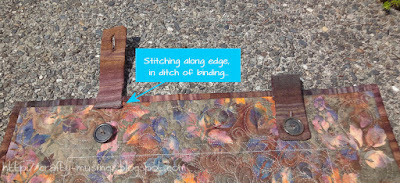
So, it sat around for a few months until I got motivated last week and added the hanging tabs and buttons. I took a strip of fabric, folded it lengthwise (right sides together) and stitched around one short edge and the long edge. Then I turned it right-side-out, added a buttonhole on the finished end, and then stitched it to the back of the quilt, trying to keep my stitching right in the ditch of the binding.
Since I couldn't actually use it until I got the hanging tabs on there, I am calling this one a 2016 finish.
"Spring Showers" now resides in my hallway. At least, it does for now... I still have visions of having a lovely collection of seasonal wallhangings to switch out. :)
Tuesday, May 24, 2016
Thursday, May 19, 2016
Chevron Appleton
I think this is it! The last unblogged project from 2015!
This is my Appleton Dress from Cashmerette. It is a classic wrap dress. I stitched it up a couple weeks before Christmas using a happy ITY chevron print from Fabric Mart.
If you haven't heard about Cashmerette patterns yet, they are designed for curvy ladies, size 12 and up, with cup sizes going up to H. No FBA required!!! Woo! My rendition is a size 12, G-H cup with 3/4-sleeves. The only alteration I made was to chop 4" off the hem.
The instructions were straightforward and everything went together without a hitch. And I love the result! I feel so pretty when I wear this dress. Sexy, even! That V-neck is no joke... it is deep. And, while it is secure, I have to be very careful about which bra I choose, as anything with a wide bridge ends up peeking out after a few minutes. Fortunately, I have one bra that works pretty well. Of course, a cami is always an option as well, and would lend to a bit more modesty in general. I haven't tried that approach yet though.
I love this dress. I've been eyeing other potential fabrics, but haven't found the perfect one yet. Hopefully, soon! I'd love to make a short-sleeved one for summer!
Tuesday, May 17, 2016
Sit & Stitch Pincushion
This is yet another completed project from last year (only a couple more left, I swear!).
It is the "Sit & Stitch Pincusion" from Cindy Taylor Oates (of Taylor Made Designs). My mother-in-law gave me the pattern for Christmas. I was so smitten with it, I jumped in and finished one that weekend.
Shopping my stash, I found a happy array of fabrics and and then got to work.
I did a couple things differently than the pattern suggested based upon the supplies I had on hand:
The whole thing came together in an afternoon.
It is designed to drape over the arm of a chair or couch. I think it is going to be perfect next time I'm downstairs doing some stitching in front of the television! (Note to self: find a project to work on in front of the tv!)
It is the "Sit & Stitch Pincusion" from Cindy Taylor Oates (of Taylor Made Designs). My mother-in-law gave me the pattern for Christmas. I was so smitten with it, I jumped in and finished one that weekend.
Shopping my stash, I found a happy array of fabrics and and then got to work.
I did a couple things differently than the pattern suggested based upon the supplies I had on hand:
- Used woven interfacing (Pellon SF101) rather than the Pellon 808 called for in the pattern.
- I made my bias binding the old-fashioned way as I didn't have a bias making thingy of the correct size.
The whole thing came together in an afternoon.
It is designed to drape over the arm of a chair or couch. I think it is going to be perfect next time I'm downstairs doing some stitching in front of the television! (Note to self: find a project to work on in front of the tv!)
Sunday, May 15, 2016
A pair of Jenna Cardis
Also left unblogged in 2015 were a couple iterations of the Muse Patterns Jenna Cardi.
The first one, completed in early December was from a hatchi sweater knit purchased from Fabric.com awhile back.
This print makes me so happy. My only regret: I wish I had used some sparkly buttons. There is gold threading through the fabric, and some crystaline buttons would bring that element out a little more and look so fun! If I run across the right buttons, I may still change 'em up.
I made Variation A, the hip length with long sleeves. Alterations included:
I wasn't sure how removing the darts would work, but, as it was only a 1" FBA, I decided to give it a go. And I am super happy with the result! I am not sure how effective it would be if the FBA was any bigger though.
The second version (also Variation A with long sleeves) is from a chocolate brown poly/lycra sweater knit from Fabric Mart. It was finished toward the end of December.
The only change to this one from the first was that I narrowed the sleeve width a bit. I just felt like my first one, the sleeves were looser than I wanted.
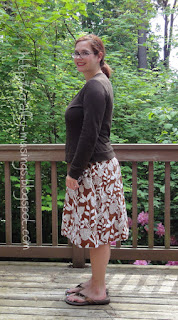
I very unscientifically trimmed, tapering the width starting from about 1" below the armscrye, ending at the hem where about 1.25" of fabric was removed from the width (and then I adjusted the sleeve bands accordingly before attaching). The picture above shows a comparison of the sleeves between the two versions.
Construction on these was straightforward and the instructions were great. It is a very quick project to construct!
I wear these cardigans quite often. The chocolate one is already starting to pill as it has been in such regular rotation. LOVE.
Recently, Muse released an add-on for the Jenna that includes a V-neck and collar variations. I snatched it up! More Jennas are definitely in my future.
The first one, completed in early December was from a hatchi sweater knit purchased from Fabric.com awhile back.
This print makes me so happy. My only regret: I wish I had used some sparkly buttons. There is gold threading through the fabric, and some crystaline buttons would bring that element out a little more and look so fun! If I run across the right buttons, I may still change 'em up.
I made Variation A, the hip length with long sleeves. Alterations included:
- 1" FBA, after which I removed the darts by following Maria Denmark's "How to: Removing Bust Darts from a Pattern."
- Shortened sleeves 2".
- Used 9 buttons (spaced ~2/25" apart) instead of the 8 suggested in the pattern (as I had added length when doing the FBA).
I wasn't sure how removing the darts would work, but, as it was only a 1" FBA, I decided to give it a go. And I am super happy with the result! I am not sure how effective it would be if the FBA was any bigger though.
The second version (also Variation A with long sleeves) is from a chocolate brown poly/lycra sweater knit from Fabric Mart. It was finished toward the end of December.
The only change to this one from the first was that I narrowed the sleeve width a bit. I just felt like my first one, the sleeves were looser than I wanted.
I very unscientifically trimmed, tapering the width starting from about 1" below the armscrye, ending at the hem where about 1.25" of fabric was removed from the width (and then I adjusted the sleeve bands accordingly before attaching). The picture above shows a comparison of the sleeves between the two versions.
Construction on these was straightforward and the instructions were great. It is a very quick project to construct!
I wear these cardigans quite often. The chocolate one is already starting to pill as it has been in such regular rotation. LOVE.
Recently, Muse released an add-on for the Jenna that includes a V-neck and collar variations. I snatched it up! More Jennas are definitely in my future.
Tuesday, May 10, 2016
Fall 2013 Mystery Quilt
Basted and ready to go, this one sat for nearly a year before I finally figured out how I wanted to quilt it. But, I finally got it quilted and bound in December:
It is the Heather Spence Designs Fall 2013 Mystery Quilt.
The fabrics all came from stash. (Yay for stashbusting projects!) It actually was a lot of fun putting this one together.
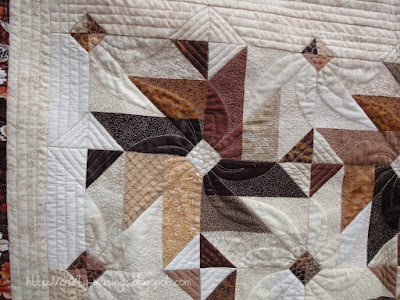
On this one I decided I wanted the center to have the feeling of waterlilies or lily pads or somesuch to help tie it and the border together design-wise. I ended up going with this super, labor-intensive approach of using the pinwheels as the basis of a flower, and then, to emphasize it, I did microstippling in the areas between. It creates a sort of trapunto-esque effect.
So. Much. Quilting. I think I listened to two books on CD. So 20 hours or so? Yikes!
Aurifil 50/2 in Light Sand/Beige (2000) throughout the center was perfect-- the 2-ply thread works so nicely for tight quilting.
Then, in the border, I just did some watery wavy lines. I used a slightly heavier-weight thread, Mettler (40/3) in a dark brown.
I do love me a pieced back!
So I haven't put a label on it.... yet. I'm kind of on the fence with this one. I really love the quilting and the overall look of the quilt. But I don't need it and it doesn't really fit with our decor at all. So I am thinking I want to donate it, but am having a hard time letting it go.
I need to give it a wash still. Maybe then I'll decide. :)
Monday, May 9, 2016
Reversible Embroidered Quilt
This quilt was started with a class I took back in 2008 through a (now closed) local Bernina dealer. The class and project were meant to highlight machine embroidery as a quilting option as well as to teach a quilt-as-you-go method of construction.
I actually completed the quilt itself back in 2008. I just didn't get the binding on it until December 2015. :P
To be honest, I'm not a huge fan of this quilt. But I learned a good number of things through the making, including that I'm really just not a fan of quilt-as-you-go. I also like more quilting in my quilt. I learned that machine binding can be an awesome thing (and nowadays, I machine bind many of my quilts... though I don't use the exact technique that was taught in this class). Also-- machine embroidery, while lovely, is really boring to do.
I plan to donate this one, so no label.
While it is maybe not my cup o' tea, the colors are happy and overall, I think it is a pretty quilt.
I am happy that the quilt is finally finished!
Saturday, May 7, 2016
"Watch the Clocks"
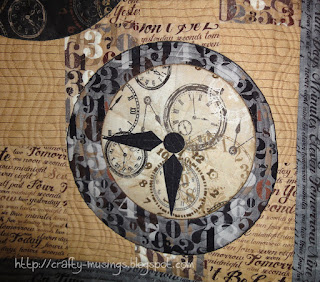
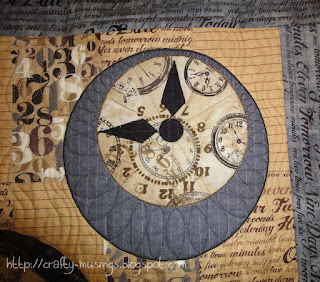
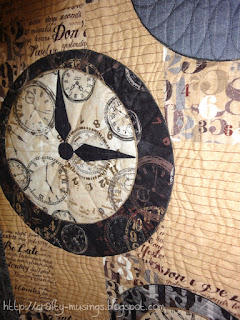
The top for this quilt was completed in 2014. I finally got it quilted last fall. Then it took two months to get the binding and buttons sewn. But-- it was technically completed just before the new year:
The quilt is from a kit my husband gifted me in 2013 from the Fat Quarter Shop. Though the fabric is no more, the design is still available as a free project from Windham Quilts and is called "Tick Tock." I call my rendition, "Watch the Clocks."
Pardon my dark and dreary pictures. My front hallway in the darkness of winter is not very photo-friendly.
Since it involved only simple piecing and fusible applique, this was a super quick and fun quilt to put together. In fact, I constructed nearly all of the top one morning during a quit-the-day-away event I attended.
It took awhile before I decided how to go about quilting it. I kind of wanted to create a feeling of gears running behind the clock faces. I think the wavy-line-circle design running across the background captures that pretty well.
Since the hanger I intended to use is closed, I needed to devise a plan to be able to take the quilt on and off of it. I decided on simple buttonhole tabs sewn in with the binding and placed the buttons on the back. It works quite well.
And the label.
We have a beautiful grandfather clock in our hallway, just across from where the quilt hangs. It is a happy pairing!
Friday, May 6, 2016
Warm Welcome: "Small Checks"
Whoa. It has been awhile! Frankly, not a lot of crafting has been happening here thus far this year. But I seem to have a backlog of finished projects from the end of 2015 that I haven't posted yet-- so let's just start with that.
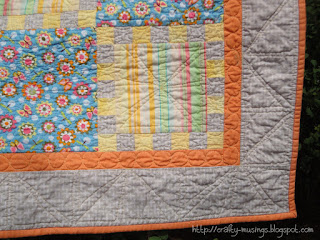
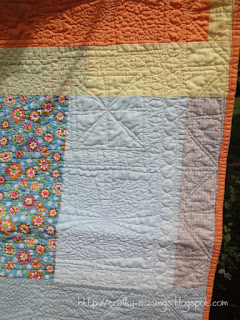
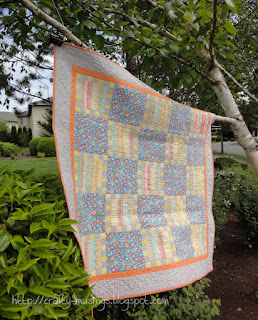
This 42" square quilt is from the book, Warm Welcome: Cozy Quilts for Baby by Mary Hickey. The design is called, "Small Checks."
I started on this quilt last May, but found myself struggling with fabric choices. I'm still not thrilled (the checks are so washed out color-wise that the piecing is lost), but considering my decision to leave the check-framed blocks as-is (rather than re-do them), I think it turned out as well as could be expected. And towards the end of the year, I finally managed to finish up the project.
The quilting is inspired by an Angela Walters Craftsy class, "Dot-to-Dot Quilting." I am really happy with how the quilting worked out in this one. Yay!
All of the quilting was completed using Aurifil Mako 50/2 thread. I used two different colors: 2710 (Ice Blue) and 2130 (Pale Yellow).
The back is pieced from scraps. I actually like the back better than the front! (As I said, I struggled with fabric choices on this one.) There is no label on this one as it is destined for donation.
This week I have been busy taking pictures of other finished quilts to share. I am determined to get caught back up with my blogging!
Subscribe to:
Posts (Atom)


