Thursday, December 29, 2011

"Forest Canopy"

Hello! It feels like a long time since I've blogged. As you know, this time of year tends to be on the busy side. We had a wonderful Christmas spent with friends and family (with, of course, much feasting!). I hope you have had a wonderful holiday season as well!

There was a fair amount of handmade gifting this year. I gave my mother-in-law the Blossom Bag I made, and my sister-in-law received the Fringed Hobo Bag. In addition, I made a pair of nifty pajama pants for my husband (more on those later-- I'm still hoping to get some pictures of him actually wearing them!). And, finally, completed just in time for Christmas:

Forest Canopy, front
Woo! It took three-and-a-half years, but my Prairie Pinwheels quilt (which has now been officially titled "Forest Canopy") is finally finished. As I technically gave it to my father-in-law two years ago (via an IOYAQ (I Owe You A Quilt) card), it was definitely time. The pattern is from the July/August 2008 issue of McCall's Quilting. It is a large quilt measuring 85 1/2" x 109 1/2" (making it very difficult to take good pictures of it-- so many thanks to my intrepid quilt-holding volunteers!).

Forest Canopy, back
Ahhh.... *happy sigh* I just love this pieced back. And I love how well the quilting shows all over.

Forest Canopy, quilting detail 1
Quilting it was a slow process. I started by stitching-in-the-ditch to stabilize the layers and then did all of the free-motion work. Since all of my quilting designs were independent motifs, it involved a LOT of starting and stopping. Slooow process.

Forest Canopy, quilting detail 2
I did the cream-colored areas first using a King Tut 40/3 variegated thread, "Sands of Time" (#920). I love how the weight of the thread really makes the quilting pop.

Forest Canopy, quilting detail 3
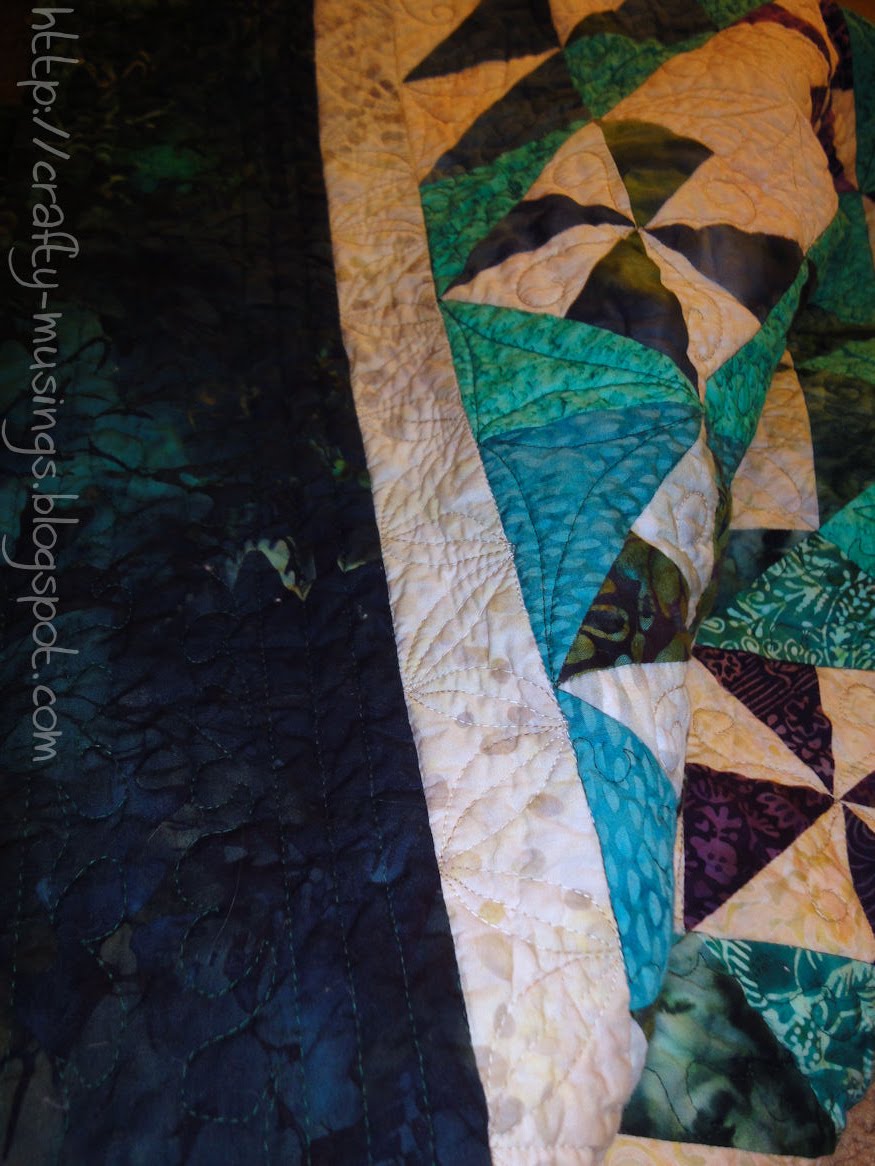
Then I completed all of the green areas, including the outside border, using Aurifil Mako Cotton 50/2 (in dark green, #4026). As much as I loved quilting with it, I'm not thrilled with how subtle it is. The lighter weight really blends in with the background and the quilting is nigh invisible. For all of the effort I put into it, I really kind of wish I had used a heavier weight thread that showed a little better.

Forest Canopy, binding detail
As it was getting down to the wire, I decided on a machine binding. I'm glad I did! I've had enough practice now that it looks good and I was able to accomplish it in about two-and-a-half hours. I do my machine binding using Red Pepper Quilts' method. It took a little practice, and it maybe isn't as fast as other methods, but I love the finished look (invisible from the front, as a hand-stitched binding would be), it works for me, and it allowed me to finish the quilt in time for gift-giving. (Yay!)

Forest Canopy, label
On the label, I repeated the wreath quilting motif I used throughout the center and in the outside border. The motif was designed with the idea of a tree's canopy-- how you stand below and look up and see the outline of the edges of the canopy, and it all looks kind of connected and of one piece with the light filtering through it and putting the canopy itself in shadow... you don't see individual leaves, but rather the outline of it all.

Forest Canopy, kitty approved
Not only was the quilt completed in time to give it to my father-in-law for Christmas, but it was also kitty approved!

Friday, December 16, 2011

My round robin returns!

Woo hoo!!! On Monday, I received my completed Once 'Round the Country round robin top from Kris. She wasn't able to post pictures, so I didn't know how it would look until I opened the box. Very exciting!!!


So cool!!! I absolutely love the way she echoed elements from previous rounds and really finished it off. This top just looks so modern and fresh to me.

Now I just need a quilting plan. I've got a few ideas floating around in my head, but they'll have to wait until the new year. I really think that quilting has the potential to really bring this design to life. I'm looking forward to the challenge!

Many, many thanks to all of the amazing women who worked on this quilt (and who trusted me to work on theirs!): Zonnah, Adrienne, Anne, and Kris. This round robin has been an amazing experience. You all inspire me.

Tuesday, December 13, 2011

Hop to It: "Garden Grace"

I couldn't help myself. I've been on such a roll lately with these Hop to It blocks that I just had to keep going and finish up the last one.

Block 9, "Garden Grace":

Hop to It block 9, Garden Grace
Techniques used:
  • Bias bars for the stems;
  • Karen Kay Buckley's Perfect Circles for the berries;
  • Needleturn with freezer paper on top for everything else.
This one was a lot of fun and I love the way it turned out. The neutrals in this one with the sparks of bright color really appeal to me. Happy! I also can't help but feel that I found the perfect fabric in my stash for that center bud-- love it! And...

Hop to It, completed blocks
All the blocks are complete! Woo hoo!!! Now I just need to figure out sashing. Here's hoping I don't fall into my recent pattern of finishing the applique and then stalling out on putting it all together (ahem... I'm talking about you, Greenpiece!).

Monday, December 12, 2011

Hop to It: "Rose Hip Wreath"

Block 12 of Edyta Sitar's Hop to It quilt, "Rose Hip Wreath":

Hop to It block 12: Rose Hip Wreath
Techniques used:
  • Bias bars for the stems;
  • Needleturn with freezer paper on top for the leaves and buds;
  • Freezer paper on bottom and starch for the ovals;
  • Karen Kay Buckley's Perfect Circles for the flower centers.
Frankly, I'm a little disappointed in this one. I think the applique itself looks great, and I love the fabrics I chose-- but they kind of blend in with the background a little too much. How is it I never notice these things until I'm already done? Sigh. Fortunately, the more I look at it, the less horrified I am. So that's good, right? And block one has a similar look, so really, it lends a certain balance to the overall quilt. Maybe. Either way, I'm not re-doing it!

Saturday, December 10, 2011

A little bit of this, a little of that

Handmade by Heidi

Last night was my first Friday Night Sew-In. Yay!

I started out my stitchin' evening around 7:00 p.m. with the September pincushion from the Shabby Fabrics Pincushion Club.

pincushion project A
I managed to complete all of the sewing. I was a little bummed that all of the final, finishing steps involved fabric glue. As I had no fabric glue on hand, I was unable to finish it. But, it will be ready to go once I get some glue!

pincushion project B
Next up was the October pincushion. I got the initial piecing done and traced all of the embroidery designs-- so it will be ready to go when I'm ready for some handwork. (This one is gonna be super cute, I think!)

pajamas for Big Bear, all cut and ready to be sewn
Then I moved on to some pajamas for Big Bear for Christmas. I managed to trace the pattern and get all of the pieces cut. At the same time, I also cut out another Christmas gift item (that will have to remain a mystery for now) and even got it all sewn up.

seam ripper
Since I can't share a picture of the completed project just yet, here's a picture of my trusty scalpel-like seam ripper which saw way more than its fair-share of use last night. Sigh... two long stitched and serged (4-thread overlock, no less) seams. For I bit, I was feeling like I was spending more time unsewing than actual sewing. But I did finish (eventually!). That's what I get for sewing so late at night!

It was 1:45 a.m. when I finally closed up the quilt mines. I admit that I wasn't working that entire time (had to stop for some snack-and-stretch breaks!). But it was still a fun and productive evening!

Friday, December 9, 2011

Friday Night Sew-In!

I've seen this button floating about the blogosphere for awhile and have finally decided to give it a go myself:

Handmade by Heidi

Tonight is Friday Night Sew0-In time! Once a month, Handmade by Heidi hosts a virtual get together wherein participants all set aside their Friday night to sew. So my plan is that I shall focus myself in my quilty cave with my sewing machine this evening and see how much I can get done. The husband has even agreed to take charge of boy duty! Woo!

I have lots of things to choose from in terms of stuff-to-do, but here is my kinda-sorta priority list:
  • Pincushion(s)-- I've got some catchin' up to do with my Pincushion Club from Shabby Fabrics;
  • Pajamas for Big Bear;
  • Quilting on the "Prairie Pinwheels" quilt (someday I will finish it!);
  • Other????
Those should keep me plenty busy and offer some good variety. And tomorrow I'll post about what I managed to accomplish. We'll see how it goes! :)

Thursday, December 8, 2011

Another bag...

...and it's NOT Amy Butler! *gasp!*

This is my version of the Trendy Faux Leather Handbag:

Faux leather handbag, front view
I found this tutorial via Stacy Sews and have had it in the back of my mind for a little while now. Then when I went to Hancock Fabrics in search of my sparkly cami fabric, I saw this pretty brown/copper-shimmery vinyl on one of their remnant tables. On sale. I snatched it up!

faux leather handbag, inside view
For the lining, I found a happy brown Laurel Burch fabric. I love me some kitty heads!

This was actually a pretty quick project. But sewing with the vinyl involved a couple of challenges for me. The main one: when I made a mistake and had do some unsewing? Holes. This vinyl had zero self-healing properties. Fortunately, the holes are not terribly visible. But I know they are there. The other big challenge was the thickness of the vinyl-- there were a couple of points when the bulk just didn't fit under my presser foot. Fortunately, having faced that challenge before with a previous project (I'm talking about you, Blossom Bag!), I knew I could take off the foot and make it work. But it is so hard to control and not the cleanest look.

My biggest frustration though was in sewing in the handles. I just couldn't get rid of that funky "bump" along the top of the bag and get it even all around. I tore out stitches a couple of times, and it just wasn't happening (and I was ending up with more and more holes!). I think it was in large part because I didn't have the small binder clips that the tutorial recommends. The vinyl-covered paperclips I was using just weren't cutting it in terms of keeping everything in position. Clearly, having the right tools makes a difference!

faux leather handbag, side view
On the bright side, at least both sides have the same issue. So now it is a design feature!

All-in-all, a very cute bag! I think now I need to make a matching wallet.

Tuesday, December 6, 2011

Hop to It: "Enchanted Garden"

Another Hop to It block:

Hop to It, block 10
This is block ten, "Enchanted Garden." I think this one turned out really beautifully. I love the background fabric; so much so that I bought some in another colorway to make a skirt (not made yet, but it's on the list!).

Techniques used:
  • Bias bars for the stems;
  • Karen Kay Buckley's Perfect Circles for the flowers;
  • Needleturn with freezer paper on top for everything else.
This makes ten complete and only two blocks to go!

Monday, December 5, 2011

Saturday night

On Saturday I went out on the town with some of the moms from preschool. Of course, I needed something to wear! I bought some fun, sparkly knit at Hancock Fabrics and dug out McCall's 4923 (now out-of-print) from my stash.

M4923, pattern envelope
The pattern includes six variations of cardigans plus a lined cami, which was perfect since the sparkly knit was sheer. I made a size XL and added 2" to the length (if I make it again, I might add a little more length... maybe 1/2"-1"?). I found a black polyester knit in my stash to use for the lining.

completed M4923, front view
Based on the finished garment measurements listed on the pattern envelope, I didn't do an FBA. As it turns out though, I did need to make an adjustment to make it work:

M4923, dart detail
When I tried it on, I found that though it fit around my bust, it also gaped significantly at the armhole. So I added darts at the armhole on each side to take in the extra fabric there. It isn't perfect, but the fabric is black-- so it's not very visible-- and it gets the job done, so I'm happy.

The pattern instructions were pretty basic and very easy to follow. The only real downside was that the method they used for the lining involved a bit of hand sewing. It wasn't bad, though it was a little time-consuming and my hand stitches with the knit were not pretty. But they're on the inside, so I'm the only one who has to look at them.

M4923, full-length view
I paired the top with some new jeans. Woo! Sparkly!

M4923, side view
Ready for a fun night on the town!

Saturday, December 3, 2011

Hop to It: "Batik Beauty"

October was so busy that I once again fell behind on my Hop to It project. So I've been trying to take some time for applique in the evenings and finally finished block seven, "Batik Beauty."

Hop to It block 7, Batik Beauty
Techniques used:
  • Bias bars for the stems;
  • Karen Kay Buckley's Perfect Circles for the flower centers;
  • Needleturn with freezer paper on top for everything else.
Probably the the most challenging and time-consuming part of this block for me was choosing the fabric to use for that funky center shape. I'm not really even sure what it is supposed to be, but I kind of see it as a plume of smoke coming out of an incense burner... with flowers? I dunno. But, as it is the main focus of the block, I really wanted to find the perfect fabric. It took a long time for me to commit, but I'm definitely happy with the end result.

I'm loving this project! *happy sigh*

Thursday, December 1, 2011

A little baking...

I recently joined Pinterest and have been finding all sorts of fabulous inspiration there, including tasty treats like this and this. (Pinterest is really a rather dangerous place... it just kind of sucks you in and suddenly, hours have gone by and you are wondering why it is 3 a.m. and you are not in bed. Or maybe that is just me.) Anyway, the call of sugar finally had to be answered so I went to work and made up a batch:

soft sugar cookie goodness
Lofthouse-style soft sugar cookies! Mmmm... I initially found the recipe at Authentic Suburban Gourmet. But that recipe was a little confusing for me (6 cups of flour, divided, but then no explanation about the division). So I found another one at The Novice Chef which has the same basic recipe, but offers more detailed instructions.

I scoffed when I read, "Let cookies sit overnight before serving to allow the flavors to develop." I mean, really? But it is TRUE! They really were more tasty the following day. The recipe also makes a ton of cookies, so I went ahead and froze some (pre-frosting) to see how that would work. Verdict: success! I took them out, let them thaw, and then frosted them. And they were just as tasty.

And they really do taste as good as the ones at the grocery store. Maybe even better, because I know exactly what's in them. Yum!!

Wednesday, November 30, 2011

Style Stitches Monthly Bag Challenge: Everything Wristlet

Style Stitches Monthly Bag Challenge button
The October Style Stitches Monthly Bag Challenge was the Everything Wristlet. I actually finished it mid-October, but somehow managed to fail in blogging about it. So here goes...

Everything Wristlet: front view
I chose to make the small version and used some fabrics that have been in my stash for quite some time.

Everything Wristlet: back view
I love that taupe-y medallion print and wish I had taken time to center the design. But when I was cutting, I didn't even think of that. Doh!

Everything Wristlet: side view
This bag is in the "Experienced" (read: advanced) section of the book. And it really earns that moniker.

Everything Wristlet: inside view
There were a number of challenges in making this bag, almost all of which had to do with the lining elements.

Everything Wristlet: sewing through some crazy thickness
For one thing, there was some crazy thickness going on because the design called for sewing through multiple layers of Peltex. Fortunately, my machine worked it like a champ. But it caused for some stress.

Everything Wristlet: 3-step inside zipper insertion
And, as always seems the case for me and these bags, the zipper instructions were very challenging. The lining is made up of two parts: the card slot/center pocket and the main body. The main body starts as one long rectangular piece of fabric. The zipper is laid on top then the lining is folded over on top of itself and laid on top of the bottom half of the zipper to create the pocket. So when stitching the bottom half of the zipper, one has to be careful not to accidentally stitch the whole pocket closed. Because the pocket is so narrow, the only way to avoid stitching through it is to sew it in 3 steps (illustrated above): 1. from the outer edge to the head of the zipper; then take it out of the machine and open the zipper and reposition the foot on the edge of where the stitching started and 2. sew to the end of the zipper, at which point you have to remove it from the machine and then 3. sew from the other outside edge to the end of the zipper.

In fact, the whole time I was working on it, I was sure I must be doing it incorrectly, because none of this was detailed in the instructions at all. All it said was: "Note: Do not stitch through the back of the pocket." But it actually worked. I was shocked. Really. I probably wouldn't have even used her technique (being as I swore off A.B. zipper instructions), except that the lining is a single piece that is folded accordian-style to create the inside of the bag. It is actually a clever design, but the execution involved to make it happen is challenging.

Everything Wristlet: inserting the lining
Inserting the lining was interesting as well (but it definitely went more smoothly than the zipper!). Essentially, you drop it inside of the bag body, fold the edges of each to the inside, and then edgestitch all around the perimeter. In theory this is simple. In practice it is challenging because you need to deal with crazy thickness on the sides, the barrier of the center pocket section, and with lining up the stitching with the outside flap seam (which you can't see at all). It took lots of pins, going very slowly, and then a little bit of handstitching to finish it all off-- but it worked.

me and my Everything Wristlet
It turned out to be a cute little bag. I like it, but I think I would like the larger version better. I'm not sure I'll ever go back and make another of this bag though, as it was a lot of effort for a style that is just okay for me. But you never know.

I didn't manage to finish the November bag, but it seems that JemJam, the challenge host, is taking a little break too. She says she'll jump back in again soon, but until she does, I probably won't start on the final two bags. I've got so much else going on with the upcoming holidays, I think it will be good to take a little break.

Saturday, November 26, 2011

The Last Round

November 1st was the send-off date for completing the last round of the fabulous Once 'Round the Country round robin. Whoops! I didn't manage to make that date, but Zonnah was wonderfully understanding and let me know it was okay if I was a little late. Nearly a month later (what happened to November???), I finally finished. Yay!

This is how it looked once Kris finished her round:

Kris's round on Zonnah's quilt, photo courtesy of Kris
I spent a lot of time being stuck thinking about options. In my ideal world, I would have done some kind of awesome applique something. But I couldn't think of anything that really fit with what came before and there really wasn't enough fabric to create a cohesive background for the applique. So I started looking about the interwebs for inspiration and fell in love with the idea of a sort of "braided" border. I felt like it would sort of echo the style of the border around the center star without being the same.

Zonnah's quilt design planning
I got out my graph paper and got to work. My husband helped me with some of the math (there was a lot of Pythagorean theorem going on in this one) and I eventually got brave enough to start cutting fabric and sewing. I actually created the four sides first and then figured out the corner blocks (because, despite all of my math, I didn't want to commit to a size until I knew exactly how wide the borders would end up being). I went with Dresden plates because I liked the idea of a little bit of curve on the outside, and I also thought they would echo the center star points as well as the spiky flowers in Anne's border. And I had always wanted to do Dresden plates (I just love the look of them, and now I definitely want to do a whole quilt of them!).

The finished border:

Zonnah's quilt top complete with Little Bear
Oops! Someone sneaked in on that shot. Let's try again...

Zonnah's top complete!
Once 'Round the Country has been so much fun! I've gotten to really work my creative muscles, try some techniques that I otherwise may not have (like a braided border and Dresden plates), and shared in the creation of some amazing quilts with an awesome group of ladies. It has been such a great experience!

Friday, November 11, 2011

Bear Paw!

What with Halloween and preparing for Quilt Festival, I managed to completely forget about completing my guild block exchange block. Doh! Yesterday, I took some time to get it done.

completed bear paw block
It is gorgeous! But, wow, she really made an interesting choice... all those pieces and points definitely made for difficulty far beyond any other block I've done in this group so far. A good part of the challenge was in the directions themselves-- they were nearly all written, with just a couple of small illustrations penciled in (I'm not even sure she drew them... I think someone else may have added them later).

Even though the putting-together of the block wasn't tough for me, following along with the instructions was, particularly when it came to the "paws" of the block. She explained a technique that was new to me, and that I found really interesting. So I took some pictures as I went along, and thought I'd share them here. I have no idea if they will be useful to anyone, but, as I said, the technique was interesting to me.

Bear paw step 1
For a pair of "paws" cut (1) rectangle 5-1/2" x 4-1/2", (2) rectangles 3-1/2" x 2-1/2", and (2) squares 2-1/2" x 2-1/2". You will need two identical small rectangles and two different squares for each unit.

Bear paw step 2
Pair a 2 ½” square with a 2 ½” x 3 ½” rectangle.

Bear paw step 3
You will need to sew 2 sets of these pairs.

Bear paw step 4
Put the units together with the rectangles on the opposite ends and sew on the long edge.

Bear paw step 5
After sewing, fold the unit along the inside edge of one of the 2 ½” squares and clip the seam allowance to the seam at the fold.

Bear paw step 6
Press the seams to the rectangles. This step re-distributes the bulk of the seam so the piece lays flatter and gives better visibility for the next step.

Bear paw step 7
Position the piece so that the squares are in the lower left and upper right corners when the wrong side is facing up. Draw a line from the outer corner of the rectangle through the stitching line of the square at a 45 degree angle. Use a 45 degree angle; otherwise you will get a “kite” shape.

Bear paw step 8
Draw a second line from the opposite corner.

Bear paw step 9
These lines should be approximately ½” apart.

Bear paw step 10
Pair each of these units with a 5 ½” x 4 ½” rectangle.

Bear paw step 11
Sew with right sides together along the drawn lines.

Bear paw step 12
These lines should be approximately ½” to 5/8" apart.

Bear paw step 13
Cut down the center between the two lines.

Bear paw step 14
Now you have two pieces.

Bear paw step 15
Press to the large triangles.

Bear paw step 16
Trim the block to 4 ½”.

And now you have two paws!

Maybe I thought this was interesting only because I so rarely ever use the degree lines on my ruler? I dunno. But I thought it was a pretty neat technique!