Thursday, March 31, 2011

Style Stitches Monthly Bag Challenge: Origami Bag Set

Phew! I finished these just in time for the Style Stitches Monthly Bag Challenge.

Style Stitches Monthly Bag Challenge button
This month was dedicated to the Origami Bag Set, project 3 in the book, Amy Butler's Style Stitches. It is a set of 6 bags, from extra small to extra large.

my set of 6 Origami Bags
Happily, I was able to find some fabrics (and zippers!) in my stash for the project, though only one of them was a home dec fabric; the rest were quilting-weight cottons. Even though the majority of the bags were made from the lighter-weight material, I think they all turned out just fine-- they are still plenty sturdy and hold their shape well.

Origami bags open to see lining
The pattern itself was pretty simple. I'll admit though, there was some serious head scratching going on as I made my first bag. The pattern instructions are minimally illustrated, and it was difficult to visualize exactly what was supposed to be happening at each step. Steps 4 and 6 (the zipper installation and attaching the exterior and lining panels, respectively) were the most befuddling for me. But, with careful reading and the assistance of JemJam's sew along (with pictures-- yay!!!), I got through it fine. Subsequent bags were much quicker to go together.

my Origami Bags all nested together
The pattern includes a nice variety of sizes (here they are nested all nicely together). I only have a plan for one bag so far, but I'm sure I'll find a purpose for the others soon enough. I can also easily envision making a few of these for gifts in the future.

Tuesday, March 29, 2011

Tri County Quilt Tour 2011

Last week was the annual Western Washington Tri County Quilt Shop Tour. Over the course of three days, I managed to visit all of the participating shops (14 this year!). This year's theme for the tour was "Birds of a Feather" and each shop designed both a block and a quilt that featured all of the shop blocks.

This is the fourth year of the hop, and my fourth year participating. I have to say, this year I saw more creativity than ever in the shop quilts. Truly, each one was totally unique. A couple of the shops really went out of the box and created some awesome displays (Two Thimbles in Bellingham actually asked local fiber artists to create their blocks). And, of course, there were some wonderful traditional-style versions as well. I took pictures of all of the quilts to share:


If you go to the album, I've posted comments with a little bit of additional information. The pictures really do not do some of these quilts justice.

And, of course, what is a shop hop without happy loot?

ri County Quilt Tour loot!
I splurged a bit this year. But, I actually have a plan for all but one of these fabrics. So only one is actually going directly into "stash." Now I just have to get sewing and put those plans into action.

I love me a happy shop hop!

Monday, March 28, 2011

Playtime: the car

Set aside, but definitely not forgotten! Working on my "Hop to It" blocks really reminded me how much I love applique, and has motivated me to get going again on my American Jane "Playtime" quilt. For those of you unfamiliar with this project, the quilt is by designer Sandy Klop of American Jane Patterns. It was designed for fusible applique, but I have been doing it all by hand. I started the project in January 2009.

Looking back at my posts, I was shocked to see that the previous block was completed last March. Whoa. Time really does fly!

The car:
Playtime: the car
This one took me a couple of weeks to complete. I think my biggest hangup was the size of the pieces. I'm really just not into appliqueing large chunks. From rear to front, the car measures 20.5" and is 9.5" tall. The steering wheel and grille were also pretty challenging because of the narrow sections on each.

Techniques used:
  • Vinyl overlay (for positioning pieces on the background)
  • Needleturn with freezer paper on top
  • Freezer paper + starch (for the large wheel pieces)
  • Karen Kay Buckley's Perfect Cirlces (for the smaller wheel pieces)
  • Backstitch embroidery (I'm kind of wishing I had used the stem stitch because I'm better at that and think it would have looked smoother... oh, well.)
And here's a look at my progress so far:

Playtime progress, car
The top two thirds are fully assembled now (though I still need to applique a couple more floaty balls and the pull for the elephant's wagon). Only two more blocks to go!

Sunday, March 27, 2011

A couple of small projects

Over the last week, I completed a couple of small projects.

First up was a pillow for a wonderful friend. She watches Little Bear for me for a couple of hours each week on my workday at Big Bear's preschool. She found a pillow at Target that she really liked and I took inspiration from it to create this:

Stacey pillow, front and back
The prints are both from Lakehouse Dry Goods. I especially love the ric-rac trim:

ric rac detail
I think it turned out pretty cute, and my friend really seemed to like it!

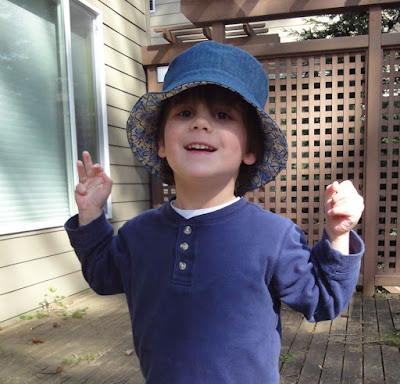
The other project this week was a Betz White Reversible Bucket Hat for Big Bear.

Big Bear in bucket hat
Denim on one side and cotton on the other (a cute print from the Toy Poodle collection by Kinkame). I actually cut it out last summer, and only just now got to putting it together-- just in time for this summer! I don't know why it took me so long to get around to it as it was super quick and easy to put together (especially since I've done it before). I really like this pattern (and still plan on making one for me someday!).

Both of these projects were in the queue for quite awhile, and it feels good to have finally completed them!

Tuesday, March 22, 2011

Style Stitches Monthly Bag Challenge 2011-March's Bag(s)

Style Stitches Monthly Bag Challenge
We're up to Chapter 3 in Amy Butler's book for the Style Stitches Monthly Bag Challenge. That means it's time for the Origami Bag Set-- six bags in varying sizes, from mini to extra large.

I'm getting a little bit of a late start this month, but I've finally found my bag-sewing mojo and figured out what fabrics I plan to use:

fabrics for origami bag set
All from the stash. Yay!

I've even managed to cut out the multitude of pieces:

piles of pieces
As suggested in the book, I labeled each piece with blue painter's tape so I can keep track of what's what. The real trick though will be getting all of these sewn up before the end of the month. Hopefully, they'll go together quickly!

Monday, March 21, 2011

Cranes for Hope

The president of my local quilt guild, Laurie Gustafson, is creating a quilt to raise funds for disaster relief in Japan. Late last week, she put out a call for help in creating blocks for the quilt. She got permission to use a paper pieced crane design by Margaret Rolfe and provided background fabric with the pattern. She asked volunteers to use those to create the blocks using Asian fabrics from their own stash.

Such a simple thing. I decided that I really wanted to be a part of it. Last night I made two blocks:

crane blocks
The blocks will be made into a quilt this weekend (at the guild's spring retreat). I think this quilt is going to be amazing!

And by donating to Red Cross or World Vision, you can earn a chance to win this quilt!!! Here's how (in Laurie's own words):
Now for the fundraising portion of the project, in lieu of selling actual tickets, people can either send me checks made out to the Red Cross, or World Vision (Laurie Gustafson c/o Stray Threads PO Box 881, Woodinville, WA 98072), I will forward them to the charities, and for every $5 donated their name will be added to the drawing. For those that would prefer to donate online, just forward the confirmation of the donation to this address lauriescranesforhope@gmail.com and again for every $5 their name will be added to the drawing.

I'm just in awe of how quickly she put all of this together. A project like this is no small thing.

Whether is it through this fundraiser or one of the myriad of other opportunities out there right now, I encourage you to help aid in Japan's recovery efforts. We really can make a difference!

Sunday, March 20, 2011

Under the Sea

Spring is finally here-- and so is the sun! Yay! So I was able to go outside and take a couple of pictures of my latest finish, Under the Sea.


A few reasons why this quilt was so fun to make:
  • Super quick and easy,

  • Tried out a new applique technique,

  • Super soft minkee on the back, and

  • It is my own design!
My initial inspiration came from a charm pack of MoMo's Odyssea. I wanted to figure out a way to use the charm pack and make baby quilt for my neighbor's new baby (well, new-ish... he's nearly 7 months old now). The initial design came to me pretty quickly, but then the applique concepts had to spend awhile percolating.

Under the Sea, the little crab
I think the main hang-up was that I kept looking to other sources for inspiration, when really, what I needed was to just do my own thing. In the end, I found myself drawing my own little applique sea creatures. Once I managed that, the design just fell into place. I think it turned out pretty cute!

It was fun trying out Natalia's starch method for applique, and I definitely learned a couple of things. One is that I really like this technique-- it makes stitching a breeze, no fusibile products are used, and the resulting applique is truly nice and soft and pliable. The starch also came out just fine after washing, leaving the blocks nice and soft. But it was kind of a pain to quilt through-- I had to use a bigger needle than I wanted because the 70/10 sharp kept skipping stitches. The 80/12 quilting needle worked okay, but the holes it left in the super-stiff starch areas were big enough that I had some bearding from the minkee on the back. After washing, the bearding wasn't evident at all and the holes all shrunk-up, but next time I'll try and rinse some of the starch out before quilting and see how that works.

octopus stitching, close-up
Also, should I use this technique again in the future, I'll definitely make sure to quilt over the applique. After I washed the quilt, there were a couple of spots where the edge of the applique shape frayed a little more than I would have liked (as pointed out in the picture above). Not dangerously so, I don't think, but I would definitely feel better if the shapes had the extra security of some quilting. I've also determined I'm not a huge fan of machine blanket stitch. In addition to just preferring the look of the buttonhole satin stitch, I think that stitch would also make me feel better about the security of the applique.

Under the Sea, the happy little starfish
I was really happy with the results of my quilting plan for this quilt. I love how soft the minkee is, and I like that the back is stabilized without being too heavily stitched. It worked out really well.

Under the Sea, label
And here's the label.

Hopefully, baby Kenji will enjoy his new quilt!

Edited to add:

Under the Sea, back view
Here is the back of the quilt, so you can see the stabilizing stitches. I quilted around the applique shapes and the path.

Tuesday, March 15, 2011

Testing the waters...

Do you ever have one of those days when things just seem to go smoothly and happily along? Today has been one of those days for me. I'm blogging with a smile. I'm even getting a little time to work on my little undersea-themed baby quilt.

For this quilt, I'm doing something a little different than the norm. A couple of years ago, I made a quilt using Elizabeth Hartman's "Simple Modern Baby Quilt" pattern (I don't think it is available anymore). She created that pattern with minkee/cuddle/chenille fabric in mind for use as the backing. She posits that in order to keep the backing super soft (and maybe also to avoid having to deal with the stretch that often goes with those specialty fabrics), it is better to do all of the quilting on just the top two layers, and then add the back at the point when one is ready to put on the binding.

I followed all of her instructions for my version and it turned out just fine. Even so, I couldn't help but wonder about the potential for "tenting" when one doesn't in some way attach the back to the front except at the sides. But I also really get that if you invest in something super cuddly for the back, you want it to stay super cuddly and not get all flattened out and stiff from quilting all over it. So for this quilt, I'm trying to see if I can find a happy medium between the two.

After completing my top, I basted it to just the batting and did the majority of my quilting. (Forgive my pictures today... there was thunder, lightning, rain and hail going on outside, so the light was definitely not on my side.)

mostly-quilted octopus ready for stage two quilting
Here you can see my mostly-quilted octopus. A note about the starch applique technique I used-- holy cow, was it weird to quilt through! I wonder if I'm supposed to somehow try and remove the starch before quilting? But then, couldn't that potentially cause a lot of distortion? I don't know. But it was weird quilting it. I guess we'll see how it does once it's complete and all washed up.

hand basted edges
Anyway-- now I've taken my mostly-quilted top/batting and have basted it to my minkee backing. I used safety pins in the center, using them only to stabilize the areas in which I plan to do some additional quilting. Then I went back to Elizabeth Hartman's instructions, pinning and hand basting along all of the edges in order to stabilize them. Initially I was concerned about how much effort/time it would take to hand baste those edges, but it turned out to be no big deal and went very quickly.

Now I'm ready to do my last bit of quilting. My hope is that just doing a minimal amount with all three layers will help keep the back nice and soft while at the same time stabilizing it and preventing it from tenting. So I'm just going to quilt around my applique shapes and a few straight lines. The goal is nice and flat but still soft and cuddly. I'll let you know how it goes!

Saturday, March 12, 2011

March guild meeting

It has already been more than a week since the March meeting of my local quilt guild. But I made some blocks for the block lotto held that evening that I've been meaning to share.

Block lotto is an optional activity for guild members. We are each given a piece of fabric and a theme and we make blocks (supplementing the given fabric with our own). All of the blocks are collected and then grouped into sets. For every block one makes, one receives a ticket. Over the course of the meeting, there are drawings and winners receive a set of blocks.

This month, the themes were '30s and pinwheels and 8.5" blocks. I actually managed to make three!

March 2011 block lotto blocks
Pinwheel blocks are so fun to make, I couldn't help myself.

Alas, I was not a winner this month. But there's always next time!

Tuesday, March 8, 2011

Percolating

I've had this quilt idea percolating in my brain for quite some time. I sketched it out last August, bought some fabric for it, and then let it sit-- in part because there wasn't room in the quilty queue at the time, but also because the design just wasn't sitting quite right with me yet. Over the last few months, I have pondered and sketched, and thought some more. Then this afternoon, the elements seemed to just fall into place and suddenly I felt like I had a plan and it was going to work. Woo hoo!!! Don't you just love it when that happens?

Not wanting to waste another minute, tonight I jumped in and started working on it.

the start of Kenji's quilt
I'm trying a new method for machine applique in this project. I'm using the Starch Applique Tutorial from Natalia at Piece N Quilt. So far, I've used a lot of starch. Really, it feels a little crazy how much starch I'm going through. But it is working just as Natalia described-- my fabric is as stiff as paper, making it very easy to cut, control, and stitch. In the past when I've done machine applique, I've always used fusible web, which is super quick and easy but results in a stiff block (because of the fusible itself as well as the added stabilizer needed for stitching). This starch method definitely involves a lot more preparation. But I'm hoping that doing it this way will make for a softer quilt in the end.

This is supposed to be a baby quilt for my neighbor's new baby boy. She had him in September, so I'm really anxious to get this one finished.

Thursday, March 3, 2011

A new guild block exchange

It has been awhile since I've done much more in my local quilt guild than attend meetings. So I've stepped it up a notch and signed up for another block exchange. I'm really hoping it will help me meet and get to know some more of my guildmates and have some quilty fun too.

The way this block exchange works:
Each person in the group (there are 12 of us) creates a box. Included in the box are fabrics, instructions, and a sample block. Over the course of the year, the boxes are passed around the group month-to-month. By the end of the year, each box will have at least 12 blocks in it-- enough to make a quilt!
This is actually the second block exchange I've participated in with the guild. Having been through one before, I feel like I'm much better prepared this time around and have a stronger plan.

I've decided to go with some mosaic blocks using Elizabeth Hartman's fabulous Mod Mosaic Floor Pillow tutorial. I saw that she recently completed an exchange using that block, and I was inspired by the results. So inspired that I'm totally copying her idea because I love it so much *ahem* totally inspired.

Here is my sample block:

block exchange 8, sample block, mod mosaic-style
And these are the fabrics I'm including in my box:

block exchange 8, fabrics
They include a bunch of prints, mostly from the Michael Miller Bot Camp collection, and a number of coordinating solids.

I think by including all of my own fabrics, and having more room for creativity in the blocks themselves, it is going to be more fun for my block exchange buddies and result in a collection of fun and happy blocks. At least, that is the goal. I'll let you know how it works out in a year or so, because that's how long it will be before I get my box back and see the finished blocks. But now that I have two little boys occupying most waking moments, I've noticed that time flies by really, really fast-- so I have a feeling the blocks will be back before I know it!

Tuesday, March 1, 2011

Hop to It: "Rose Hip Heart"

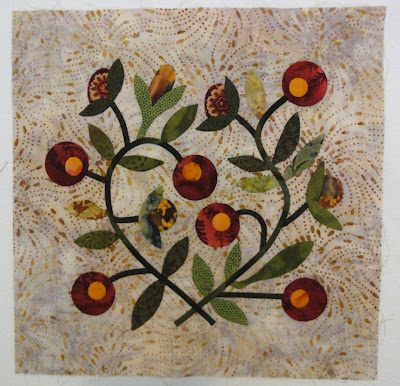
The group I'm in that is working through Edyta Sitar's Hop to It quilt decided last meeting that we weren't going to focus on specific blocks each month. Rather, it will be up to each individual as to what block to work on. So for this month, I decided to focus on block 1 of the quilt, "Rose Hip Heart."

Hop to It, block 1
Overall, I'm pleased with how it came out. I made a couple of mistakes with my flower placement, but I don't think it's noticeable unless compared to the original design. There was also a little bit of drama in the making of this block. As I went to stitch down the very last piece, I realized it was missing! Gah! After 10 minutes of focused searching (including an exploration of the couch crevices that revealed a number of toys, coins, and pins and resulted in an impromptu late-night vacuuming session), my eagle-eyed husband found it in the middle of the floor. Huzzah! I really didn't want to have to prep another one of those circles.

I used needleturn applique with freezer paper on top for the majority of the block, bias bars to make the stems, and Karen Kay Buckley's Perfect Circles for all of the circular pieces. But the most fun part of this block for me was choosing the fabrics. I'm really loving how this quilt mixes both batiks and prints. For a totally different take on the block, you should definitely check out Carrie P.'s beautiful version, done all in Martinique by 3 Sisters for Moda. Gorgeous!