Saturday, December 26, 2015
Cute kitty skirt!
This was a skirt I have been thinking about for a long time-- ever since I first saw this happy Lizzie House Catnap print nearly two years ago! The print just spoke to me. And I could not get it out of my head. But I didn't pull the trigger on buying the fabric until I saw that Hawthorne Threads had put it on sale, at which point it immediately went into my cart (along with a coordinating Denyse Schmidt print).
Now it is a Cute Skirt! Literally. The design is from a pattern from Favorite Things called "Cute Skirts." I made the view with contrasting gores. It is a simple design, and it showcases fabrics so happily. This is actually the third skirt I've made from this pattern (the previous ones were pre-blogging). So clearly, it works for me.
Construction was straightforward. My only quibble was with the instructions for the gores.
The instructions have you sew the gores from hem through the point all the way to the edge of the gore fabric. As a result, they just look a bit janky. I mean, from the outside, all is well, but they could be much cleaner on the inside. If one stitched from the hem and stopped at the seam allowance at the top (rather than stitching all the way through to the raw edge), I think the gores would not only look prettier inside, but also sit a bit flatter overall. It had been so long since I made this view (I made my first one in 2005) that I just didn't remember. So-- I'm writing this down so I remember for next time!
My only tweak to the design was to add a line of stitching through the elastic in the back waistband. I didn't do that once, and was constantly fighting with elastic getting all twisted up in there (I really hate twisty elastic-- it's just not comfy!).
I sewed up the size 14 based on my measurements, which I think worked out well. But the sizing is also pretty forgiving since you can easily adjust the elastic during construction.
Here I've styled the skirt with a cozy sweater and boots. Comfy, cozy, with kitties!
Thursday, December 24, 2015
It's not all selfish sewing here...
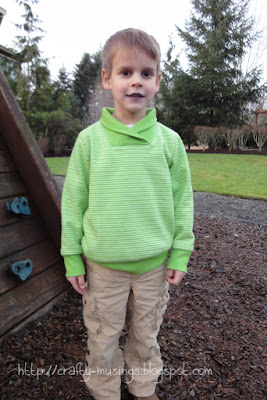
While I have been doing lots of sewing for me lately, there have been a couple other projects in the queue for others as well. This one was for Little Bear (who had just finished eating a blue sucker when I took these... truly, he's not freezing to death here!):
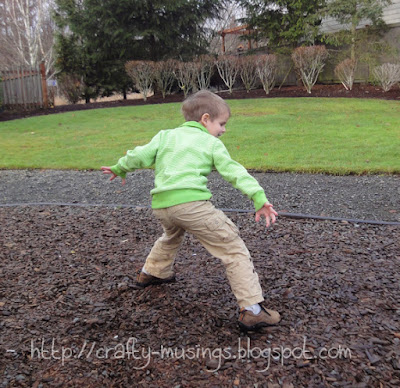
It is the Varsity Cowl Neck Pullover from Peekaboo Patterns. I recently saw this made up by Stacy Sews and it looked like something my boy would like (he is into cozy sweaters) and so I picked it up during a recent sale.
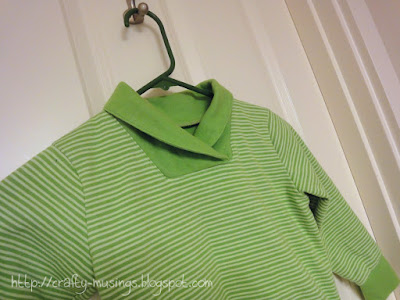
I used a knit from my stash. It is pretty snazzy because it is solid on one side and has the stripes on the other, making it perfect for the contrasting neck and hem bands.
The pattern is very straightforward and the instructions are very clear and easy to follow.
Little Bear is 5 years old and is wearing a 4T-5T in RTW. I sewed up the size 5 for him, and it fits about how a Gymboree 5T fits him (so there is a bit of room to grow for him). So-- the fit seems spot on!
And it is, indeed, very cozy.
And perfect for my active boy!
I already have plans for another (maybe two...).
Wednesday, December 23, 2015
Another Kimono Tee
The first one turned out so well, I immediately went on the lookout for fabric for another Kimono T-Shirt from Maria Denmark.
I found the perfect fabric at Fabric Mart-- a happy Maggy London ITY print.
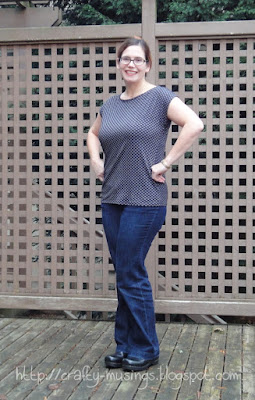
Making it the second time was even faster than the first time (and I felt like that was pretty darn quick!). No changes at all.
I am definitely feeling the love for this design and fully intend to make more at some point. But I've got some other projects lined up, including plans for using these:
Activewear knits! Woo!
Saturday, December 19, 2015
The perfect gift
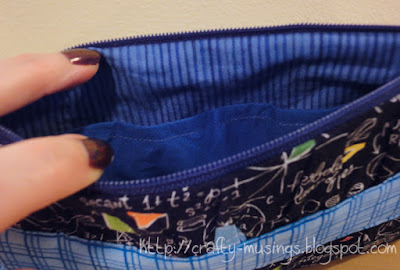
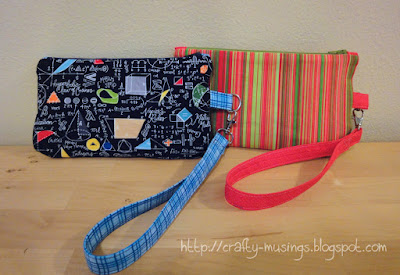
The Noodlehead Gathered Clutch must be my idea of the perfect gift because I just keep making 'em! They are quick, easy, practical and cute, and I never get tired of making them. What's not to love?
These are for the boys' teachers.
Bright pink and bright green are Little Bear's Kindergarten teacher's favorite colors. I dug deep in the stash to find this perfect fabric from Michael Miller with bright green and pink stripes. It was meant to be!
Big Bear's teacher has a passion for math and science, so this print from Timeless Treasures seemed like a great fit. And I figured one can't go wrong with blue accents.
It has been awhile since I've made any of these and I forgot the topstitching on either side of the zipper-- fortunately, it is not a critical mistake. Phew! But other than that, they went together beautifully. And I finished the gifts off by including a gift card to a favorite restaurant. These ladies definitely deserve a couple of glasses of wine nice meal. :)
These are for the boys' teachers.
Bright pink and bright green are Little Bear's Kindergarten teacher's favorite colors. I dug deep in the stash to find this perfect fabric from Michael Miller with bright green and pink stripes. It was meant to be!
Big Bear's teacher has a passion for math and science, so this print from Timeless Treasures seemed like a great fit. And I figured one can't go wrong with blue accents.
It has been awhile since I've made any of these and I forgot the topstitching on either side of the zipper-- fortunately, it is not a critical mistake. Phew! But other than that, they went together beautifully. And I finished the gifts off by including a gift card to a favorite restaurant. These ladies definitely deserve a
Monday, December 14, 2015
Stars!
This time of year is tough for me. With the clouds and the rain that come this time of year, and the short days... it feels dark ALL the time! But, a girl's gotta blog. If I wait until spring to blog about projects, I'm just not going to remember! And so I go with crappy, poorly lit pictures. Which is a shame, because this is such a bright and happy quilt!
The design is "White Stars" from Julie Herman's book, Skip the Borders. I changed it up just a bit with a 9-block layout instead of 12 in order to keep it a more baby-friendly size. Mine ended up at about 48" square.
I didn't follow the instructions in the book, instead opting to use the "No Waste" method for Flying Geese blocks (as shown here). I had to do a little math to figure it out, but it saved sooooo much time and fabric. And it worked like a charm.
I knew I wanted purple and grey (I used Kona Shadow) and that I wanted to use this pattern. As I was looking about my local quilt shop, I came across a happy fabric with little animals with umbrellas from David Walker. When I saw that, it inspired me to pull the aqua and pink to coordinate. Then I used that cute animal print on the back. I love how it all came together!
I spent a lot of time quilting this one. I was very influenced by the quilting on the sample in the book, which was quilted by Angela Walters. I chose to use a paisley-type filler to give lots of texture to the solid fabric stars (from the book, Free-Motion Quilting with Angela Walters). Then I again took inspiration from Walters's Craftsy class, "Dot-to-Dot Quilting" and used that to create some motifs in the surrounding blocks. Throughout I used Aurifil 50/2 thread #2600 (Dove).
I wish I was able to get better pictures of the quilting... I was having a tough time getting any decent pictures that day, so I'm thankful even to have gotten these. I've gone ahead and attempted to draw in my quilting design on the photo above so you can get an idea. (Thankfully, the quilting looks MUCH better on the quilt than my feeble Paint Shop Pro drawing skills indicate!)
And the label. Baby's papa commented how glad he was that there were care instructions included on the label. He seemed in a bit of disbelief as to how his 3-week old baby manages to require so much laundry. I had to laugh at that. :P
Hopefully little Penelope will enjoy snuggling with her new quilt!
Friday, December 4, 2015
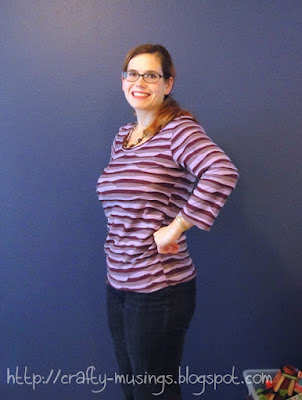
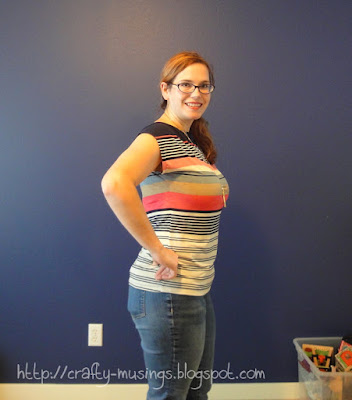
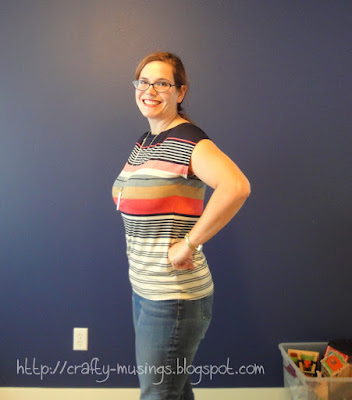
Striped Style Arc Ann T-Top
This was another pre-Halloween sewing project to help get me back in the sewing groove (after months of very quilt-focused stitching).
It is another Style Arc Ann T-Top. My first was made back in August 2014-- I kind of considered that short-sleeved version my wearable muslin and I was pretty happy with it. For this version I went with a 3/4-sleeve and used a lovely stripe-y jersey purchased at the beginning of this year from Gorgeous Fabrics. It is really quite cool looking-- the wavy look is actually created by seaming, giving it a fabulous texture.
Again I sewed up the size 12. I shortened the long sleeve pattern piece to create the 3/4-sleeve. I made sure to stabilize the shoulder seams with Stay Tape, and then used a knit stay tape along the neckline edges (this helped make application of the neck band much smoother this time around). Overall, construction was much better the second time around! This fabric does not have nearly the stretch that my first iteration had though and I am finding it does not fit the same way.
It is apparent to me now that I really needed to do an FBA. The front kind of rides up over the girls making for some unfriendly wrinkle action once I start moving about. In addition, I am finding I really just don't love the rouching on the sides. It just puts extra fabric over my tummy, making me feel fluffier than I am-- it has a very maternity vibe to me. The slinkier fabric I used the first time minimized this effect, but the heavier jersey has made me notice it much more. I don't foresee another Ann T-Top in my future.
None of this is stopping me from wearing the top, however! It is in very regular rotation because I love the fabric so much and it is quite soft and comfy.
Wednesday, December 2, 2015
"Her Favorite Color Is Rainbow"
After it laid in limbo for nearly three months, I finally got to quilting my rendition of the McCall's Quilting May/June 2014 "Galaxy" quilt.
I finished it just in the nick of time, too-- literally the day before the intended recipient's 8th birthday party. I feel lucky I managed to get some pictures of it!
I really enjoyed choosing the fabrics and pairing them together for each individual star. I started with a beautiful rainbow fat quarter grouping from Pile O'Fabric and then supplemented with some additional solids and prints. It is subtle, but I actually used two different fabrics for the background. One was a Kona solid, Nautical, a deep navy blue. The other was an old Moda print that I pulled out from my stash-- deep, mottled blues with white dots that I thought looked very starry. I did a diagonal band of the print from the top left corner down to the bottom right, and then used the solid in the other corners. I feel like it gives it a sense of a ribbon of stars running through it-- like the Milky Way. It's almost too subtle, really. But I know its there!
To try and help emphasize the different backgrounds, I quilted them differently (which you can kind of see in the photo above, showing the quilting from the back side). The Milky Way band received some wavy lines (mimicking the mottled waviness of the print) and the solid got lots of swirls. Then I used some Dot-to-Dot quilting for the stars themselves (inspired by the Angela Walters Craftsy class-- which, by-the-way, is excellent and has many great ideas for quilting).
All of the quilting was completed using Aurifil 50/2 thread in 2745 (Midnight). I used nearly a whole 1,422 yard spool.
When I was doing the initial planning for this quilt, I was thinking to use this Kaufman Quilter's Linen in Midnight for the background of the stars, but when I finally put my palette together, it felt a bit bright. But, since I had plenty of it, it made for a perfect back!
And the label.
The name I gave the quilt is pretty reflective of the recipient. Many a time have I heard her say her favorite color is, "rainbow."
Thursday, November 19, 2015
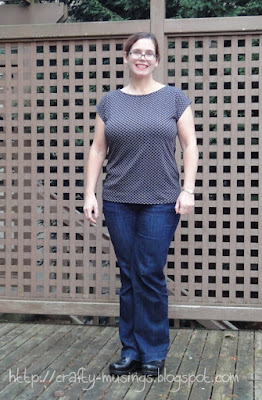
Striped Kimono Tee
While there is definitely sewing going on here, and even finishes(!), I seem to be having problems actually taking pictures of my stuff. I even made a Halloween costume for me, but failed to get decent pictures. So there is a bit of a backlog at this point. Hopefully, I'll start catching up soon! Anyway...
At the beginning of October (as a sort of Halloween costume sewing warm-up), I sewed up a couple of tops. This was the first:
The fabric is a Misty Stretch Slub Jersey Stripe Pink/Multi, 96% Poly/4% Lycra ITY knit I picked up from Fabric.com last year. I was initially thinking it for a skirt, but it is a pretty thin, drape-y knit that seemed better-suited to a t-shirt (i.e., I didn't want to have to do a lining). Enter the MariaDenmark Kimono T-Shirt pattern (which is currently a free download when you sign up for her newsletter). Note that there are no seam allowances included in this pattern. I arbitrarily decided to add 3/8" seam allowances.
I made a quick and dirty muslin of the size Large a few months ago (no pictures of that) and determined I wanted/needed to do an FBA. Conveniently enough, MariaDenmark even has instructions for doing a dartless FBA.
I think it worked pretty well! I really like the way this fits on me. And, while not perfect, I am definitely pleased with the stripe matching I managed. I made sure to stabilize the shoulder seams with some nylon stay tape and also used a knit fusible stay tape along the neckline. I used my coverstitch machine for the hems.
Love it!!! I have been wearing this top every week since I completed it. I definitely want to make more and have my eyes peeled for potential fabric candidates.
Monday, November 9, 2015
Halloween 2015: Jay from Ninjago
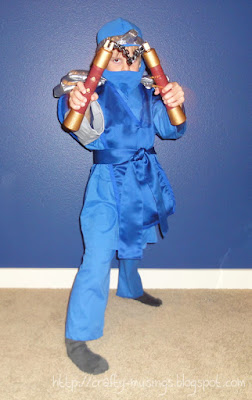
This year for Halloween, Little Bear decided he wanted to be the character Jay from Lego Ninjago. It was a pretty appropriate choice for him, as he is into all things Lego and ninja right now (he is even enrolled in a Ninja Zone gymnastics class!).
This costume was pretty straightforward. I used Simplicity 1037, using views A, B, D, and F and made the size 4. I was really pleased with the fit-- I measured him and everything fits very true to size (a pleasant surprise compared to some of their adult patterns!).
A couple things to note about the pattern: It does not include any instructions/advice for the additional ties (arm/wrists and legs) pictured on the cover. That wasn't a big deal (and I ended up not using them), but I was fully expecting them to be included somehow as they are pictured. Also, the instructions for finishing the tabard piece (D) are pretty lacking... I fudged my way through the suggested bias binding, but it is far from pretty. But, you know, galloping horse and all that. (Thank goodness!)
The only modifications I made to the pattern were to add shoulder armor to the tabard and then create the headband (both self-drafted). I was pretty happy with how the shoulder armor turned out, but the weight of the armor pieces pulled the tabard backward (making them appear to be shoulder-blade armor-- doh!). So I added some velcro to the underside of the tabard shoulders to connect with the top of the robe shoulders in order to help hold everything in place. It helped some, but the fix was no match for my active ninja boy! He could easily defeat the velcro with all of his jumping-crouching ninja moves. But for trick-or-treating, it worked fine.
This was a fun costume to make.
And I know he is happy because he has asked to wear it every day since I finished it!
Sunday, November 8, 2015
Halloween 2015: The Purple General
Hope you had a fun and happy Halloween! I know it was a week ago, but I still want to document my costume work for this year. I'll start with the most complicated of the costumes made, The Purple General.
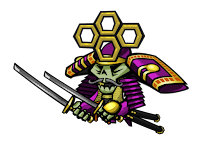
The video game of the year for Big Bear has been an indie game called, Skulls of the Shogun from 17-Bit.
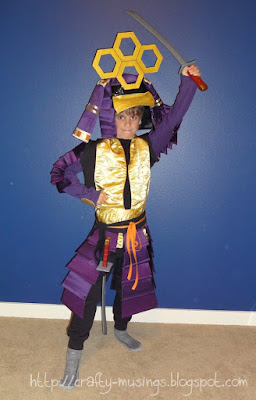
One of the characters is a purple shogun, and that's what he decided he wanted to be. Mama did her best to make it happen:
This was a pretty involved costume! I used the character art and also found some pictures of traditional samurai and shogun garb to guide me. I ended up working in layers:
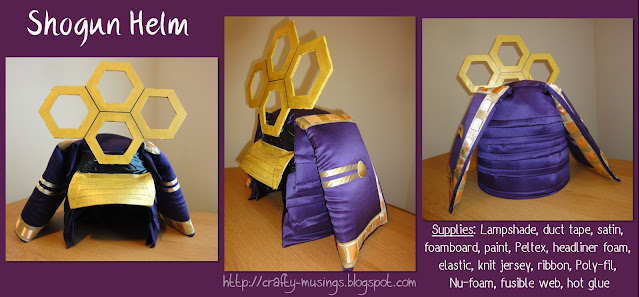
The helm seemed like the most important part to me, so that is where I started. It took a full week, 2-4 hours a day, to put it together. Supplies included the lampshade (and special wire cutters to cut it), black spray paint, duct tape, satin, foamboard, acrylic paint, Peltex, headliner foam, elastic, knit jersey, ribbon, Poly-fil, Nu-foam, fusible web, and (of course) some hot glue. There was also quite a bit of sewing involved in piecing the various parts.
Here's a picture of the inside. You can see the chin strap and the foam headliner I used to pad his noggin from the lampshade support crossbars at the top. And lots of duct tape.
I wish I had thought to take pictures in process, but in the thick of creation and problem-solving, pictures tend to be very far from my brain.
Thankfully, all of the disparate pieces came together in a pretty cohesive way and resulted in a very happy Purple General:
Worth it!
The video game of the year for Big Bear has been an indie game called, Skulls of the Shogun from 17-Bit.
One of the characters is a purple shogun, and that's what he decided he wanted to be. Mama did her best to make it happen:
This was a pretty involved costume! I used the character art and also found some pictures of traditional samurai and shogun garb to guide me. I ended up working in layers:
- Black t-shirt and sweatpants-- purchased,
- Bolero jacket with armored arms-- Butterick 4385 with self-drafted armor plating,
- A sash around the neck and a wide brocade belt-- Simplicity 1037,
- An armor-plated skirt-- self-drafted, and, last but not least,
- The helm-- a lampshade base and a LOT of modification.
The helm seemed like the most important part to me, so that is where I started. It took a full week, 2-4 hours a day, to put it together. Supplies included the lampshade (and special wire cutters to cut it), black spray paint, duct tape, satin, foamboard, acrylic paint, Peltex, headliner foam, elastic, knit jersey, ribbon, Poly-fil, Nu-foam, fusible web, and (of course) some hot glue. There was also quite a bit of sewing involved in piecing the various parts.
Here's a picture of the inside. You can see the chin strap and the foam headliner I used to pad his noggin from the lampshade support crossbars at the top. And lots of duct tape.
I wish I had thought to take pictures in process, but in the thick of creation and problem-solving, pictures tend to be very far from my brain.
Thankfully, all of the disparate pieces came together in a pretty cohesive way and resulted in a very happy Purple General:
Worth it!
Wednesday, October 14, 2015
Alpha Animals
Yikes! Time flies, right? I'm afraid that back-to-school this year has been a challenge. One in half-day kinder, another in third grade, two different schools... I'm still trying to find a routine that balances me-time with volunteer work (PTA, classroom, HOA, etc.), chores and the have-to-get-dones. While I am getting some crafting time, blogging has had to fall to the wayside. That's why it has taken so long to get to this quilt:
I finished it back in July but didn't manage to gift it until late August. But I'm finally getting it blogged now!
This quilt started from some oops blocks. The blocks were fine, but they just were not working in the quilt for which they were intended so I switched them out. They were kind of a funky size though, so I ended up designing this quilt to make use of them (I couldn't let this cute fabric go to waste!).
Here is the Electric Quilt design image:
Pretty close! Gotta say, EQ is a really helpful design tool.
The quilting is pretty simple: a stipple over most; straight lines in the aqua areas, and a cute orange peel cross in the yellow parts.
I used various coordinating colors of Aurifil 50/2 for the quilting, including white (2024), light turquoise (2805), and medium butter (2130).
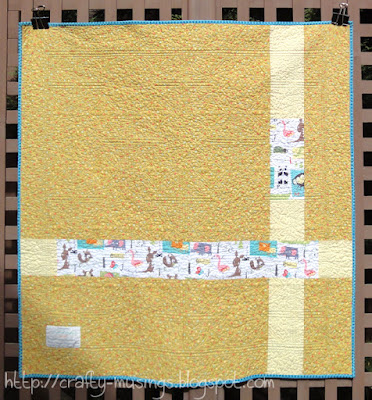
Most of the fabric, including the back (pictured above), came from my stash (yay!), though I had to purchase the striped background/border fabric.
This quilt was given to baby Clark.
I have it on good authority that he loves it! Yay!
Subscribe to:
Posts (Atom)


