Sunday, July 31, 2011

Style Stitches Monthly Bag Challenge: Key Keeper Coin Purse

I'm thinking this little bag could make for some fun holiday gift-giving.

Key Keeper Coin Purse, front view
It is the Key Keeper Coin Purse, the seventh project featured in Amy Butler's book, Style Stitches. I chose fabric to coordinate with my Beautiful Balance Checkbook Cover.

It's a cute little bag, about 6" x 6", perfect for coins, cards, my cell phone, and a lip balm.

Key Keeper Coin Purse, lining view
It is pretty much a mini-version of last month's full-size Teardrop Bag, so the instructions were very easy to follow.

Key Keeper Coin Purse, zipper view
The only change I made was to use Noodlehead's method for inserting the zipper (which she details in her gathered clutch tutorial).

And I completed mine just in time to enter this month's Style Stitches Monthly Bag Challenge!

Style Stitches Monthly Bag Challenge
Next month's project is the Fringed Hobo Bag-- the one bag in the book that I am considering skipping. I mean, it's big, it's round, and it has crazy trim. On the other hand, I have a sort of bohemian sister-in-law who might really enjoy such a unique bag. So I may still give it a go if I can find the perfect fabric. We'll see!

Wednesday, July 27, 2011

Hop to It: "Spring Reel"

It has been a busy couple of weeks! My husband had three weeks off from work and so we've been getting to spend lots of family time together. We did some hiking, took a family vacation to the peninsula (visiting the beautiful town of Sequim), celebrated my husband's birthday, and generally just had a great time being together. The boys have been in heaven getting to spend so much time with papa!

There hasn't been much crafting during this time, but I'm starting to get back into some evening stitching and I finally have another Hop to It block to share. Yay!

This is block four, "Spring Reel":

Hop to It block 4: Spring Reel
It was pretty straightforward. I needleturned everything but the little circle in the center (go, go Perfect Circles-- LOVE that tool!). It's taken a couple of years, but I'm finally feeling more confident about my pointy-points. I'm definitely managing to make them more consistent and more pointy these days. Just so long as they don't need to be too pointy-- then they kind of stress me out still.

It feels good to be getting back into the saddle on this project and do a little bit of catch up. With this block is complete, I'm now only two behind schedule.

Monday, July 11, 2011

Success!

Yay! All the time spent fitting paid off. I have a happy new top now:

S3697 complete, front view
This is view F of Simplicity 3697. The biggest change I made from my third muslin was to go from the two outside pleats to a single inverted box pleat in the center (I used this tutorial at BurdaStyle as a guide). I think it looks very clean and is more figure-flattering than the pair of pleats. I also chopped 3" from the bottom to shorten it up a little bit and added a modesty panel (because that V was just a little too low).

S3697 complete, inside view of bodice finishing
The pattern instructions were very easy to follow and seemed pretty well written. No head-scratching moments at all. But I did make a change to the band facing. The method described in the instructions would result in an exposed seam between the band and the bodice (as shown in the diagram above). Since there is a facing there, doing that made no sense to me. So I enclosed the upper seam in the facing as well. So much cleaner.

S3697 complete, back view
The fit still isn't perfect. I think I spent so much time focused on the front, I kind of failed to address the back. It isn't bad, but I think it could fit better. I think I may need a broad back adjustment. I'll have to experiment and see what I can do to loosen it up a little back there. I definitely plan to make this top again (it has been suggested to me that it could also be a very cute dress as well with some added length), so the time spent fitting is certainly worth it to me.

S3697 complete, side view
I've always wanted to have a top like this, but have never been able to find a ready-to-wear one that even comes close to fitting (they are either tents or boob-crushers or a bit of both...). So I'm thrilled that I was able to make this pattern work for me.
S3697 complete, full front view
Yay!

I'm still feeling the sewing mojo... now to decide what to do next!

Thursday, July 7, 2011

Third time is the charm...

I think that may indeed be the case here. I finished up muslin #3 of Simplicity 3697.

S3697 - muslin #3
Here's what I changed from muslin #2:
  • Kept the version 2 bodice as is (with the FBA from version 1 and the added length from version 2) except I tried spreading out the underbust gathers more.
  • Went back to the original band (the one I used in the first muslin).
  • Pleated the skirt instead of doing gathers.
I posted pictures of my previous muslins in the forums at PatternReview.com and received some awesome advice that really helped me move forward on this project and led to good improvements. I'm actually feeling pretty good about this version! When I look at myself, I'm so much happier with how I look in the top. My concerns at this point are:
  1. The pleats in the skirt. I'm not sure which direction my pleats should be going... in toward the center or out away from the center? And should they be closer to the center?
  2. I wish the band was a little smoother below my bust. But there are also ties that will be added at the side seams in line with the band which I think will mitigate the wrinkles there.

In fact, I'm actually feeling like I can take this version and move on to my actual fabric. Woo hoo!!!! Hopefully, I'll be able to get to that this weekend. I'm really excited!

Wednesday, July 6, 2011

Simplicity 3697-- muslin #2

For my second muslin of Simplicity 3697, I went ahead and lengthened the bodice front top and the front band.

S3697-- lengthening top and band
Frankly, I'm not sure if it is an improvement or not.

S3697-- muslin 2
My initial response (after trying it on at 1 a.m. last night) was definite fail. But looking at it this morning, I'm not sure. It seems to look a little droopier in the cup area and I'm wondering if I should go back to version 1 and experiment first with just doing a bigger FBA on the top. I may still want to lengthen, but version 2 makes me think I may not need to if I make the bust area in the top section more roomy.

S3697 muslins 1 and 2
Any thoughts?

I think my next step will be to go back to version one and do a bigger FBA on top and see how that looks.

Lots of trial and error... hopefully it pays off!

Tuesday, July 5, 2011

Learning about fit

Lately, I've been in the mood to sew for me. Yay! I recently read a quote that said something to the effect of: "Sew for the woman you are now, rather than wait for the woman you want to be." That kind of inspired me. It seems so simple, but reading it really reminded me that no matter what size one is, having clothes that fit is a good thing. So why wait? Why not have good-fitting clothes now? And if I happen to lose weight (ahem... we're not going to talk about the other possibility), and they're too big-- well, that is hardly a bad thing... heck, that would be a rather excellent excuse for new clothes!

pattern cover, Simplicity 3697
Anyway, with all of this newfound inspiration, I decided I wanted to make a shirt. I have a hard time finding shirts that fit in stores, so it seems like a very worthwhile project candidate. I chose Simplicity 3697.

Simplicity 3697, front and back views
I love the lines in this top, and I think it could be very flattering on me. And I have a beautiful cotton that I think would be lovely for it.

So tonight I jumped in and attempted my first muslin. My first step was to figure out how to do a full-bust adjustment (FBA). Using Debbie Cook's tutorial for doing an FBA on a dolman-sleeved top, I came up with this:

S3697, FBA first attempt
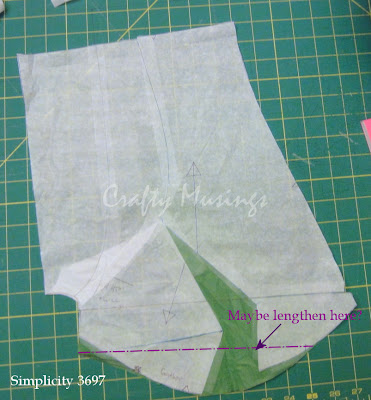
Then I went to make a muslin so I could see how it fit.

S3697, first muslin
It needs a lot of work still, I think, including a bigger FBA, lengthening to fully cover my bust, and a modesty panel. Frankly, I'm a little bit stuck at this point. I'm not exactly sure how to go about adding length in that area. In fact, I had this feeling that I needed to add length when I did the initial FBA, but chickened out because of my cluelessness. Add to that, I'm not even sure about this top. I *think* it will look super-cute if I can get it to fit my chest right. But I'm not sure. Just getting this far took me all evening. (And then I needed a break, so I'm writing this.)

What do you think? Ditch it and try something different? Or keep on truckin'?

Monday, July 4, 2011

Applique adventure!

For the latest round of Once 'Round the Country, the online round robin bee I'm participating in, I had the privilege to work on Anne's quilt. I knew almost as soon as I saw her center block that I wanted to do some applique.

working on the design for Anne's quilt
I don't have the earliest design drawings, but these were the last ones. My goals:
  • Echo the organic symmetry of the print fabric (which was also captured so beautifully by Kris in her flying geese border).
  • Use the designs of the print fabrics to inspire the shapes that I would use.
  • Utilize some of the open space left in Kris's border to help create a sense of flow from hers to mine.
  • Make it look cool.
Once I felt I was in a good place design-wise, I went ahead and made a full-size template.

completed applique design template for Anne's quilt
I did it on freezer paper since that was the only paper I had that was big enough. Once I had it all drawn out, I used it to trace freezer paper templates for all of the leaf and flower shapes. I also created lots of bias tape to use for the vines. This was my first time trying out a continuous bias creation technique (I used a tutorial from Make It Modern and a video tutorial at Erin Compton Design as my guides-- both were super-helpful). It was a little bit labor-intensive, but it worked really well and I didn't have to cut a large diagonal swath from Anne's fabric-- I only had to cut off a small chunk (I think I used 1/3 yard). And there is a ton of bias left over (whoops!). So I guess if anyone else decides they want to do vines, some will be ready for them!

bulb flower
I started by reverse appliqueing the centers of the bulb-flowers.

pretty white flower
Then I needleturned all of the leaves and the other flowers to the background. Next I added the vines. Lastly, I added the base of the white flower and the bulb-flowers at the ends of each vine.

This was my first time designing and executing an applique border and I definitely learned a couple things.
  1. Don't use so many points! There were a lot of pointy-points in my design-- the leaves, the ends of the bulb-flowers, the petals on the white flowers... I'm not sure what I was thinking there as I'm not very good at executing pointy points. But, they got done (albeit, they maybe aren't as pointy as I'd originally intended).

  2. Create the border wider than needed and then trim down after completing the applique. I didn't do that, and my border is a little wavy because I pulled the fabric a little tight at some spots as I worked. It shouldn't cause a problem for Zonnah (who is adding the next border and has mad skillz), but I'll definitely keep it in mind for future projects.

And the big reveal:

Anne's completed applique border
Yay! I think it turned out pretty cool. Hopefully, Anne will like it too.

Sunday, July 3, 2011

Style Stitches Monthly Bag Challenge: The Teardrop Bag

It was a close call, but I managed to get my Teardrop Bag made in time to enter it in the June Style Stitches Monthly Bag Challenge.

Style Stitches monthly bag challenge button
completed Teardrop BagWhen I first browsed through the book, the Teardrop Bag was definitely the design that appealed to me most. I love me a long strap, and the teardrop shape with the pleat just looked classic. So this is the bag that I was probably most looking forward to making. It didn't disappoint!

me and my bag
I made the small version and in the self-portrait above you can get a better idea of the scale of the bag. I went with the smaller version because I have been wanting something to just toss my keys and wallet into for quick outings. Not to mention that as I am usually hauling around a big ol' diaper bag, the thought of carrying something small and petite really appealed to me.

Teardrop Bag-- inside view
The inside is finished nicely, and has a divider pocket. I followed all of the instructions as written and the bag went together with no problems. Again, I find myself a little flummoxed that this bag is rated "Intermediate" when the Cosmo Bag (the first project in the book) is"Beginner"-- because I found the Teardrop Bag to be much more straightforward and far quicker to make. Go figure.

Teardrop Bag, detail of decorative stitching on top bands
I took inspiration from 1PrettyBag's completed bag and decided to do some decorative stitching across the top bands on the outside. I'm really pleased with the result!

After six months, the Style Stitches challenge is officially at the halfway point. This challenge has been really motivating for me! I'm pretty excited that I've managed to keep up with the monthly projects. I am truly thrilled with the book thus far and am really looking forward to making more bags.