Showing posts with label Style Stitches Bag Challenge. Show all posts

Wednesday, November 30, 2011

Style Stitches Monthly Bag Challenge: Everything Wristlet

Style Stitches Monthly Bag Challenge button
The October Style Stitches Monthly Bag Challenge was the Everything Wristlet. I actually finished it mid-October, but somehow managed to fail in blogging about it. So here goes...

Everything Wristlet: front view
I chose to make the small version and used some fabrics that have been in my stash for quite some time.

Everything Wristlet: back view
I love that taupe-y medallion print and wish I had taken time to center the design. But when I was cutting, I didn't even think of that. Doh!

Everything Wristlet: side view
This bag is in the "Experienced" (read: advanced) section of the book. And it really earns that moniker.

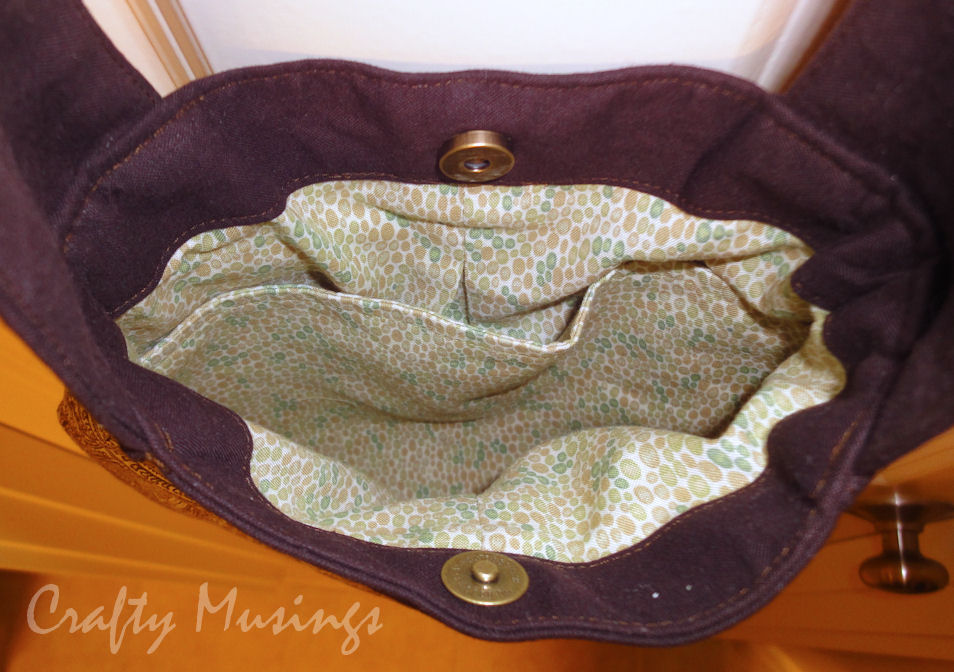
Everything Wristlet: inside view
There were a number of challenges in making this bag, almost all of which had to do with the lining elements.

Everything Wristlet: sewing through some crazy thickness
For one thing, there was some crazy thickness going on because the design called for sewing through multiple layers of Peltex. Fortunately, my machine worked it like a champ. But it caused for some stress.

Everything Wristlet: 3-step inside zipper insertion
And, as always seems the case for me and these bags, the zipper instructions were very challenging. The lining is made up of two parts: the card slot/center pocket and the main body. The main body starts as one long rectangular piece of fabric. The zipper is laid on top then the lining is folded over on top of itself and laid on top of the bottom half of the zipper to create the pocket. So when stitching the bottom half of the zipper, one has to be careful not to accidentally stitch the whole pocket closed. Because the pocket is so narrow, the only way to avoid stitching through it is to sew it in 3 steps (illustrated above): 1. from the outer edge to the head of the zipper; then take it out of the machine and open the zipper and reposition the foot on the edge of where the stitching started and 2. sew to the end of the zipper, at which point you have to remove it from the machine and then 3. sew from the other outside edge to the end of the zipper.

In fact, the whole time I was working on it, I was sure I must be doing it incorrectly, because none of this was detailed in the instructions at all. All it said was: "Note: Do not stitch through the back of the pocket." But it actually worked. I was shocked. Really. I probably wouldn't have even used her technique (being as I swore off A.B. zipper instructions), except that the lining is a single piece that is folded accordian-style to create the inside of the bag. It is actually a clever design, but the execution involved to make it happen is challenging.

Everything Wristlet: inserting the lining
Inserting the lining was interesting as well (but it definitely went more smoothly than the zipper!). Essentially, you drop it inside of the bag body, fold the edges of each to the inside, and then edgestitch all around the perimeter. In theory this is simple. In practice it is challenging because you need to deal with crazy thickness on the sides, the barrier of the center pocket section, and with lining up the stitching with the outside flap seam (which you can't see at all). It took lots of pins, going very slowly, and then a little bit of handstitching to finish it all off-- but it worked.

me and my Everything Wristlet
It turned out to be a cute little bag. I like it, but I think I would like the larger version better. I'm not sure I'll ever go back and make another of this bag though, as it was a lot of effort for a style that is just okay for me. But you never know.

I didn't manage to finish the November bag, but it seems that JemJam, the challenge host, is taking a little break too. She says she'll jump back in again soon, but until she does, I probably won't start on the final two bags. I've got so much else going on with the upcoming holidays, I think it will be good to take a little break.

Tuesday, October 18, 2011

Style Stitches Monthly Bag Challenge: Blossom Bag

The Blossom Bag was the September project for Jem Jam's Style Stitches Monthly Bag Challenge.

Style Stiches Monthly Bag Challenge button
This is a bag I've been looking forward to making. My mother-in-law (who gave me my copy of Style Stitches last year for Christmas) pointed to this bag as being her favorite in the book. So I knew right then that I needed to make it for her! I even picked out fabric for it a few months ago (extra notable because this is also the first project in the book that I've gone out and bought fabric for-- everything else I've made using my stash).

However, despite all of my enthusiasm, September was just not much of a crafty month for me (as my dearth of blog posts attests). But last week, I was finally ready! The preparations were mighty-- I think I spent nearly two hours just cutting out all of the pieces. Then I spent nearly two hours applying all of the interfacing. Then I spent about five hours putting it all together.

front view of my Blossom Bag
I chose to do the handbag style, with the shorter handle length. I also chose to use a regular quilting-weight cotton instead of the recommended decorator-weight. Following Natalie's advice, I decided to go ahead and double interface all of my exterior and lining fabrics in order to simulate the heft of a dec-weight. It was a lot of interfacing. But it really seems to have worked.

purse feet on the bottom of my Blossom Bag
Natalie also said that though she loved her bag, she was finding that it was already showing signs of wear on some spots, probably due to the lighter-weight fabric. With this in mind, I went ahead and added some purse feet to at least help with that on the bottom. Also based on her recommendation, I plan to Scotch-guard the bag.

back view of my Blossom Bag
And here's the back of the bag. I love the handle details in this bag. They weren't too complicated to make, but measuring to ensure even placement is definitely something I would recommend taking the time to do.

side view of my Blossom Bag
This is a view of the side. It was a little tricky sewing the side in, due to the thickness and inflexibility of the Peltex. But lots of pins and just taking it slow got me through it just fine.

inside view of my Blossom Bag
In putting the bag together, I ran into two main challenges. The first one: the zipper pouch. If ever a section needed an illustration, it was this one. I swear those instructions were on crack. She approached this zipper differently than every other one she has presented in the book thus far. But, similar to the other methods she has offered up thus far, this one is convoluted and far more difficult than it needs to be. Frankly, even after having done it, I am still wondering if I actually did it correctly. But it does work. If you decide to make this bag, I would highly recommend using a different zipper approach (this one, from Bree of My Crafty Crap, looks pretty promising-- I definitely plan to try it!). I think I'm officially declaring myself DONE with Amy Butler zipper instructions.

close-up of bar tacks on side panels
The other major challenge? The last step wherein one is supposed to bartack through the side panels in order to hold the dividers in place. So THICK! Ugh. My machine managed it, but I had to take off the foot and go super slow to make it happen (many thanks to Tori at James Family Blog for sharing that fabulous tip!). Thank goodness-- because hand stitching that would have been painful (literally, I think).

me and my completed Blossom Bag
And here I am with the bag. Should I decide to make one for me at some point, I'll definitely do the longer straps. I'm a shoulder-bag kind of girl.

me standing and holding my bag
This view gives a little better perspective on the actual size of the bag. It really is a great size.

If you want to make one of your own, or even just get a taste of what an Amy Butler pattern is like, Sew, Mama, Sew! has a FREE Blossom Bag pattern download.

Monday, October 17, 2011

Lucky September!

September really was a lucky month for me. I won two different giveaways-- woo hoo!

First, I was one of the winners for August's Style Stitches Monthly Bag Challenge (my entry was this Fringed Hobo Bag). I received a gift certificate to the Fat Quarter Shop. And then I immediately used it to buy this:

Fat Quarter Shop Apple Dumplings Quilt Kit
Happy and fall and Aneela Hoey... I don't do kits very often, but this one just spoke to me. Of course, now I need to actually make it. More hours in the day, please!

My second win was from Laundry Basket Quilts in their giveaway for the Moda County Fair blog hop:

Laundry Basket Quilts giveaway treats... so awesome!
Wow!!! Winning this one was such a treat because I am a big fan of Edyta Sitar and her designs (I'm currently having a ton of fun working on her Hop to It design). Such a wonderful array of treats, including her beautiful new book, Reasons for Quilts, which is full of inspiration and eye candy. I need to start finishing some things, because I really want to jump in and make that Wagon Wheel quilt (she even sent the templates to go with it!).

Many, many thanks to Jemellia and the Fat Quarter Shop for hosting and sponsoring the Style Stitches challenges, and to Laundry Basket Quilts for the wonderful treats!

Tuesday, August 30, 2011

Style Stitches Monthly Bag Challenge: Fringed Hobo Bag

Another month, another project from Amy Butler's fabulous book, Style Stitches!


For this month's Style Stitches Monthly Bag Challenge, I made the Fringed Hobo Bag.

Fringed Hobo Bag, front and reverse views
Going into it, this was the one project in the book I was seriously considering skipping. It just seemed a little too over-the-top. So, I never thought I'd say this, but it really turned out to be such a fun bag!

I decided on the small version because I liked the slightly longer strap that can be worn over the shoulder. The bag is listed as an "Advanced" project, and I definitely concur. Dealing with the curves, the trim, and the sheer bulk of all the interfacing and fleece involved all make for a bit of a challenge. So much interfacing. I think I probably spent more time fusing all of it on than I did actually sewing. And I nearly lost it when it came to the topstitching through it all at the end. Ugh. But once I switched to my 90/14 Topstitching needle, I got through it. Thank goodness I had one of those on hand (because the 80/12 quilting needle I usually have in my machine was an epic FAIL)!

Fringed Hobo Bag, inside view of zipper
I decided to go ahead and add a zipper pocket to the inside. This was a little more challenging than normal because of the bulk of the fleece that had been fused to the lining panel. But I got it to work.

Fringed Hobo Bag, side view
Inspired by cottage revolution's version, I went out and found some wooden disc trim at Hancock Fabrics. It felt like a great match for my woodsy-themed fabric (a gorgeous Julie Paschkis print from In the Beginning fabrics).

me and my Fringed Hobo Bag
Here I am modeling it. You can see exactly just how "small" it is. Ha!

Overall, I'm really pleased with the bag. It is a gift for my sister-in-law. Hopefully, she'll enjoy it!

ETA: I nearly forgot! There was some trim drama on this one. The pattern for the small bag calls for 2-3/4 yards of trim. That was about 9" too short. I ran back to the store and was able (thankfully!) to get another 1-1/2 yards, and that fit exactly. So the small bag definitely requires at least 3 yards (I'd probably err on a little extra, like 3-1/8 yards).

Friday, August 19, 2011

Style Stitches Monthly Bag Challenge 2011-August's Bag


I've picked out some fabrics for my August Style Stitches project, the Fringed Hobo Bag.


Initially, I was not very excited about this design. But now that I have my fabrics picked out, I'm starting to get psyched!

Hopefully, I can start work on it this weekend.

Sunday, July 31, 2011

Style Stitches Monthly Bag Challenge: Key Keeper Coin Purse

I'm thinking this little bag could make for some fun holiday gift-giving.

Key Keeper Coin Purse, front view
It is the Key Keeper Coin Purse, the seventh project featured in Amy Butler's book, Style Stitches. I chose fabric to coordinate with my Beautiful Balance Checkbook Cover.

It's a cute little bag, about 6" x 6", perfect for coins, cards, my cell phone, and a lip balm.

Key Keeper Coin Purse, lining view
It is pretty much a mini-version of last month's full-size Teardrop Bag, so the instructions were very easy to follow.

Key Keeper Coin Purse, zipper view
The only change I made was to use Noodlehead's method for inserting the zipper (which she details in her gathered clutch tutorial).

And I completed mine just in time to enter this month's Style Stitches Monthly Bag Challenge!

Style Stitches Monthly Bag Challenge
Next month's project is the Fringed Hobo Bag-- the one bag in the book that I am considering skipping. I mean, it's big, it's round, and it has crazy trim. On the other hand, I have a sort of bohemian sister-in-law who might really enjoy such a unique bag. So I may still give it a go if I can find the perfect fabric. We'll see!

Sunday, July 3, 2011

Style Stitches Monthly Bag Challenge: The Teardrop Bag

It was a close call, but I managed to get my Teardrop Bag made in time to enter it in the June Style Stitches Monthly Bag Challenge.

Style Stitches monthly bag challenge button
completed Teardrop BagWhen I first browsed through the book, the Teardrop Bag was definitely the design that appealed to me most. I love me a long strap, and the teardrop shape with the pleat just looked classic. So this is the bag that I was probably most looking forward to making. It didn't disappoint!

me and my bag
I made the small version and in the self-portrait above you can get a better idea of the scale of the bag. I went with the smaller version because I have been wanting something to just toss my keys and wallet into for quick outings. Not to mention that as I am usually hauling around a big ol' diaper bag, the thought of carrying something small and petite really appealed to me.

Teardrop Bag-- inside view
The inside is finished nicely, and has a divider pocket. I followed all of the instructions as written and the bag went together with no problems. Again, I find myself a little flummoxed that this bag is rated "Intermediate" when the Cosmo Bag (the first project in the book) is"Beginner"-- because I found the Teardrop Bag to be much more straightforward and far quicker to make. Go figure.

Teardrop Bag, detail of decorative stitching on top bands
I took inspiration from 1PrettyBag's completed bag and decided to do some decorative stitching across the top bands on the outside. I'm really pleased with the result!

After six months, the Style Stitches challenge is officially at the halfway point. This challenge has been really motivating for me! I'm pretty excited that I've managed to keep up with the monthly projects. I am truly thrilled with the book thus far and am really looking forward to making more bags.

Friday, June 24, 2011

Miscellany

It has been kind of a slow week crafting-wise. My stitching efforts have been focused on my Once 'Round the Country commitment and getting that done in time for the July 1st send-off. I'd show you my progress, but (frankly) it's not very exciting looking at this point. It's going to be a close call, but I'm hopeful that I'll get it done on time.

I'm also hopeful that I'll somehow be able to squeeze in another project: the Teardrop Bag for this month's Style Stitches challenge. I've only gotten so far as picking fabrics, but for me that's nearly half the battle!

Teardrop Bag fabric picks
This project is my personal favorite in the book, so I'm really excited about working on it.

Also going on right now is the 2011 Western Washington Shop Hop. This year, instead of attempting a family shop hop adventure with my 14-month-old and 4-year-old sons, I opted for taking a bus tour with 40 other quilt-obsessed ladies. We hopped on the bus bright and early on Wednesday morning and visited 12 shops over the course of the day. I made some new friends, actually got time to browse in every shop, and had a really good time. I even came home with a few goodies:

Western Washington Shop Hop 2011 loot!
I have plans for most of the fabric, but not all. Considering all of the enabling going on, I feel like I stayed fairly strong and curbed the majority of my fabric-acquisition impulses.

And then last night...

my new hairdo
I got a new 'do! It's pretty different for me-- but I'm diggin' the purple. Fun!

Hope y'all have some happy and crafty weekends!

Tuesday, May 31, 2011

Style Stitches Monthly Bag Challenge: Perfectly Pleated Clutch

Style Stitches Monthly Bag Challenge
I can't believe it is already the 31st. What happened to May??? My goodness.

This month's bag in the Amy Butler's Style Stitches challenge was the Perfectly Pleated Clutch. The book includes three size options for this design; I decided to go with the medium.

The instructions call for 1-7/8 yard of fabric for the medium clutch. From that, there are only 2 pieces to cut, each 9" x 64". This would result in a lot of leftover fabric. So I decided to go ahead and piece mine since I figured I could hide the seam in the pleats. From 1 yard of fabric, I cut four pieces 9" x 36" and then pieced them together to create two pieces, each 9" x 72". Then I pleated... and pleated... and pleated some more.

pleating in progress
There were many pleats.

Here you can see my 72" piece of fabric pleated to measure close to 16" (the width of the pattern piece). And there's that seam-- but it is completely invisible on the front side.

Pefectly Pleated Clutch, pleats in progress
I pleated the heck out of it! I didn't measure my pleats (in fact, the book even suggests varying the pleat widths)-- but I did as suggested and made them small, between 1/4" and 5/8". Now, I've read a number of people say that the amount of fabric is excessive, that you don't need that much to get the cool pleated look. That may be true. But I'm really glad I did it as instructed because not only does it look super cool, but it also really helped to create a very sturdy exterior. Fewer or wider pleats would likely result in a wibbly-wobbly bag and would definitely warrant extra structural support.

In addition to piecing my fabric, I made a couple of other changes in my bag.

Perfectly Pleated Clutch, view of lining
One was to add an interior zipper pocket. For that I used the same technique as described in the Jenna Lou Designs Mabel Messenger bag pattern (which I made last year)-- very easy!

Perfectly Pleated Clutch, zipper view
I also decided to try a different zipper technique for the bag closure. This design offers the same method as was used in the Origami Bag Set, and I was not thrilled with the results. This time I tried a technique shared by Noodlehead in her gathered clutch tutorial that uses tabs to close off the ends of the zipper. My measurements were a little off, so I ended up sewing over most of my tabs-- but you can see the contrasting orange peeking out at either end in the picture above. Even though I haven't mastered the technique, it was definitely an improvement over the Style Stitches method and creates a much nicer finish. With practice (and better measurements), I'm certain it will be a winner.

Perfectly Pleated Clutch, front view
Lastly, I used a tutorial I found over at Alphamom to create the fabric flower that I pinned to the front. Super quick and easy and I love the way it looks. It adds that little extra somethin', I think.

Perfectly Pleated Clutch, back view
I'll be honest here: I'm not a clutch kinda gal. I love me a good shoulder bag. But after finishing this one, my tune has changed. This bag is great: fun design, the perfect size for just tossing in a couple of things and going, and I love that it has a little handle. I'm also diggin' the pretty orange print I used. It is so happy! So much so that I think I'm going to gift it to the friend who inspired me to buy it. Hopefully she'll love it too!

Of course, this means I have to make another one for me. LOL! I'll just add that to the list.

Friday, May 27, 2011

This week in the quilt mines...

My husband calls my sewing room the "quilt mines" (*crack!*) <-- sound of cracking whip. Ha! Anyway, Little Bear is finally starting to sleep through the night. Huzzah! The only downside is that he now wakes up at 6 am, so my late night crafting has really slowed down (I'm just too sleepy!). But I do have some projects moving along, slowly but surely.

Some handwork:

embroidery in progress
Embroidery complete! Now I need to work on getting all of my sashing sewn for my Whimsy quilt.

Some machine work:

pleating in progress
I've started on my next Amy Butler project for the Style Stitches Monthly Bag Challenge: the Perfectly Pleated Clutch. I've decided that pleating is definitely NOT my favorite thing to do. But boy, does it look cool!

And another bucket hat:

Sarah's hat, outer and reverse views
This one is for baby Sarah. Her mama made a super cute crocheted hat for Little Bear. I had to reciprocate. Once again, I used the ever-fabulous Betz White Reversible Bucket Hat pattern. I added a little ric-rac trim to the brim just for a little extra cuteness.

It is too small to fit my boys, so here it is on another bear:

hat on bear
Hopefully, I'll get to spend some more time in the quilt mines over the weekend. *crack!*