A few years ago, I made an Amy Butler High Street Messenger bag for my sister-in-law for Christmas (it was pre-blogging, but I posted a review of it on PatternReview.com). Since that time, my husband has not-so-subtly hinted that he would love to have a bag like that for himself. I finally managed to get it done and gave it to him for Christmas.
The exterior is a navy blue twill. The lining is a quilting weight cotton with a fun circuit board print. The pattern calls for home dec weight fabric for both the exterior and the lining. Since I chose a quilting cotton for the lining, I went ahead and used Pellon SF101 interfacing on every lining piece to provide a little more heft. I also (as per the instructions) used a canvas interlining for the entire exterior. I opted for the velcro closure since my husband is likely to haul about some electronic devices.
In an attempt to break up all of the plain navy, I did all of the topstitching in a light blue-grey thread. I kind of wish I had opted for a heavier duty thread so it would be even more pronounced, but my machine is sometimes persnickety about heavier threads and I just didn't want to fight. One thing to note about the design of this this bag is that the strap is NOT adjustable. Which isn't necessarily bad, but when trying to make it with no way to fit to the person for whom it is intended... it is kind of a crap shoot. In this case, I left it at the full cut length of the pattern, and it works perfectly on my husband. If it were for me, I would have needed to shorten it by a few inches.
This bag is a great size (15" tall, 12.5" wide, 3.5" deep) and includes 3 large zipper pockets. One on the exterior back, one on the inside flap, and one in the interior hanging tool pocket. I'm not sure why I always decide to follow Amy Butler zipper instructions, considering all of the negative experiences I've had with them, but I did it here too. As it turns out, the zipper instructions for this bag are relatively easy to follow. However, I am not a fan of the finished look.
In the method used, the ends of the zipper tape (both above and below the zipper stops) are left visible, and there is a tiny opening left (really, really tiny-- nothing would ever be likely to escape it is so small, but knowing it is there kind of just bothers me). Pictured above is the inside flap zipper so you hopefully can see what I'm trying to describe. Should I make this bag again, I will definitely start with a longer-than-12" zip, trim to size, and use end tabs to make sure the zipper tape is covered and no holes remain. I feel kind of silly though because in my pattern review when I made this for the first time, I noted that I used longer zippers to avoid this very issue. Duh. Clearly, I should have read my own review before making it again!
I just love this lining print! With the flap open, you can get a good look at the nice open pockets on the front. I think they look snazzy, and seem like a nice easy spot to stash small things when you don't want to have to dig in the depths of the bag.
One interesting feature of this bag is the hanging tool pouch. It hangs down on the inside of the bag from the top of the front inside edge. It has a nice zipper pocket and a nice sized open pocket (perfect for a smart phone or even a portable gaming device) and some pen slots. The fact that it can be lifted out allows for easier access to the zipper pouch-- very practical!
A couple of notes about the pattern:
The instructions are very detailed. But they are a little frustrating as they refer to pieces by number in the cutting instructions, but then by name everywhere else-- which wouldn't be so bad except that all of the names sound very similar, and there are lots of pieces to keep track of. Painter's tape or sticky notes are definitely helpful for keeping track of what's what. Also of note: all of the pieces are square/rectangular. I found it easiest to measure the pattern and then rotary cut everything, rather than tracing and laying them out as per the instructions.
He was thrilled when he received the bag. And it suits him really well, both in style and fit. Yay!!!
Showing posts with label 2012 finishes. Show all posts
Thursday, January 3, 2013
Tuesday, January 1, 2013
Welcome, 2013!!!
Whew! That sure went by fast. I still can't believe that it is already a new year and 2012 is officially in the past. Wow!
Frankly, I wasn't even going to write this post, but then I went and looked back at my 2012 goals and was shocked to find that I actually followed through on them. While I had a good year overall, it did not feel like a great crafting year. There were many dry spells and not much blogging as a result. I made some great stuff though!
Looking at that collage really makes me smile. I may not have been crazy-productive, but I made some things I am really proud of!
Here were my goals for 2012:
Here's to a crafty and fabulous 2013!
Frankly, I wasn't even going to write this post, but then I went and looked back at my 2012 goals and was shocked to find that I actually followed through on them. While I had a good year overall, it did not feel like a great crafting year. There were many dry spells and not much blogging as a result. I made some great stuff though!
Looking at that collage really makes me smile. I may not have been crazy-productive, but I made some things I am really proud of!
Here were my goals for 2012:
- Use more fabric than I buy.-- This is a biggie. I list this as a goal every year, and it usually falls by the wayside. But NOT THIS YEAR!
Fabric In: 74.681
That's right-- I used more than I bought!!!! Woo!
Fabric Used: 81.826
- Get my Jane Stickle quilt basted and start quilting it!-- Basted, check! As for quilting, I have managed to quilt two blocks so far. Not much, but it is a start.
- Complete the Amy Butler Style Stitches challenge.-- Alas, this one was a no go. While I definitely want to complete one of those bags (I have the fabric for it and everything), I just wasn't in the mood for bags most of this year. I did just finish a different Amy Butler bag though-- a Christmas present for my husband! I'll share pictures soon.
- Finish some UFOs-- I specifically listed Hop to It (began 2011), Playtime (began 2008), and my wedding quilt (began 2002). I finished the Playtime quilt top (woo!) and now it is waiting for quilting. Hop to It and my wedding quilt are DONE! Another UFO I managed to finish was the Paintbox Quiltalong (began 2010). So I'm feeling like 2012 was a pretty good year for UFO completion for me!
- Keep exercising!-- Woo! I'm still going! I completed two half-marathons in the last 4 months, and have started to regularly work on my strength and core-training by going to boot camp twice a week. I haven't lost much weight this year (only about 10 pounds), but my body has changed a LOT-- I can see that my hard work is paying off, even if the scale isn't showing it (yet!).
- Use more fabric than I buy.-- I made it this year, but it was close. I need to really make an effort to buy what I need (as opposed to stash-building) and work to use what I already have.
- Finish at least 2 UFOs.-- Carrie P. over at A Passion for Applique has declared 2013 to be the year of the UFO. Now she is super hard core and is focusing her efforts on all UFOs, all the time. I know that is beyond me. I need fresh projects every so often to keep me motivated. So it won't be "Nothing but UFOs in 2013" for me. But, I'd really like to move some of my unquilted tops out of the closet and finish a couple tops that have been languishing. I think the top two need-to-be-quilted on my list are my Bargello Reflections top (unblogged) and my recent Mystery Quilt top. The top two on my wanna-finish-that-top list are my Greepiece project and my most recent block exchange. But really, whatever I can get done will be a good thing. I might even pick a couple of months to play along with everyone participating in Carrie's challenge-- I'll need all the motivation I can get!
- Sew more clothes for me!-- I had some great sewing successes last year, and I want to keep the ball rolling. One project I know I want to do is a coat or jacket. It will definitely stretch my skills, but I think if I can focus myself to get it done right, it would be so worth it.
- More handwork.-- I miss my handwork! I have really lost focus on this aspect of my sewing life, and I want to make an effort to bring it back in. I have a number of projects I can work on (including Harrington and Hannah and quilting my Jane Stickle) and (hopefully) I'll be doing lots of binding this year too to finish those UFOs I'll be quilting up!.
- Lose that last 15 pounds.-- On one level, I realize that this magic number I've set for myself is arbitrary and meaningless. But on another level, it is a goal, and I want to see what my body is like at that goal. I want to be healthier and weight is a part of that. I've been working hard, the key now is to keep doing that and work to get the whole food thing in balance. That is tough. I really (really) like food. But I can do this!
Here's to a crafty and fabulous 2013!
Thursday, December 27, 2012
Wristlet gifts
Happy Holidays!!! I hope you and yours have had a wonderful holiday season. Our house has been full of fun and joy. My boys were definitely into Christmas this year. It was awesome!
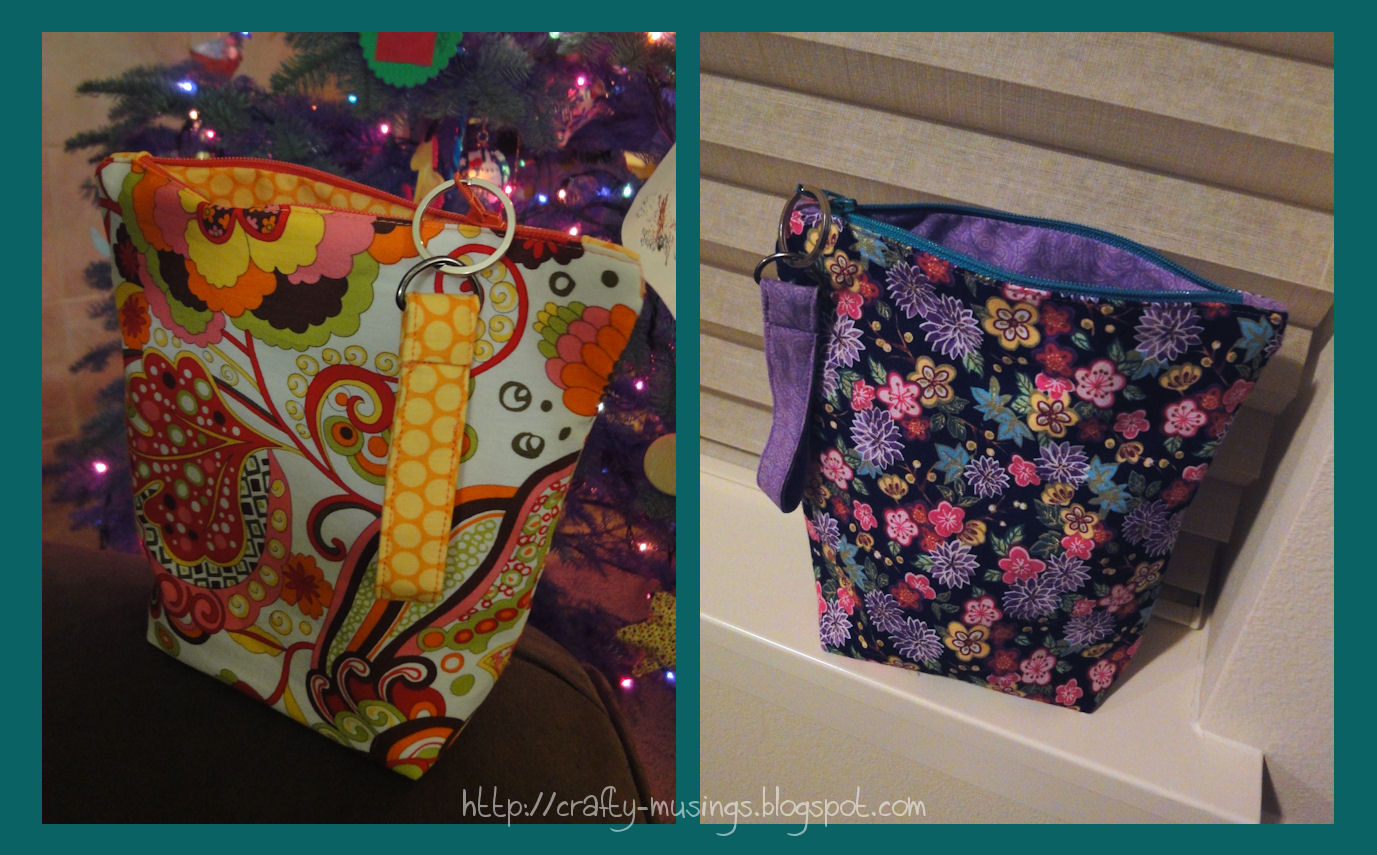
This year, I went pretty light on the crafty gifts. I did make a few things, however, including these cute wristlets:
I used the "Perfect Zip Bags" pattern from Elizabeth Hartman of Oh, Fransson! and made style "C"-- the version that can stand upright.
Well-illustrated with clear, concise directions, the instructions were great. My only quibble is that they involve a bit of navigation. If you go to the page where the "C" style bag instructions begin, it only gives you cutting instructions for the bag itself and informs you to go back and figure out what other pieces you need to cut based on style choices you can make (e.g., zipper, style of handle). So before I started, I made a list of the pieces I needed to cut. Just that little bit of pre-planning definitely made the process go more smoothly. But still, the flipping back and forth took a little bit of extra patience.
I especially appreciated the detailed zipper instructions. Insertion worked like a charm! Yay!
Then, of course, I filled them with goodies:
Those worked out so well, that I went ahead and made a couple more. This time though, I chose to skip the patchwork element and just go with one fabric for the exterior (time was of the essence at this point!).
Making these is kind of addictive! I'm sure I'll find more reasons to make some soon.
This year, I went pretty light on the crafty gifts. I did make a few things, however, including these cute wristlets:
I used the "Perfect Zip Bags" pattern from Elizabeth Hartman of Oh, Fransson! and made style "C"-- the version that can stand upright.
Well-illustrated with clear, concise directions, the instructions were great. My only quibble is that they involve a bit of navigation. If you go to the page where the "C" style bag instructions begin, it only gives you cutting instructions for the bag itself and informs you to go back and figure out what other pieces you need to cut based on style choices you can make (e.g., zipper, style of handle). So before I started, I made a list of the pieces I needed to cut. Just that little bit of pre-planning definitely made the process go more smoothly. But still, the flipping back and forth took a little bit of extra patience.
I especially appreciated the detailed zipper instructions. Insertion worked like a charm! Yay!
Then, of course, I filled them with goodies:
Those worked out so well, that I went ahead and made a couple more. This time though, I chose to skip the patchwork element and just go with one fabric for the exterior (time was of the essence at this point!).
Making these is kind of addictive! I'm sure I'll find more reasons to make some soon.
Saturday, December 15, 2012
Simplicity 3754
And here is the third project for me:
This is Simplicity 3754, view F (the shortest). It is actually the second time I've made this pattern (last time, I did view E). Back when I made the previous version, I said I wanted one in corduroy. Now I have it!
The striped corduroy was initially purchased a couple of years ago to make a pair of pants for Little Bear. But the fabric just kept calling to me-- I just love these colors! Unfortunately, I only had about 7/8 yard. So I had to do a bit of Franken-skirting.
I cut the waist/yoke from a solid brown corduroy-- technically, it doesn't really "match" since that color of brown is nowhere in the main fabric. But it seems to work okay nonetheless. But I didn't have enough of that to do the yoke facings, so I found a quilting cotton in my stash that matched pretty closely. And then the pocket facings are made of yet another quilting cotton. It is a motley skirt, for sure!
This time around I made a size 16. After reviewing my notes from last time, I decided to omit the binding along the top edge of the pocket. But, I forgot to add a little to the top to make up for the seam allowance I had to take, so I feel like the pockets sit a little lower than I'd like. But, I think they look okay still. The only other change I made was I used some hem tape. The skirt is so short, I didn't want to take a full 1-1/4" hem. Using the tape allowed me to turn up less fabric, putting the skirt at a length that works for me. It is the first time I've tried applying hem tape, so I found a tutorial and just went for it. It is definitely not perfect, but it accomplished what I wanted and the hem is extra pretty on the inside. Yay!
After three successful projects for me in a row, I'm feeling really motivated to make some more! But, the holidays are upon us, and I do have a couple of projects I want to complete before Christmas. Hopefully, I'll be able to get to some more sewing for me in the New Year.
This is Simplicity 3754, view F (the shortest). It is actually the second time I've made this pattern (last time, I did view E). Back when I made the previous version, I said I wanted one in corduroy. Now I have it!
The striped corduroy was initially purchased a couple of years ago to make a pair of pants for Little Bear. But the fabric just kept calling to me-- I just love these colors! Unfortunately, I only had about 7/8 yard. So I had to do a bit of Franken-skirting.
I cut the waist/yoke from a solid brown corduroy-- technically, it doesn't really "match" since that color of brown is nowhere in the main fabric. But it seems to work okay nonetheless. But I didn't have enough of that to do the yoke facings, so I found a quilting cotton in my stash that matched pretty closely. And then the pocket facings are made of yet another quilting cotton. It is a motley skirt, for sure!
This time around I made a size 16. After reviewing my notes from last time, I decided to omit the binding along the top edge of the pocket. But, I forgot to add a little to the top to make up for the seam allowance I had to take, so I feel like the pockets sit a little lower than I'd like. But, I think they look okay still. The only other change I made was I used some hem tape. The skirt is so short, I didn't want to take a full 1-1/4" hem. Using the tape allowed me to turn up less fabric, putting the skirt at a length that works for me. It is the first time I've tried applying hem tape, so I found a tutorial and just went for it. It is definitely not perfect, but it accomplished what I wanted and the hem is extra pretty on the inside. Yay!
After three successful projects for me in a row, I'm feeling really motivated to make some more! But, the holidays are upon us, and I do have a couple of projects I want to complete before Christmas. Hopefully, I'll be able to get to some more sewing for me in the New Year.
Wednesday, December 5, 2012
Kwik Sew 3765
I've been wanting a simple, black pencil skirt for quite some time. It's one of those things that I see in stores all the time, but think to myself, "I should make that." Finally, I did! Kwik Sew 3765 is the second of three projects-for-me that I've been working on. The description: "Straight pull-on skirts in three length have side seams, center back, seam, and elastic in casing at waist."
I made view C (the shortest one) in a size M. The fabric is a black double-knit from Hancock Fabrics that I've had in my stash since 2007 (bought at the same time as the fabric I used in my recently-completed dress!). It is truly a wonderful weight and hangs beautifully. I referenced More Fabric Savvy by Sandra Betzina, and decided on a 75/11 Stretch needle; it worked perfectly.
No alterations were necessary for this one. The one change I made was to do a 1/2" seam instead of 5/8" for the center back seam. I decided on a blind hem for the skirt. While it is not the first time I have done a blind hem on my machine (I used it awhile back to make some curtains), it is the first time I've used it on something I intend to wear. I think it turned out pretty well, and love the clean finish at the hem.
It is a great basic wardrobe piece that can be dressed up or down (as I've attempted to show in the pictures above... it is magical what a belt and high heels can do to change it up!). It is a big bonus that it is comfy, stretchy, and soft. The design is super simple (I'm sure I probably could have found a tutorial that would have led me to the same result, but I do like the security and confidence a pattern gives me), but it is exactly what I was wanting. And now I want more skirts like this!
I made view C (the shortest one) in a size M. The fabric is a black double-knit from Hancock Fabrics that I've had in my stash since 2007 (bought at the same time as the fabric I used in my recently-completed dress!). It is truly a wonderful weight and hangs beautifully. I referenced More Fabric Savvy by Sandra Betzina, and decided on a 75/11 Stretch needle; it worked perfectly.
No alterations were necessary for this one. The one change I made was to do a 1/2" seam instead of 5/8" for the center back seam. I decided on a blind hem for the skirt. While it is not the first time I have done a blind hem on my machine (I used it awhile back to make some curtains), it is the first time I've used it on something I intend to wear. I think it turned out pretty well, and love the clean finish at the hem.
It is a great basic wardrobe piece that can be dressed up or down (as I've attempted to show in the pictures above... it is magical what a belt and high heels can do to change it up!). It is a big bonus that it is comfy, stretchy, and soft. The design is super simple (I'm sure I probably could have found a tutorial that would have led me to the same result, but I do like the security and confidence a pattern gives me), but it is exactly what I was wanting. And now I want more skirts like this!
Monday, December 3, 2012
McCall's 6612
I've been wanting to do some sewing for myself for quite some time, but more pressing projects always seem to get in the way. So, once I got the wedding quilt basted, the mystery quilt top completed (pictures coming soon), and my sewing area picked up some, I decided to take the plunge and do some cutting.
This dress is the first of three projects I cut. It is McCall's 6612. I made View B, but shortened it to View A's length. I cut a size 16 with no alterations.
The fabric is from my stash, a super-stretchy textured knit that I bought from Hancock Fabrics back in 2007. The picture above shows the front neckline and is the best representation I could get of the actual colors in the fabric-- pretty burgundy, taupe, and black.
I probably should have done a full-bust adjustment (FBA), but the knit was so stretchy, I decided to take the lazy way and go without. It looks fine, but I wish maybe it didn't pull quite so much across the front.
The knit was textured on one side and smooth/slinky-ish on the back. After referencing the book More Fabric Savvy by sewing guru Sandra Betzina, I decided on a size 75/11 Stretch needle and a Teflon foot. No skipped stitches! Yay!
I made a couple of deviations from the pattern instructions. The first was to add the step of stabilizing the shoulder seams and back neck edge with clear elastic (I used a tip from PatternReview as my guide, "Using Clear Elastic to Stabilize Necklines"). The second deviation was to avoid sewing a set-in sleeve by sewing everything in the flat-- I attached the top of the sleeve to the body and then sewed one long seam from the bottom hem all the way to the sleeve hem. Much simpler!
The one other minor change I made was in using a 3/4" seam allowance for most of the sleeve, because of a little cutting mishap that left a notch a little too close to the 5/8" seamline for my comfort. But I tapered back in to a 5/8" seam a couple of inches before the underarm seam.
Overall, I'm thrilled with this dress. I already have plans to wear it for a couple of holiday events, and I can even see myself making another one in the future. Success!
Wednesday, November 14, 2012
A festive pincushion!
I made myself another happy pincushion. Yay! This is another kit I received in the Shabby Fabrics Pincushion Club last year. It is one of their exclusive designs and is called the "Christmas Tree Pincushion."
It is a biggie! At the base it is about 6" wide and it stands 10" tall. As it is filled with crushed walnuts, it is pretty darn heavy too. Essentially, it is made of a series of stacked, stuffed yo-yos. It is put together nearly entirely by hand (the exception being the stitching on the star topper-- I did that on my machine). All of the fabrics were included in the kit, as well as the happy colored pearl-topped pins. I love those! Unfortunately, I don't see either the pattern or the kit available at Shabby Fabrics at this point. It might have even been a pincushion club exclusive kit. But, if you are interested, you could always contact Shabby Fabrics and ask (they are really friendly there!).
My only challenge in putting this one together was in cinching my yo-yos closed... I kept breaking my thread. Gah! Eventually, I figured the whole tension thing out though. And now I have a happy tree pincushion, just in time for the holiday season. Woo!
It is a biggie! At the base it is about 6" wide and it stands 10" tall. As it is filled with crushed walnuts, it is pretty darn heavy too. Essentially, it is made of a series of stacked, stuffed yo-yos. It is put together nearly entirely by hand (the exception being the stitching on the star topper-- I did that on my machine). All of the fabrics were included in the kit, as well as the happy colored pearl-topped pins. I love those! Unfortunately, I don't see either the pattern or the kit available at Shabby Fabrics at this point. It might have even been a pincushion club exclusive kit. But, if you are interested, you could always contact Shabby Fabrics and ask (they are really friendly there!).
My only challenge in putting this one together was in cinching my yo-yos closed... I kept breaking my thread. Gah! Eventually, I figured the whole tension thing out though. And now I have a happy tree pincushion, just in time for the holiday season. Woo!
Wednesday, November 7, 2012
Finished: Paintbox Quilt Along!
After finishing up my wedding quilt, I was feeling motivated. So I grabbed my basted Paintbox Quilt Along sandwich, and got to work. And now I have another UFO complete. Woo!
The pattern is from Elizabeth Hartman of Oh, Fransson! She hosted a quilt along in 2010 for her Paintbox Quilt design.
I made quick work of the quilting by doing a simple, all-over stipple using King Tut thread in White Linen (#971). I am thrilled with how it looks, especially after washing it!
For the binding, I used Kona cotton in Navy from my stash.
I didn't do the fancy back suggested by the quilt along on this one. Instead, I used this happy blue-striped stars fabric from Sandy Gervais. It worked perfectly, as the front was completed using one of her collections (a layer cake of her Zippety Doo Dah line from Moda).
When I started this quilt, I was planning on giving it to my guild for donation to one of our chosen charities, so I did not include a label, as per guidelines. It feels weird to finish a quilt and not have a label! But there are some good reasons for keeping it anonymous, so I can respect that.
Last Thursday I gave the quilt to our Charity Committee at the monthly guild meeting. Hopefully it will end up in a happy new home!
The pattern is from Elizabeth Hartman of Oh, Fransson! She hosted a quilt along in 2010 for her Paintbox Quilt design.
I made quick work of the quilting by doing a simple, all-over stipple using King Tut thread in White Linen (#971). I am thrilled with how it looks, especially after washing it!
For the binding, I used Kona cotton in Navy from my stash.
I didn't do the fancy back suggested by the quilt along on this one. Instead, I used this happy blue-striped stars fabric from Sandy Gervais. It worked perfectly, as the front was completed using one of her collections (a layer cake of her Zippety Doo Dah line from Moda).
When I started this quilt, I was planning on giving it to my guild for donation to one of our chosen charities, so I did not include a label, as per guidelines. It feels weird to finish a quilt and not have a label! But there are some good reasons for keeping it anonymous, so I can respect that.
Last Thursday I gave the quilt to our Charity Committee at the monthly guild meeting. Hopefully it will end up in a happy new home!
Wednesday, October 31, 2012
Halloween 2012
This year, both bears had opinions about what they wanted to be for Halloween.
Little Bear finally decided on a "scary dinosaur." As we happened to have a dragon costume on hand (in the right size, even!), and I didn't want to re-invent the wheel, we have Dragon 2.0 -- aka Scary Dinosaur!
Dinosaur ROAR!!!
Hopefully, I'll manage to get some better pictures of Little Bear as Scary Dinosaur today.
Meanwhile, Big Bear decided he wanted to be Perry the Platypus. I got to break out the sewing machine for this one!
I used Kwik Sew 2711 for the main suit, and then drafted my own tail, bill, and feet. I made a size Small, and shortened the legs by 1". The eyes are from Simplicity 3594 (the frog prince view). Because I had made the pattern before (Blue Kitty!), the main part went together both smoothly and quickly. The other parts took some time to figure out, but once I had a plan, they went together quickly (except for the tail... the quilting took a bit of time!).
Here he is with the actual Perry. I'm still a little amazed I was able to find the perfect color of fleece. Best of all, Big Bear LOVES it. Yay!!!
Tonight, we trick or treat! Woo!
Happy Halloween!
Little Bear finally decided on a "scary dinosaur." As we happened to have a dragon costume on hand (in the right size, even!), and I didn't want to re-invent the wheel, we have Dragon 2.0 -- aka Scary Dinosaur!
Dinosaur ROAR!!!
Hopefully, I'll manage to get some better pictures of Little Bear as Scary Dinosaur today.
Meanwhile, Big Bear decided he wanted to be Perry the Platypus. I got to break out the sewing machine for this one!
I used Kwik Sew 2711 for the main suit, and then drafted my own tail, bill, and feet. I made a size Small, and shortened the legs by 1". The eyes are from Simplicity 3594 (the frog prince view). Because I had made the pattern before (Blue Kitty!), the main part went together both smoothly and quickly. The other parts took some time to figure out, but once I had a plan, they went together quickly (except for the tail... the quilting took a bit of time!).
Here he is with the actual Perry. I'm still a little amazed I was able to find the perfect color of fleece. Best of all, Big Bear LOVES it. Yay!!!
Tonight, we trick or treat! Woo!
Happy Halloween!
Labels:
2012 finishes,
Big Bear,
costume,
family,
Halloween,
KS2711,
Little Bear,
sewing
Friday, October 26, 2012
Blogger's Quilt Festival -- Fall 2012
October 26th is a special day at my house. It is the day my husband and I were married-- and this year marks our 10th anniversary! At our wedding, instead of a guest book, we had guest blocks-- blank quilt blocks for our guests to write any well-wishes (or whatever else) they had for us. At left is a picture of our "block signing station" at the wedding.
After the wedding, I designed a quilt to feature those blocks. I even started the quilt. But then, for whatever reason (I can't even remember why), the project got set aside... Until now! I finished our wedding quilt just in time for our anniversary. Woo!
I created the design using Electric Quilt and then I went out and shopped for fabrics. That beautiful leafy print just called to me, and I pulled all of the other colors from that.
The compass was created using paper foundation piecing. Setting it onto the background was one of my early attempts at hand applique. I try not to look too closely at the stitching. Ha! But I am pleased with the quilting. It isn't perfect, but I think it manages to add to the look of the compass in a positive way.
I drew the pieced border onto freezer paper and then cut it apart to create paper templates. The templates were used to cut the fabric, and then I pieced it all together.
I love the little fans in the corners! I was seriously stressed out about those corners and what to do with them. Eventually I stumbled into the fan idea, and I'm so glad I did. They make me happy.
Here is a view of the same corner from the back where the quilting is much more visible. Overall, I'm really proud of my quilting on this project! I used Hobbs Tuscany Wool batting for this quilt. I was actually really worried that it might result in the quilt being too poofy looking. But I'm glad I went for it. It is not too poofy, and it forced me to quilt more than I otherwise would have as the wool batting has denser quilting requirements than I'm used to. It really made me think about the type of quilting I wanted to do and how to deal with every space on the quilt.
The woodsy print in the center of the back was purchased when we went on our honeymoon to Maine. When I bought it I knew I wanted to use it on the back of this quilt. So even the back of this quilt has special memories attached to it.
I vaguely recall creating the embroidery design back when I first got my sewing/embroidery machine. I think my intention was to use it in a block on the front. But, coming back to the project many years later, I couldn't figure out a way to make it work. So I put it on the back with the label.
I am so glad that I finally finished this! Just picking up the project again, reading all of the wonderful words our friends and family wrote for us... it is a very special quilt, and it truly reminds me how blessed my husband and I are and I am so excited to continue our journey together!
Not only did I complete this quilt in time for my anniversary, I am thrilled that I've finished it in time to share in the Fall 2012 Blogger's Quilt Festival hosted by Amy's Creative Side.
Here are some stats for my quilt:
Finished size: 53" x 53"
Pieced and Quilted by: Robin Zaback (me!)
Best Categories: Home Machine Quilted Quilt; Wall Hanging
Thanks so much for stopping by and I hope you enjoy your Blogger's Quilt Festival adventures! So many beautiful quilts; so much fabulous inspiration!!!
Subscribe to:
Posts (Atom)