It's taken a few years, but I've finally gotten around to making a Betz White Reversible Bucket Hat for me! Not only that, but I even made one for my husband and a new one for Little Bear.
After measuring our noggins, I made a Small for Little Bear, Large for me, and X-Large for my husband. The sizing in this pattern is spot-on. Each of us got a great fit.
Motivation for hat-making came in the form of a family kayaking adventure. We signed up for a tour and in the instructions, it suggested that participants have hats to protect from the sun in the open water. Since Big Bear was the only one with a hat that fit, I got to work on hats for the rest of us.
And now the whole fam is rockin' the bucket hat!
We got a lot of use out of these hats this summer after our kayaking tour. They came in handy for trips to the beach, visits to the zoo, and on many hikes. The unstructured nature of this design makes it perfect for shoving in a bag or backpack. Now I'm thinking I may need to get some water-repellent fabric so I can make some rain hats!
Showing posts with label family. Show all posts
Showing posts with label family. Show all posts
Monday, September 7, 2015
Saturday, April 20, 2013
Spring Break!
This year, Spring Break for the bears was April 15-19. Unfortunately, my husband and I spent most of the week being sick. Ugh. But, the boys and I did get out a little bit:
And this is one of the good pics! Ha! We had a fun time at the Skagit Valley Tulip Festival one day this week.
Truly, the tulip fields are just spectacular!
Yesterday and today, I finally felt good enough to do a little bit of crafting. So I spent some time catching up on my Spring Mystery Quilt clues.
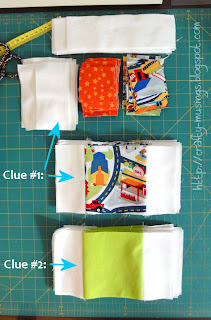
Here are Clues 1 and 2 completed. I ended up adding the bright green in when I realized that Clue 2 would have resulted in a big block o' white for me in my initial fabric selections. But this works out on another level as well, since I didn't actually have enough white to cut those center squares. So, I'm making it work. Woo!
I also managed to bind about 2/3 of one side of the wedding quilt. Not much, but it is at least a start! Hopefully, I'll start getting some energy back so I can stay up past 8 and actually sit and work on it soon.
Friday, February 1, 2013
Volcano Party!
Last weekend was the big event: Big Bear's 6th birthday party!!! He had a great time with family and friends.
The hit of the party was the lava rock toss into the paper mache volcano we created:
Seeing Little Bear attempting to get his lava rock out of the volcano kind of gives you a sense of scale. It was a fair-sized mountain!
I made some special bean bag "lava rocks" to toss. I just used some rock and lava-looking fabrics from my stash. Some were traditional square shapes, others were more irregular (rock-like!). They are filled with a mix of poly-fil and dry red beans.
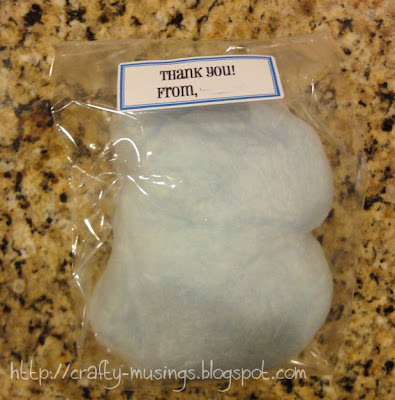
For prizes/favors, I ordered some custom-created cotton candy through etsy seller, Sweetopia. She was even able to color it grey-- to mimic volcanic ash! It was awesome!
And of course, there was a volcano cake. I took inspiration from a tutorial I found for making an erupting volcano cake and used a bundt pan and a bowl to create the cake stack. Since I knew we wanted it to be sturdy (as opposed to spongy), I used a recipe for Vanilla Bean Bundt Cake that was nice and dense (though it was also a little on the dry side; still tasty though!). We used a glass to cut out the center of the bowl cake and then stuck it down the hole through both layers, just as in the tutorial. Then we used some dry ice to create a foggy/eruption-effect. It was actually pretty darn cool in person. Big Bear loved it!!!
Happy Birthday, Big Bear!!!
Saturday, January 26, 2013
Making of a volcano - Days 2-5
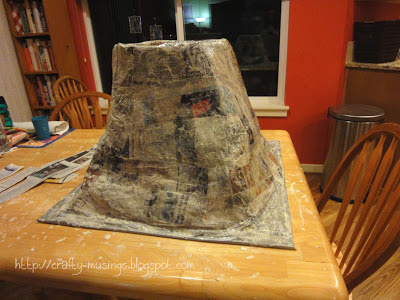
And then the great volcano sat. Dormant... waiting for its time to erupt! (In other words, lots of waiting around while the giant mountain dried.)
Day 2:
Definitely drying on the outside, but the inside was clearly still on the very wet side. Big Bear worked the blow dryer to help it along.
Day 3:
Hmmm... dry on the outside, but still way too wet on the inside.
My husband decided to try drilling some holes on the sides of the bucket to see if allowing more airflow to the inside would help. There was some blow dryer action after the holes were drilled as well.
Day 4:
The venting holes worked! The inside was definitely drying out. Yay!!!
Day 5:
Dry!!! Time to prime...
...and paint!
Ready toerupt party!
Day 2:
Definitely drying on the outside, but the inside was clearly still on the very wet side. Big Bear worked the blow dryer to help it along.
Day 3:
Hmmm... dry on the outside, but still way too wet on the inside.
My husband decided to try drilling some holes on the sides of the bucket to see if allowing more airflow to the inside would help. There was some blow dryer action after the holes were drilled as well.
Day 4:
The venting holes worked! The inside was definitely drying out. Yay!!!
Day 5:
Dry!!! Time to prime...
...and paint!
Ready to
Tuesday, January 22, 2013
Making of a volcano - Day 1
Big Bear is coming up on his 6th birthday this week, and we are getting ready to party! We're branching out from just family this year and are inviting some of his friends, so we're trying to plan a couple of games/activities for them to do together. The theme is: Volcano! One idea I thought of for an activity was a "lava rock" toss into a "volcano." So our first step is to make a volcano. We decided to try paper mache. It's not something either my husband or I have any experience in, so I thought it might be fun to document our adventure. Here's hoping it is successful, too!
We made a family trip to Home Depot yesterday for the main supplies: a big bucket, duct tape, a piece of plywood for the base, chicken wire, and bolts/nuts/washers. Then I made a trip to the grocery store to get some newspapers and flour.
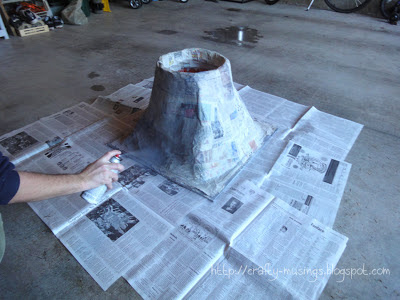
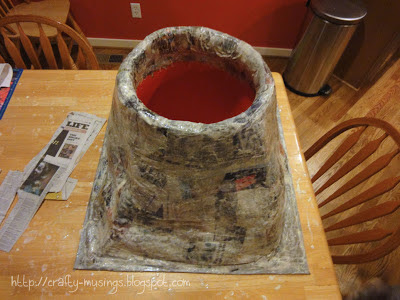
My husband started by drilling two holes into the plywood and the bottom of the bucket. Then we secured the bucket to the plywood using the bolts/nuts/washers. Next we used chicken wire to build a sort of cage around the bucket.
Duct tape was used to cover the edges of the board and the inside of the bucket where the chicken wire ended-- to cover up all the pointy edges.
As we worked, my husband tried to shape the chicken wire and create some contours. I used a staple gun to help secure the wire to the base as well.
Then came the fun part: paper mache!
Using the recipe we found at cockeyed.com of 3 cups of water to 2-1/2 cups of flour, we made our goopy paste.
Then we used strips of torn newspaper and got to work.
Paper mache is a seriously messy business.
Big Bear didn't help because he was in bed-- but as he hates getting his hands dirty, I suspect he wouldn't have wanted anything to do with this process anyway. LOL!
After about 2 hours of focused paper mache work, we finally had something resembling a volcano.
Now we're crossing our fingers that it will be dry by Wednesday or Thursday night.
I made some cookies today to help warm up the kitchen and facilitate dry time. (Mmmmm.... chocolate chip!!!)
There may still have to be some blow dryer action involved. Or maybe more cookies.
Wednesday, October 31, 2012
Halloween 2012
This year, both bears had opinions about what they wanted to be for Halloween.
Little Bear finally decided on a "scary dinosaur." As we happened to have a dragon costume on hand (in the right size, even!), and I didn't want to re-invent the wheel, we have Dragon 2.0 -- aka Scary Dinosaur!
Dinosaur ROAR!!!
Hopefully, I'll manage to get some better pictures of Little Bear as Scary Dinosaur today.
Meanwhile, Big Bear decided he wanted to be Perry the Platypus. I got to break out the sewing machine for this one!
I used Kwik Sew 2711 for the main suit, and then drafted my own tail, bill, and feet. I made a size Small, and shortened the legs by 1". The eyes are from Simplicity 3594 (the frog prince view). Because I had made the pattern before (Blue Kitty!), the main part went together both smoothly and quickly. The other parts took some time to figure out, but once I had a plan, they went together quickly (except for the tail... the quilting took a bit of time!).
Here he is with the actual Perry. I'm still a little amazed I was able to find the perfect color of fleece. Best of all, Big Bear LOVES it. Yay!!!
Tonight, we trick or treat! Woo!
Happy Halloween!
Labels:
2012 finishes,
Big Bear,
costume,
family,
Halloween,
KS2711,
Little Bear,
sewing
Friday, October 26, 2012
Blogger's Quilt Festival -- Fall 2012
October 26th is a special day at my house. It is the day my husband and I were married-- and this year marks our 10th anniversary! At our wedding, instead of a guest book, we had guest blocks-- blank quilt blocks for our guests to write any well-wishes (or whatever else) they had for us. At left is a picture of our "block signing station" at the wedding.
After the wedding, I designed a quilt to feature those blocks. I even started the quilt. But then, for whatever reason (I can't even remember why), the project got set aside... Until now! I finished our wedding quilt just in time for our anniversary. Woo!
I created the design using Electric Quilt and then I went out and shopped for fabrics. That beautiful leafy print just called to me, and I pulled all of the other colors from that.
The compass was created using paper foundation piecing. Setting it onto the background was one of my early attempts at hand applique. I try not to look too closely at the stitching. Ha! But I am pleased with the quilting. It isn't perfect, but I think it manages to add to the look of the compass in a positive way.
I drew the pieced border onto freezer paper and then cut it apart to create paper templates. The templates were used to cut the fabric, and then I pieced it all together.
I love the little fans in the corners! I was seriously stressed out about those corners and what to do with them. Eventually I stumbled into the fan idea, and I'm so glad I did. They make me happy.
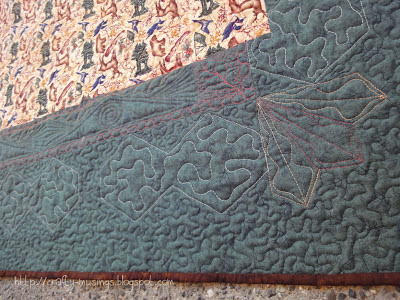
Here is a view of the same corner from the back where the quilting is much more visible. Overall, I'm really proud of my quilting on this project! I used Hobbs Tuscany Wool batting for this quilt. I was actually really worried that it might result in the quilt being too poofy looking. But I'm glad I went for it. It is not too poofy, and it forced me to quilt more than I otherwise would have as the wool batting has denser quilting requirements than I'm used to. It really made me think about the type of quilting I wanted to do and how to deal with every space on the quilt.
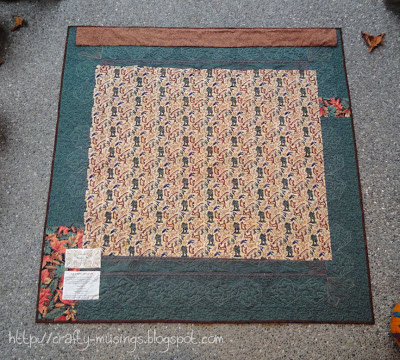
The woodsy print in the center of the back was purchased when we went on our honeymoon to Maine. When I bought it I knew I wanted to use it on the back of this quilt. So even the back of this quilt has special memories attached to it.
I vaguely recall creating the embroidery design back when I first got my sewing/embroidery machine. I think my intention was to use it in a block on the front. But, coming back to the project many years later, I couldn't figure out a way to make it work. So I put it on the back with the label.
I am so glad that I finally finished this! Just picking up the project again, reading all of the wonderful words our friends and family wrote for us... it is a very special quilt, and it truly reminds me how blessed my husband and I are and I am so excited to continue our journey together!
Not only did I complete this quilt in time for my anniversary, I am thrilled that I've finished it in time to share in the Fall 2012 Blogger's Quilt Festival hosted by Amy's Creative Side.
Here are some stats for my quilt:
Finished size: 53" x 53"
Pieced and Quilted by: Robin Zaback (me!)
Best Categories: Home Machine Quilted Quilt; Wall Hanging
Thanks so much for stopping by and I hope you enjoy your Blogger's Quilt Festival adventures! So many beautiful quilts; so much fabulous inspiration!!!
Thursday, October 25, 2012
Clue #3
Lookie here! I managed to complete Clue #3 in the Heather Spence Mystery Quilt. Woo!
I'm thinking they must be borders? Maybe I'll learn more when Clue #4 is revealed on Friday. I'm loving the anticipation!
And a gratuitous boy pic:
We went to the pumpkin patch last weekend. The boys had a great time (it was nice and muddy!). I love this picture of the two of them working together to lift a pumpkin. They weren't able to get it off the ground, but they sure gave a great effort! :)
Wednesday, August 1, 2012
Train painting fun!
Last week, my husband picked up some unpainted wooden train toys. We all worked together to get them ready for playtime.
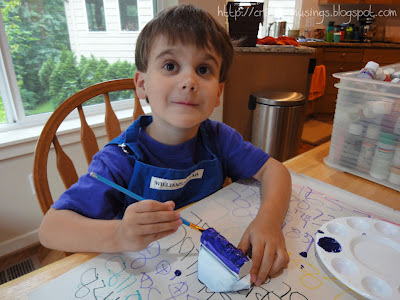
Big Bear decided he wanted an apple-grape juice car, so he started by painting his tanker dark purple.
Little Bear is a chocoholic, so we decided to make his into a chocolate syrup car and he painted his tanker a light brown.
Then Mama and Papa took over and did some detail work. He finished up the apple-grape juice tanker, and I completed the chocolate syrup tanker.
And now there are some very unique tankers being shunted about on the train table as well as a pair of very happy boys.
Saturday, May 5, 2012
Little Bear is TWO!
Last week Little Bear turned two. Crazy! How does it go by so fast? My goodness. We celebrated his special day with a family party. And there was, of course, some crafty goodness involved.
Cupcakes!
Vanilla Bean Cupcakes with Vanilla Bean Frosting to be specific (recipe from How Sweet it Is) decorated with dark chocolate M&Ms (because LB is a budding chocoholic). They tasted amazing! I especially LOVED the frosting. The cupcake itself was a little on the dry side, but had great flavor. Little Bear definitely enjoyed them!
Like mama, he did seem partial to the frosting.
The festivities also included opening lots of presents, including a few made by mama.
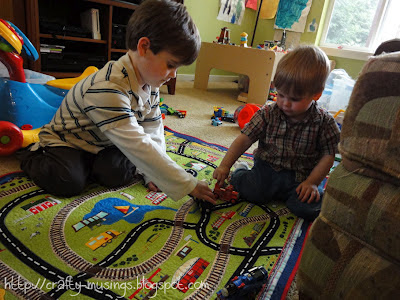
First up was a quilted playmat.
I found this canvas panel when I was on shop hop a few weeks ago. As both Big Bear and Little Bear are fanatics of things that go (particularly cars and trains), I had to pick it up. The panel is a Clothworks design by Richard Neuman called "Choo Choo You."
I spent about four hours quilting it-- lots of stippling and outline stitching. This is the back, so you can maybe get a better idea of the amount of quilting on there. It was a simple project, but not quick. I am really happy with how it turned out, as were the Bears.
They spend part of every day playing on it-- building lego houses, racing cars and trains, and creating elaborate adventure stories. It is so much fun to watch them play!
I also made a flannel pillowcase and a pair of comfy pajama bottoms.
The pajama pants are Kwik Sew 3126 (which I have made before for Big Bear). I shortened them by 1-3/4" and also cut them to allow me to do a contrasting band at the bottom of the legs (I didn't have enough of either fabric to do a full pair, so I adapted it to allow me to use what I had left of each).
Little Bear loves his new comfy pants and they fit perfectly (yay!). Unfortunately, he is not a fan of the pillowcase. Every night when we put him in the crib, the first thing he does is pull the edge of the flannel back to expose the pillow inside. Then he sleeps on the bare pillow. Doh! So, a non-flannel pillowcase for him has been added to the queue. But not to worry, Big Bear is perfectly happy with the flannel one-- so it is definitely getting used!
The day after his birthday, we went to the Skagit Valley Tulip Festival.
I love this picture of us. Happy birthday, Little Bear!
Labels:
2012 finishes,
family,
KS3126,
Little Bear,
pillowcases,
playmat,
quilting,
sewing,
The Boys
Subscribe to:
Posts (Atom)


