Friday, December 31, 2010

Gift to self

As a gift to myself, I have decided to join another block-of-the-month club. This one is through a local quilt shop, Gathering Fabric. They are going to be working on a gorgeous applique quilt from Edyta Sitar of Laundry Basket Quilts called "Hop to It."

startup pack for my Hop to It quilt
The cool thing about this group is that there is no requirement to purchase any fabrics-- the shop is very supportive of those who want to use their stash. But, for those who want it, they created some beautiful kits. And the kit was too pretty for me to pass up. But no doubt I'll be supplementing with stash fabrics as well.

What I really love about this program is that I get to go once a month and meet with other people working on the same project. I found that to be so inspiring and motivating for me as I worked on my "Greenpiece" quilt last year. I'm looking forward to our first meeting in mid-January!

Thursday, December 30, 2010

Christmas joy

Christmas was a ton of fun this year. Big Bear hit the mother lode when Santa brought him a train table and some new engines.

a very happy boy and his train table
In addition to the "official" Thomas engines, he also received a couple of special cars:

custom tar wagons
The tar wagons are featured in a few of the Thomas stories, and BB includes them in his play a lot. However, there is no actual tar wagon toy in the Thomas collection, so he has been using legos and blocks to stand in for them. My husband found some plain wooden trains and then painted them to create this pair of custom tar wagons. Didn't they turn out awesome? And Big Bear LOVES them!

It was such a joy watching him take it all in and then seeing his excitement once he started to play (and he didn't stop... all trains, all day!).

baby boy playing with his new activity cube
Little Bear was not left out of the fun either. He got some wonderful new toys for his first Christmas, including a big wooden activity cube from Santa and some electronic goodies from the grandparents. It is currently very noisy at our house (why don't those toys have volume controls???), but the boys are having a lot of fun.

I received some wonderful new "toys" as well!

Mama's new toys!
My in-laws gave me some wonderful new crafty books, including Amy Butler's Style Stitches, Pretty Little Potholders by Lark Books, and Jelly Roll Quilts & More by Kimberly Einmo. And then my mom gave me a beautiful fat quarter pack the new Sanctuary collection by Patty Young in the chocolate berry colorway. So lovely!

cute little pouch
And look at this wonderful piece of handmade loveliness from the super-talented Evelyn! And it had a cool little seam ripper gadget inside too!

Shabby Fabrics Pincushion Club
In addition to a fabulous gift certificate to the Fat Quarter Shop, my husband signed me up for a new block of the month at Shabby Fabrics: The Pincushion Club! It is the coolest thing! Each month I will receive a new pincushion kit. Some of the kits will even have enough to create multiple pincushions. And every month features a different designer. The first kit is supposed to arrive at the end of January. I can't wait!!!

I hope all of you have been having a wonderful holiday season as well!

Friday, December 24, 2010

And the stockings were hung...

I finished Little Bear's Christmas stocking last night (just in the nick of time!).

Little Bear's new stocking
That big blur at the top is where his name has been fancily machine embroidered. (That makes two uses of the embroidery unit this year! Woo hoo!)

Because I started this blog after I made it, I don't think I've ever shown the stocking I made for Big Bear.

Big Bear's stocking

I hope all of you are having a wonderful holiday season. And for those who celebrate it:

Merry Christmas 2010
Merry Christmas!

Thursday, December 23, 2010

Santa came a little early

Last week, my little 2001 Honda Civic died. Poor Pep-Pep's transmission went kaput.

Fortunately, Santa (aka, my glorious husband) made his visit a little early:


...and now I have a swanky new 2011 Subaru Outback. Woo hoo!!!

And since I can't very well have a post with no craftiness, I'll share this:

Cookie Time!
Mmm... cookies! And my very helpful decorating buddy!

Seriously-- I am a very fortunate girl.

Wednesday, December 22, 2010

Perpetually behind

Yep. That's me. Always a little behind. Of course, I have no one to blame but myself.

Could I have finished my father-in-law's quilt by now? Probably. If I had gone with my original plan to just do an all-over quilting design on it. And I was going to do just that. But then I was looking at the quilt and was really feeling all those hours I spent in piecing the top. And I just couldn't do it. I've decided that I really need to do it "right"-- a design specifically for this quilt in hopes of truly enhancing all the piecing in it.

Unfortunately, this decision has put me rather behind schedule. I haven't even started quilting yet. But-- now I have a plan!

a quilting plan
I made a printout of one of my photos and tried out ideas by penciling in the lines. Of the options I thought of, I like this one the best.

My husband has next week off from work, so I am hopeful that I can take some time and focus on the quilting. I'm kind of excited because I think it is going to be really cool!

Thursday, December 9, 2010

With only 4 pins remaining


...basting is complete! When I started, that pin bucket was more than half-full. There were a lot of pins. It took four hours (but that also includes a long baby feed break in the middle). Bedtime was 2 AM.

So sleepy.

And now I just have to quilt it!

Wednesday, December 8, 2010

Basting the behemoth

The top is 86" x 110". Since I don't have a space near big enough to lay it all out, I'm having to baste it in sections. Wish me luck on that!

getting ready for basting across my bedroom floor
Fortunately, it's too late for me to chicken out because it is currently laid out across my bedroom. So now I have to finish it before I go to bed. Unfortunately, it is already 10 pm. Methinks it is going to be a late night. And my back is probably not going to thank me in the morning. But-- I'll have a basted quilt!

Monday, December 6, 2010

Now with borders!

Prairie Pinwheel quilt, now with borders
...and it only took 10 months to put them on!

I am determined to get this quilt finished in time for Christmas. Since it was already "given" last year (in the form of a coupon), I think it would be wonderful to be able to put the actual quilt under the tree this year.

Next up: piecing together the back!

Wednesday, December 1, 2010

Some more blankets

Since I have all of my flannel laying out and about, I have been feeling this compulsion to get it off my floor and use it. I managed to make a couple more blankets this last weekend for Project Linus.

A receiving blanket:

receiving blanket

And something a little larger too:

starry blue square blanket
This one is made with 5" squares so it is about 35" x 40".

I'm building a nice little pile to take to the next Project Linus workday. Yay!

Tuesday, November 30, 2010

One Thing, One Week Challenge :: 5 So close...

Alas! I had good intentions, but this week's One Thing, One Week Challenge just didn't happen for me.

Amy's Creative Side


Between cooking, feasting, best friend visit, and little boys with colds, there just weren't enough hours in the day to accomplish my stated goal (posted in the comments section of the challenge announcement):
Yay for your challenges, Amy! It is going to be a busy week, but I really hope to get a good start on some holiday crafting. Specifically, I want to get a fabric basket made and a mug rug started. Here’s hopin’! :)
What did I accomplish? I chose fabric picked for the basket and mug rug projects I had hoped to complete. I also managed to plan a design for the mug rug and calculate all the measurements required. I even got the pieces cut out. So, I was definitely off to a good start!

Then, last night I got to spend some time in the sewing room...


...and finished a holiday fabric basket! Because it just wouldn't be the holidays if I didn't make at least one of these! For the third consecutive year, I have made use of the fabulous Pink Penguin tutorial. This time I used 2.5" cut squares for the patchwork and then enlarged the other pieces to suit.

I also managed to complete my first mug rug:

holiday mug rug, front view
I've been seeing these popping up all over blogland over the last couple of months, and decided I needed to give it a try. Using a tutorial from Jennifer of That Girl... That Quilt... as a starting point, I designed this happy holiday mug rug.

holiday mug rug, action shot
Here's an action shot. I love the addition of the pocket. I embellished it with a little embroidered tree and some happy rick-rack. Cute!

These two items are going to packaged up together along with a mug and some tea or hot chocolate mix. I think it is going to be a a fun contribution to the holiday gift exchange I'm attending this weekend.

I may not have finished in time for the challenge, but I sure feel pretty darn successful! Yay!

Monday, November 29, 2010

Thankful

I hope all of you had a wonderful weekend! Thanksgiving is my favorite holiday, and we had a wonderful celebration here at home. Family and good friends joined us for a happy feast. Of course once again I was so engrossed in food preparation (and then eating), that I failed to take any pictures. Sigh... But-- I can show you my gravy boat!

Robin's (now chipped) gravy boat
A couple of weeks ago, I went to a Mom's Night Out with some preschool mamas at a paint-your-own ceramics place. And for the first time ever, I actually had a gravy boat in which to put my gravy. Huzzah!!! Of course I managed to fumble and chip it just a few minutes before filling it with gravy. Doh! But, it is glue-able and now it just fits right in with the rest of my chipped dinnerware. :P

I can also show you our fabulous centerpiece, courtesy of Big Bear:

gobble, gobble
He made it at preschool. I guess everyone else used pinecones for a base. But he wasn't into those. So he made his with playdough and pumpkinseeds. It is definitely a festive conversation starter!

I truly have much to be thankful for in my life, including my wonderful and amazing family, good friends, the abundant love in our lives, as well as all of the material stuff too (fabric and otherwise). Having a time of year like this, with the idea of thankfulness at the forefront, is a wonderful reminder for me to be grateful for all the good in my life. I just love this season of thanks and giving. And feasting. Gotta love the feasting!

Tuesday, November 23, 2010

A quickie blankie


A few weeks ago, Big Bear saw this flannel panel at the quilt shop and decided he needed it. Because he was being such a good sport about shopping at the fabric store with me, I went ahead and got it. Then yesterday, I sewed it up using a happy striped flannel for the back. This is the first time I've ever used a panel. I have to say, it sure was quick and easy! It's kind of a funky size (about 24" x 40"), but I don't think it will matter to him.

Sometimes, a quickie is a good thing!

Monday, November 22, 2010

Happy beverage cup!

Way back in 2001, I bought one of those nifty design-it-yourself coffee cups. I scrapped it up and created my own design with paper and pictures. I called it the "Kitty Cup" because it featured our two kitties. And it has had that same design now for nearly 10 years. In that time, we acquired two more cats and two little boys. It was definitely time for a change!

This weekend, I delved into my digital scrapbooking software (I use StoryBook Creator Plus) and created a new cup design.

cup design
I included a quote:
Today a new sun rises for me; everything lives, everything is animated, everything seems to speak to me of my passion, everything invites me to cherish it.
--Ninon de Lenclos
I love that quote. Carrie P. featured it on her blog one day and it really spoke to me. I have it hanging on my wall and now I have it on my cup.

Robin's beverage cup
So now my cup includes all of my kitties and both of my little boys (and a quilt, too!) and it really represents me again. Yay!

Thursday, November 18, 2010

Sleepy blog

I just haven't been in that blogging "mood" lately. Frankly, I haven't really been in a crafty mood lately either (though I have managed to do a couple of things). Happily, the craftin' urge is rekindling. Thank goodness, because the holiday season is upon us, and I have lots to do!

So I still have those last 3 triangles to do for my Jane Stickle quilt. However, in lieu of working on them, I have been busily stitching blocks together. Here's another chunk:

chunk o' Jane, G-4 to J-6
It doesn't look wildly impressive, but this was probably about 5 evenings of work for me. Hand stitching may not be the speediest of methods, but I really enjoy doing it.

I have also had the urge lately both to do some charity work as well as use up some of my stash. This time, I'm working with flannels. I bought a bunch of'30s-style flannel prints some time ago... 2003, maybe? The original plan was to make a big ol' rag blanket. But I ended up making a couple of other rag blankets. And now I'm just kind of done with those. So, the flannel has just been sitting. Inspired by the amazingly productive and generous Evelyn, I decided to start by making a couple of swaddling blankets for Project Linus.

a pair of receiving blankets
Evelyn has a great tutorial on how to make them. I did mine a little differently. I cut them smaller (36" x 36") and then cut some curved corners (just because I felt like it). It was fun using a couple of the fancy stitches on my machine, too.

I've also been busily cutting squares from my flannel scraps. My plan is to create a couple of blankets with those, including a disappearing nine-patch. At this point, I'm not entirely sure when this will happen, but it is the plan. And, if nothing else, having a plan is a good start.

Tuesday, November 9, 2010

Jane Stickle Quilt: BRC

Jane Stickle bottom right corner kiteBlock number/name: BRC “Sarah Jane”

Date completed: November 6, 2010

Number of pieces: 13


Notes on block: Since it worked so well with the last block, I went ahead and used the English paper piecing and appliqué technique for the star on this block. In the original quilt, the star has a white center, but because I used 6 different fabrics for the flower, I wanted to use all 6 fabrics in the star as well.

I love the look of all the different prints! This is a happy block. I’m also thinking I may embroider my initials in this block somewhere.

Only 3 to go!

Monday, November 8, 2010

Jane Stickle Quilt: TLC

Jane Stickle top left corner kiteBlock number/name: TLC “Sadie Rose”

Date completed: November 5, 2010

Number of pieces: 16

Notes on block: If it works for hexagons, why not octagons? So I went ahead and tried out English paper piecing for the first time (I used this video tutorial by Connecting Threads). I prepped all of the octagons and then whip-stitched them together and then appliquéd the group to the background. It worked really well!

Friday, November 5, 2010

Jane Stickle Quilt: RS-3

Jane Stickle block RS-3Block number/name: RS-3 “Epicenter”

Date completed: November 3, 2010

Number of pieces: 20


Notes on block: I love the name of this block. Not only does it seem to fit the block well, but it makes me think of natural disaster movies. I love natural disaster movies! My guilty pleasures include Armageddon, The Core, 2012, and The Day After Tomorrow. The key elements: over-the-top disaster scenarios, a sense of humor, massive special effects showcasing the awesome power of the given disaster, and happy endings. I especially love happy endings.

Other than this block, not much crafting has been going on this week. I’ve been sick, so my spare moments over the last few days have been focused on rest. I’m feeling better today—so maybe there will be another block in my future tonight!

Sunday, October 31, 2010

Halloween Crazy Jack

I finally took down my nativity quilt! (Please don't judge me... I just didn't have another quilt to replace it, so I didn't want to take it down and stare at a blank wall all year.) It has now been replaced by this:

Crazy Jack front
This much more seasonally appropriate little wallhanging was made from a pattern by Pieces of My Heart called, "Crazy Jack." It was super quick and easy to make. The front is made entirely from one charm pack of "Pumpkins Gone Wild" by Sandy Gervais (it used 44 charm squares plus a little extra for the nose).

Crazy Jack label
After making the front, there was one charm square remaining. I used it to make the label. I was able to pull the binding and backing from my stash. You can get a glimpse of the backing behind the label above. It is a fun Michael Miller print.

Crazy Jack label
Here it is on it's spot on the wall. The hanging rod is fixed, so a regular sleeve wouldn't work. I added three button tabs to the top edge of the quilt to use for hanging.

A couple of nights ago, Keith and I carved up our pumpkins. Mine was inspired by "Crazy Jack." So I had to take a picture:

glowing pumpkins
Happy Halloween!!!

Friday, October 29, 2010

Blogger's Quilt Festival: Autumn House

Amy's Creative Side - Blogger's Quilt Festival

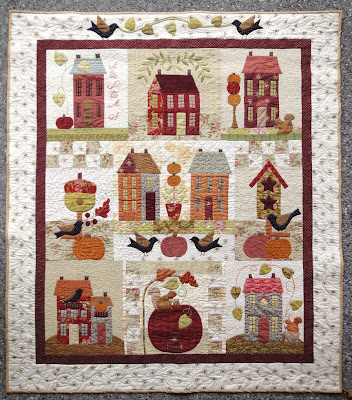
Last month, I finally completed "Autumn House," a BOM quilt from Bunny Hill Designs! Woo hoo! I've been super excited to share the finished quilt with y'all, but decided to wait until Blogger's Quilt Festival for the big "reveal."

Autumn House quilt completed
The BOM subscription from Shabby Fabrics was a Christmas gift from my awesome husband. I started as soon as the first block arrived in January 2009. All of the blocks are hand appliqued. The top was finished in January 2010. But I didn't manage to quilt it until last month.

This is my first completed hand applique quilt, and I was really, really nervous about messing it up by quilting it. I spent a long time working out a quilting plan. I spent some time practicing. Then I finally just took a deep breath and did it.

Autumn House block 1 quilted
I started with straight lines, outlining the blocks and the borders. Then I outlined all of the appliques. Next I focused on all of the details in the appliques (the pumpkins, doors, roofs, etc.). I did the background quilting next, starting with cross-hatching in the center block.

Autumn House quilted center block
I was initially going to cross-hatch 5 blocks, but after finishing the center block (shown above), I was done. Holy cow, not only was it time consuming, but it was hard! So, I tried a couple other things with the remaining blocks.

Autumn House block 3 quilting
In blocks 1, 3 (shown above), 7, and 9, I used a curly-cue motif.

Autumn House block 8 quilted
In blocks 2, 4, 6, and 8 (shown above), I did the leafy-viney motif.

Autumn House border quilting detail
Lastly, I completed the borders. I quilted the inner border with a leaf pattern. Then I did the outer border with vines and a little pumpkin at the bottom that was inspired by Lynn's beautiful quilting.

Almost all of the quilting (straight lines, outlining, backgrounds, borders) was done using King Tut 40 weight thread in a pretty variegated color, "Sands of Time." I quilted the details with Mettler 50 weight in colors to match the area I was quilting.

Autumn House quilt label
And, here's the label I created for it. There's a peek at the backing too. It is an old Moda print I had in my stash.

I am so proud of this quilt. Thanks so much for taking time to visit and letting me share it with you!

Thursday, October 28, 2010

Gnome baby!

Unlike his big brother, Little Bear had no opinion about what he wanted to be for Halloween (he is only 6 months old, after all). So I decided that he would make an excellent little gnome.

standing gnome boy
I couldn't find a gnome pattern, so I winged it. I started with a pair of overalls made using a pattern in the Kwik Sew book, Sewing for Baby. It's a great book full of baby basics. The pictures are dated, but the patterns are timeless and the directions are easy to use and follow.

gnome overalls
I used the overall pattern in size 6-12 months, and shortened them by about 3" (though I probably could have left them a little longer). They were really easy to put together and fit really well. How fun is that plaid corduroy print?

hatted gnome boy
The hat was inspired by some gorgeous hats I saw on Etsy by Swirly Hats. I used McCall's 5253 for the base of the hat, and then drafted my own top. I stuffed the swirl to help it keep its shape. The hat is a little big, but it still looks pretty darn cute.

gnome shoes
For the little shoes, I modified the fabulous Cloth Shoe Pattern from Stardust Shoes. It took me a few tries to figure out how to make them work and to get the shape right, but it was worth the trouble. I used a faux suede-backed sherpa for the sole, and a fuzzy fleece for the upper-- so they should also keep his feet nice and warm for trick-or-treating. I'm a little in love with the gnome shoes.

happy gnome boy
Happy gnome baby!

Wednesday, October 27, 2010

Blue Kitty!

This is the first year that Big Bear had an opinion about what he wanted to wear for Halloween. Yay! His request: a blue kitty.

My son loves stuffed animals. He has one particular favorite that he has dubbed "Yellow Kitty" (which, as you might expect, is a cat and is the color yellow). His favorite color is blue. This, I suspect, is the genesis of his request for a blue kitty costume.

Of course, I was more than happy to oblige!

Kwik Sew 2711
I used the kitty pattern included in Kwik Sew 2711. Kwik Sew patterns are awesome! The instructions are clear, concise, and they are sized really well. I made an XS. The only adjustments I made were to shorten the legs 3.5" and also to cut about 12" off the tail (which was very, very long).

a barbaric meow!
Big Bear loves it! He has even asked to wear it around the house. Yay! In the picture above, he is demonstrating his "Meow!" for the camera (and he is holding the "inspiration" kitty). The ears in this pattern are rather on the big side. My husband suggested BB looks more like a mouse than a cat. But I argued that mice have round ears, not pointy ones. So there!

kitty back view
BB actually chose the fabric himself. I was a little worried about working with the Cookie Monster blue fur, but it was no problem at all (though it did shed some). The hook-and-loop closure in the back is very handy and makes for easy in-and-out.

blue kitty side view
All we need to do now is add some whiskers to his face. Then we'll be all ready for a trick-or-treating extravaganza!