Wednesday, November 30, 2011

Style Stitches Monthly Bag Challenge: Everything Wristlet

Style Stitches Monthly Bag Challenge button
The October Style Stitches Monthly Bag Challenge was the Everything Wristlet. I actually finished it mid-October, but somehow managed to fail in blogging about it. So here goes...

Everything Wristlet: front view
I chose to make the small version and used some fabrics that have been in my stash for quite some time.

Everything Wristlet: back view
I love that taupe-y medallion print and wish I had taken time to center the design. But when I was cutting, I didn't even think of that. Doh!

Everything Wristlet: side view
This bag is in the "Experienced" (read: advanced) section of the book. And it really earns that moniker.

Everything Wristlet: inside view
There were a number of challenges in making this bag, almost all of which had to do with the lining elements.

Everything Wristlet: sewing through some crazy thickness
For one thing, there was some crazy thickness going on because the design called for sewing through multiple layers of Peltex. Fortunately, my machine worked it like a champ. But it caused for some stress.

Everything Wristlet: 3-step inside zipper insertion
And, as always seems the case for me and these bags, the zipper instructions were very challenging. The lining is made up of two parts: the card slot/center pocket and the main body. The main body starts as one long rectangular piece of fabric. The zipper is laid on top then the lining is folded over on top of itself and laid on top of the bottom half of the zipper to create the pocket. So when stitching the bottom half of the zipper, one has to be careful not to accidentally stitch the whole pocket closed. Because the pocket is so narrow, the only way to avoid stitching through it is to sew it in 3 steps (illustrated above): 1. from the outer edge to the head of the zipper; then take it out of the machine and open the zipper and reposition the foot on the edge of where the stitching started and 2. sew to the end of the zipper, at which point you have to remove it from the machine and then 3. sew from the other outside edge to the end of the zipper.

In fact, the whole time I was working on it, I was sure I must be doing it incorrectly, because none of this was detailed in the instructions at all. All it said was: "Note: Do not stitch through the back of the pocket." But it actually worked. I was shocked. Really. I probably wouldn't have even used her technique (being as I swore off A.B. zipper instructions), except that the lining is a single piece that is folded accordian-style to create the inside of the bag. It is actually a clever design, but the execution involved to make it happen is challenging.
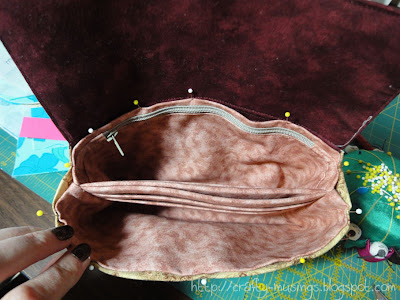
Everything Wristlet: inserting the lining
Inserting the lining was interesting as well (but it definitely went more smoothly than the zipper!). Essentially, you drop it inside of the bag body, fold the edges of each to the inside, and then edgestitch all around the perimeter. In theory this is simple. In practice it is challenging because you need to deal with crazy thickness on the sides, the barrier of the center pocket section, and with lining up the stitching with the outside flap seam (which you can't see at all). It took lots of pins, going very slowly, and then a little bit of handstitching to finish it all off-- but it worked.

me and my Everything Wristlet
It turned out to be a cute little bag. I like it, but I think I would like the larger version better. I'm not sure I'll ever go back and make another of this bag though, as it was a lot of effort for a style that is just okay for me. But you never know.

I didn't manage to finish the November bag, but it seems that JemJam, the challenge host, is taking a little break too. She says she'll jump back in again soon, but until she does, I probably won't start on the final two bags. I've got so much else going on with the upcoming holidays, I think it will be good to take a little break.

Saturday, November 26, 2011

The Last Round

November 1st was the send-off date for completing the last round of the fabulous Once 'Round the Country round robin. Whoops! I didn't manage to make that date, but Zonnah was wonderfully understanding and let me know it was okay if I was a little late. Nearly a month later (what happened to November???), I finally finished. Yay!

This is how it looked once Kris finished her round:

Kris's round on Zonnah's quilt, photo courtesy of Kris
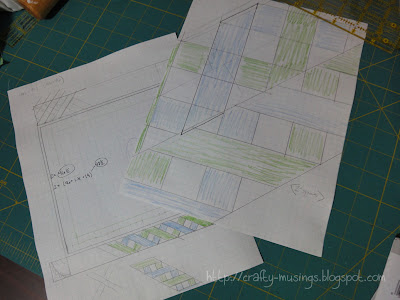
I spent a lot of time being stuck thinking about options. In my ideal world, I would have done some kind of awesome applique something. But I couldn't think of anything that really fit with what came before and there really wasn't enough fabric to create a cohesive background for the applique. So I started looking about the interwebs for inspiration and fell in love with the idea of a sort of "braided" border. I felt like it would sort of echo the style of the border around the center star without being the same.

Zonnah's quilt design planning
I got out my graph paper and got to work. My husband helped me with some of the math (there was a lot of Pythagorean theorem going on in this one) and I eventually got brave enough to start cutting fabric and sewing. I actually created the four sides first and then figured out the corner blocks (because, despite all of my math, I didn't want to commit to a size until I knew exactly how wide the borders would end up being). I went with Dresden plates because I liked the idea of a little bit of curve on the outside, and I also thought they would echo the center star points as well as the spiky flowers in Anne's border. And I had always wanted to do Dresden plates (I just love the look of them, and now I definitely want to do a whole quilt of them!).

The finished border:

Zonnah's quilt top complete with Little Bear
Oops! Someone sneaked in on that shot. Let's try again...

Zonnah's top complete!
Once 'Round the Country has been so much fun! I've gotten to really work my creative muscles, try some techniques that I otherwise may not have (like a braided border and Dresden plates), and shared in the creation of some amazing quilts with an awesome group of ladies. It has been such a great experience!

Friday, November 11, 2011

Bear Paw!

What with Halloween and preparing for Quilt Festival, I managed to completely forget about completing my guild block exchange block. Doh! Yesterday, I took some time to get it done.

completed bear paw block
It is gorgeous! But, wow, she really made an interesting choice... all those pieces and points definitely made for difficulty far beyond any other block I've done in this group so far. A good part of the challenge was in the directions themselves-- they were nearly all written, with just a couple of small illustrations penciled in (I'm not even sure she drew them... I think someone else may have added them later).

Even though the putting-together of the block wasn't tough for me, following along with the instructions was, particularly when it came to the "paws" of the block. She explained a technique that was new to me, and that I found really interesting. So I took some pictures as I went along, and thought I'd share them here. I have no idea if they will be useful to anyone, but, as I said, the technique was interesting to me.

Bear paw step 1
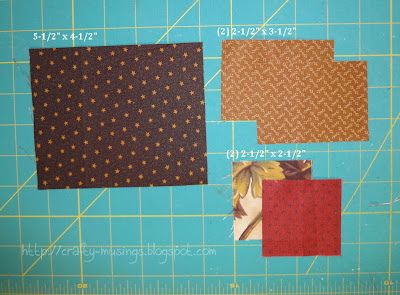
For a pair of "paws" cut (1) rectangle 5-1/2" x 4-1/2", (2) rectangles 3-1/2" x 2-1/2", and (2) squares 2-1/2" x 2-1/2". You will need two identical small rectangles and two different squares for each unit.

Bear paw step 2
Pair a 2 ½” square with a 2 ½” x 3 ½” rectangle.

Bear paw step 3
You will need to sew 2 sets of these pairs.

Bear paw step 4
Put the units together with the rectangles on the opposite ends and sew on the long edge.

Bear paw step 5
After sewing, fold the unit along the inside edge of one of the 2 ½” squares and clip the seam allowance to the seam at the fold.

Bear paw step 6
Press the seams to the rectangles. This step re-distributes the bulk of the seam so the piece lays flatter and gives better visibility for the next step.

Bear paw step 7
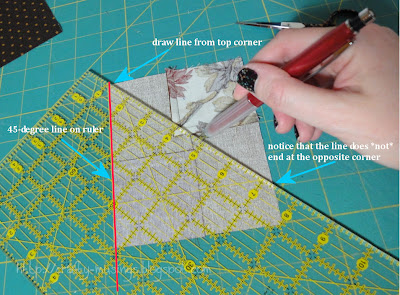
Position the piece so that the squares are in the lower left and upper right corners when the wrong side is facing up. Draw a line from the outer corner of the rectangle through the stitching line of the square at a 45 degree angle. Use a 45 degree angle; otherwise you will get a “kite” shape.

Bear paw step 8
Draw a second line from the opposite corner.

Bear paw step 9
These lines should be approximately ½” apart.

Bear paw step 10
Pair each of these units with a 5 ½” x 4 ½” rectangle.

Bear paw step 11
Sew with right sides together along the drawn lines.

Bear paw step 12
These lines should be approximately ½” to 5/8" apart.

Bear paw step 13
Cut down the center between the two lines.

Bear paw step 14
Now you have two pieces.

Bear paw step 15
Press to the large triangles.

Bear paw step 16
Trim the block to 4 ½”.

And now you have two paws!

Maybe I thought this was interesting only because I so rarely ever use the degree lines on my ruler? I dunno. But I thought it was a pretty neat technique!

Tuesday, November 8, 2011

Quilt Fest: a little bit of eye candy!

Mikki and I spent a good five hours last Friday wandering through exhibits and vendors at the International Quilt Festival in Houston, just taking it all in (we spent a few hours on other days too... but the bulk was on Friday). Though I had my camera, I didn't take too many pictures (and that was only partly because I was chastised for taking a picture in a no-photo zone... oops!-- but I deleted that one right away). There is just so much to look at that pictures tend to be an afterthought. And it is often very crowded, so getting a decent shot can be very challenging. But I do have a little bit of eye candy to share (I've also included the artist information in each photo):


Bouquet by Keiko Morihiro-- all those tiny little bricks in the border? Each and every one was hand appliqued. Gorgeous, meticulous work. Truly.


An Unexpected Pleasure by Nancy Arseneault-- not sure what to do with those orphan blocks you have laying about? Well, this quilter found inspiration in many places and then took hers to the next level. Gorgeous!


Happy Birthday by Harumi Asada-- sappy mama that I am, this quilt actually brought tears to my eyes. Such a beautiful tribute to her granddaughter (I just love how the quilter integrated the photos through the design). And look-- there's Mikki! Hi, Mikki!


Alpha Quilt by Becky A. Grover-- how fun is this quilt? I just love the quilting in this. Such an awesome idea and beautifully executed.


B.S. I Love You by Janet Stone-- the look of this quilt really appealed to me. The applique is gorgeous. And that checkered background? Pieced. Lots and lots of little squares. Totally awesome.


Portland Reflection by Gay Ousley-- this is one I could just look at all day. Peaceful, harmonious, beautiful... I love it.

Sometimes we were in awe, sometimes we felt woefully inadequate-- but at all times, we were inspired. It was fabulous! We didn't see everything, but I think we both felt like we got a great view of much of what was available. And, best of all, I got to reconnect with my friend. It was an awesome adventure.

Monday, November 7, 2011

Escape to Quilt Festival!

Because of my wonderful friend Mikki (who proposed the adventure) and my incredibly wonderful husband (who willingly took three days off from work to watch the boys), I had the opportunity to attend the annual International Quilt Festival in Houston. Holy cow!!! How insanely lucky am I???

I arrived in Houston on Wednesday afternoon, just in time for a few Mexican Martinis with Mikki followed by Preview Night (when class enrollees are allowed a sneak peek at festival exhibits and shopping before it is open to the public).

Our self portrait:

Mikki and Robin
On Thursday, I attended two classes. The morning class was "A Fine Line: Creating the Quilting Design" with Melody Crust. It was kind of a brainstorming class wherein participants hung their quilts on the wall and Melody led discussion on quilting options and various design considerations. I'm kind of kicking myself that I didn't have a top to hang too! (But I opted to have a less full suitcase that I could fill with goodies on the way home.) Then in the afternoon I attended another class with Melody, "Borders: The Final Chapter." It was another collaborative discussion class where people brought their projects and Melody led discussion on border options and considerations. Again, it was a great class (and, again, I was kicking myself for not having a top to hang on the wall!). Having those real-life examples and hearing so many perspectives was great for fueling my own creativity. It is funny-- I kind of justified the classes I took with the thought that Festival would allow me to take classes with teachers who I would never otherwise have an opportunity to see. Imagine my surprise when I learned that the teacher for both classes happens to be from Seattle. Ha! Still, I'm so glad I had the chance to take them, because they really were great. After classes ended on Thursday, we only had a couple of hours to wander around Festival-- but we took full advantage of it!

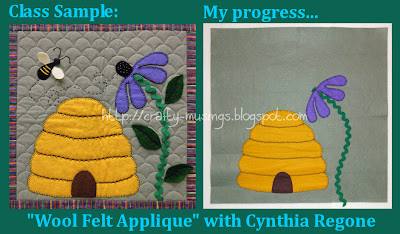
Wool Felt Applique class with Cynthia Regone project progress
My last class was on Friday morning, "Wool Felt Applique" with Cynthia Regone. It was AWESOME! All of my questions about working with wool (and wool felt) were answered, the class included a super cute project, and it was just plain fun. Immediately after class, I went downstairs and bought some wool. And a few other things as well...

Quilt Festival phat lewtz
I didn't go too crazy-- some fun patterns, some gorgeous wool and wool felt, a new thimble. My biggest splurge was on those cones of King Tut thread (I love quilting with that stuff!).

There were also many amazing quilt exhibits. This post is getting long, so I'll share those tomorrow to split it up a little. Suffice it to say, there was an overwhelming amount of eye candy.

On Saturday morning I returned home to my boys. Homecoming is a lovely thing. I think we were all very happy to see one another!