It is gorgeous! But, wow, she really made an interesting choice... all those pieces and points definitely made for difficulty far beyond any other block I've done in this group so far. A good part of the challenge was in the directions themselves-- they were nearly all written, with just a couple of small illustrations penciled in (I'm not even sure she drew them... I think someone else may have added them later).
Even though the putting-together of the block wasn't tough for me, following along with the instructions was, particularly when it came to the "paws" of the block. She explained a technique that was new to me, and that I found really interesting. So I took some pictures as I went along, and thought I'd share them here. I have no idea if they will be useful to anyone, but, as I said, the technique was interesting to me.

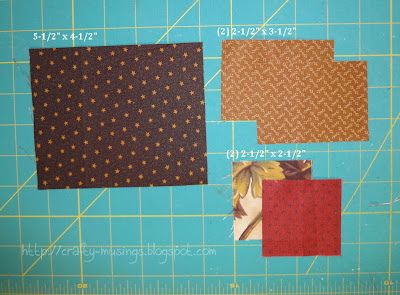
For a pair of "paws" cut (1) rectangle 5-1/2" x 4-1/2", (2) rectangles 3-1/2" x 2-1/2", and (2) squares 2-1/2" x 2-1/2". You will need two identical small rectangles and two different squares for each unit.

Pair a 2 ½” square with a 2 ½” x 3 ½” rectangle.

You will need to sew 2 sets of these pairs.

Put the units together with the rectangles on the opposite ends and sew on the long edge.

After sewing, fold the unit along the inside edge of one of the 2 ½” squares and clip the seam allowance to the seam at the fold.

Press the seams to the rectangles. This step re-distributes the bulk of the seam so the piece lays flatter and gives better visibility for the next step.

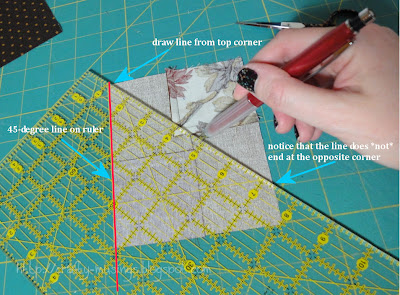
Position the piece so that the squares are in the lower left and upper right corners when the wrong side is facing up. Draw a line from the outer corner of the rectangle through the stitching line of the square at a 45 degree angle. Use a 45 degree angle; otherwise you will get a “kite” shape.

Draw a second line from the opposite corner.

These lines should be approximately ½” apart.

Pair each of these units with a 5 ½” x 4 ½” rectangle.

Sew with right sides together along the drawn lines.

These lines should be approximately ½” to 5/8" apart.

Cut down the center between the two lines.

Now you have two pieces.

Press to the large triangles.

Trim the block to 4 ½”.
And now you have two paws!
Maybe I thought this was interesting only because I so rarely ever use the degree lines on my ruler? I dunno. But I thought it was a pretty neat technique!


Isn't that interesting. I've never seen this kind of tutorial before. I love being able to visit friends to learn new things.
ReplyDeleteI love Bear Paw, such a great block and lovely fabric.
ReplyDeleteI have done that method before and thought it very clever, who thinks of these techniques? What a fabulous pieced block.
ReplyDeleteI am going to have to try this :)
ReplyDeletethat is fascinating! It is a beautiful block.
ReplyDeleteThanks for stopping by and visiting all my recent posts.
Have a Blessed Thanksgiving.
Wow how cool is this technique! I know I would have had to read the directions a million times before doing it! Your illustrations are great!
ReplyDeleteMissouri star quilt co does a you tube tutorial on this technique
ReplyDeleteshaded 4 patch I think