And so the blogging/crafting slump continues. But! Since little Miss Maddie has finally received her quilt, I can at long last share the finished project with you. Yay!
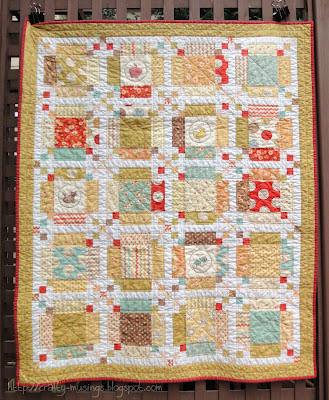
This is "Whimsy Baby":
The design is from a Moda Bakeshop tutorial by Lisnaweary Quilts, the "Criss Cross Quilt." I used two charm packs of the wonderful "Whimsy" line from Fig Tree Quilts, which is the basis of the name of the quilt as well.
The charm pack included some light creamy marble print squares. They were so light that I felt like I needed to use them a little differently. So I created some embroidery designs inspired by the style of the illustrations in some of the prints (you can read a little more about their creation in this earlier post). Those embroidered squares really give this quilt a little something extra special.
The binding is a French General fabric I thought coordinated nicely.
The back is made from some fabric I've had in my stash for quite awhile (it is "Paisley Panache" from Northcott). It is not really a match to the front at all, but I think it works.
The label.
This quilt was a long time in the making. I just looked back and am rather shocked to find that I started it last May! The top was done by mid-August. I know I was indecisive about how I wanted to quilt it. But boy... last May? At least I finished it before little Maddie's first birthday! Mostly though, I'm just happy she finally has her quilt and is able to enjoy it now.
Sunday, March 18, 2012
Friday, March 9, 2012
A quick and easy tee!
Crafting has been a bit on the slow side lately. Hopefully, my mojo will kick back into gear again soon (because I have a quilt I need to finish this month!). But, I do have a project to share that I stitched up last week. I made a new t-shirt using Simplicity 4076. It was truly a quick and easy project (6 seams!) and I'm absolutely thrilled with the results.
I've been eating better and exercising regularly, and in the last 6 months, I've lost 35 pounds. Yay, me! :) But now much of my wardrobe practically falls off of me. On the one hand, that is awesome. On the other, I feel dumpy all of the time because my clothes don't fit. So I've decided to start re-inventing my wardrobe a little bit at a time. I figured a simple shirt would be a good start.
Because I can't really sew any kind of top right out of the envelope, I had to take a little bit of time to do some alterations. These took longer than the actual sewing did!
In the picture above, I've tried to outline the alterations I made. I started with the size 18 of View C based on my upper bust measurement and then did a full-bust adjustment of 1.5" (using the method described in the book, Fit for Real People by Pati Palmer and Maria Alto). Because the design didn't have a side dart, and I didn't want to add one, I decided to rotate the dart that was created in the FBA over to the neckline. Since the neckline is gathered, I knew I could take up the extra fabric there pretty easily without adding any additional darts. Then I went ahead and lengthened the top by 2" (as a number of reviews I read mentioned that the top is on the short side-- and I don't like short tops!).
Here's the finished top:
I just love the gathering at the neckline. It is a pretty design element. I used a very soft, lightweight rayon/spandex blend fabric. It feels amazing!
In this back view, you can see the bell-shaped sleeves. They're fun and flirty, but also a little annoying. Next time I'll probably look for a fitted sleeve that I can use with this pattern.
Yay for a new shirt (that fits!)!
Subscribe to:
Posts (Atom)


