

Monday, June 30, 2025
Rainbow log cabin top
I finished the top of the rainbow log cabin blocks on Saturday!
 It measures 57" wide by 69" long. I am feeling pretty good about it.
Yesterday, I pieced together a back for it. I used scraps from the blocks as well as a couple fabrics I pulled from the stash (that's the goal with all of this-- use what I have!). I even pieced together the batting using remnants.
Now I have yet another completed top+back to add to the pile. Time to quilt something!
It measures 57" wide by 69" long. I am feeling pretty good about it.
Yesterday, I pieced together a back for it. I used scraps from the blocks as well as a couple fabrics I pulled from the stash (that's the goal with all of this-- use what I have!). I even pieced together the batting using remnants.
Now I have yet another completed top+back to add to the pile. Time to quilt something!
Saturday, June 28, 2025
UFO: Rainbow Log Cabin blocks
Since last fall, I have been slowly working through unfinished quilt projects. Hopefully, I'll get around to posting them here, as I have really been enjoying revisiting those old projects-- and using my blog to re-orient myself on some of them! Having this journal of work to look back on has been both helpful and pretty cool.
Anyway-- the year was 2010. I participated in a super fun virtual quilt bee, Snip.Sew.Send. I sent out monochromatic fabric packs to each participant.


Yesterday (day two of piecing), I managed to get the left third and the bottom third stitched.


In return, they sent me completed wonky log cabin blocks. The blocks were intended to be used to create a baby quilt for my then unborn son. He is now 15.
A couple days ago, I paused my "Grey's Anatomy" binge-watching to actually try and craft something, and came across these blocks. I put them up on my design wall to see if I could get inspired and I came up with this:

I supplemented the blocks with remaining scraps of the original fabrics sent to participants (most actually sent the extra fabric back with their completed blocks). Looking through my fabric stash for potential background options, the only one I really had enough of was a Kona cotton in the color Ash. So I went with it and started sewing.

By the end of the first day, I had managed to piece together some chunks in the top left portion.

I am hoping I can actually get the rest pieced in the next couple of days.
It feels a bit strange to have a sense of urgency for these blocks that have just been sitting in a bin for the last fifteen years. But it is also exciting to be experiencing some creative drive again.
Monday, January 24, 2022
Rediscovery
It has been awhile! I have crafted here and there over the last few years-- sewing the occasional costume, clothing, gifts... but making has definitely been on the periphery and blogging off the radar all together. I was a dedicated mom and volunteered and that consumed the bulk of my free time.
The tides have turned in the last year, and I am finding myself back in a place where I have creative energy, and the time and desire to make... and to document!
Last night I was attempting to dig through the chaos that my quilt cave had become and I stumbled across an old UFO (Un-Finished Object):
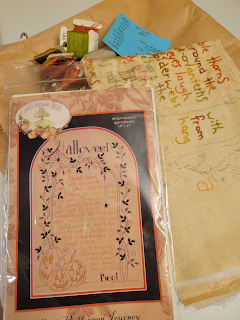
It is an embroidered work-in-progress of a Crabapple Hill design. I can't actually remember when I got it or why I stopped working on it. But I've decided I'm going to start on it again, and I want to mark the occasion for posterity (i.e., my failing memory).
So-- this is where I'm starting from:
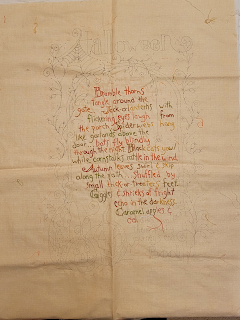
I have done a little bit at the end, "...les & ca" just to see if I
can replicate the stitching... it took a couple letters, but I think
I've got it now.
On to stitching!!!
Thursday, January 3, 2019
Counting Sheep
Crafting has (once again) fallen by the wayside over the last few months (years). But I have been trying to make time to do more. Because when I do, I feel happy. Yay, happiness!
My PTA work finally quieted down enough for my creative juices to flow a bit right at Thanksgiving. My husband's cousin had a baby in June 2018 and I got a wild bee in my bonnet to make the little dude a quilt. Because every baby needs a quilt! But it had to be simple and something I could finish quickly as we were going to meet baby in person for the first time at the family Christmas party on December 8th. My other goal was to try and use my stash and avoid purchasing any additional fabric.

Success!!! I even finished with a whole day to spare. ;)

The design is "Hyde Park" from the book Super Simple Fat Quarter Quilts by Lynda Milligan and Nancy Smith (see amazon.com listing). The instructions were straightforward and clear and the top came together very quickly. I didn't have enough full fat quarters, so I went a bit scrappier. I purchased this cute sheep fabric in 2013 (a Hamil Textiles fabric, designed by World of Susybee). It was great to finally be able to put it to good use!

I quilted it with swirls through the center and then did a fancier border treatment-- I try to embrace opportunities like this practice and build my quilting skills. Babies don't judge. ;)

Here I've added in some lines to show the design a bit more clearly. I love how it turned out! My one regret though is that, because of the scrappy nature of the fabrics, the quilting doesn't show up very strongly. However, had the design turned out not-so-great, this would have worked to my advantage. So, not a huge regret.

The back isn't ideal-- but it was available in my stash and I had enough of it that it only took one seam (important as time was of the essence!). The binding was finished by machine (I used Red Pepper Quilt's binding tutorial).

Little sheep on the label! Yay!

The 56x67" size is perfect for playing on and as he gets older, it will be excellent for snuggling.
It was a joy to meet our new baby cousin and to be able to give him this quilt.
Monday, July 23, 2018
Another Concord

This is my second Cashmerette Concord T-Shirt make. I cut a size 12 G/H. For this version, I went with the curved, faced hem, the v-neck, and long-sleeves. I shortened the sleeves by 1.5"-- but as a general rule, I seem to just push them up (didn't realize until this moment that I don't have any pics of the sleeves not pushed up... whoops!). The fabric is a soft, 100% poly ribbed knit that I purchased from Fabric Mart last summer.

Based on the fit of my first Concord T make (and of the other Cashmerette patterns I've made-- this seems to be a consistent issue for me across styles), I did a broad back adjustment to add a total of 3/4" to the upper back. I feel like it fits my back a bit better now, giving me a bit more room to move such that it doesn't feel tight. I am starting to wonder though, if maybe I should also try going up a size and see how that works for me. Hmmm...

I followed the instructions for everything for the most part. I did stabilize the shoulder seams with some regular stay tape. And then also added the additional step of stabilizing the neckline with SewkeysE fusible knit stay tape. On the one hand, the neckline is nice and smooth and pretty. But, it also doesn't "hug" my body the way I want it-- it seems to stand away from my body. I need to do a bit of research to figure out how to remedy this.

And a lesson learned on this one: pay attention to the hem facings. The front and back are, in fact, different. :P I accidentally attached the front hem facing to the back and had stitched and serged. When I went to attach the back facing to the front, I realized my mistake... doh! But I was not wanting to deal with a re-do. So I went with it. On the outside, it looks fine. But it is a bit janky on the inside.

I am happy with how this came together. Though I am a bit bummed that I haven't had a chance to wear it yet. It has been a warm summer (yay!)-- and this poly is on the warm side. But it will be perfect come fall!
Thursday, July 19, 2018
Hearts Full
My heart is definitely full! I have just completed my two-year term as PTA president at my boys' elementary school and I am finally finding myself with the energy and wherewithal to craft again! Huzzah! I mean, I've done stuff here and there-- very occasionally-- and I've kept track of those on Instagram (my account name is furicious). Blogging however has just not been a thing. But, now that I'm finding myself in my craft room a bit more regularly, I'm feeling the urge to journal again. So here I am!
First up: a quilt! I started this quilt in the summer of 2016, when I learned that one of my friends was pregnant. The design is from a Moda Bake Shop tutorial, "Layers of Love," by Sterling LaBosky. I used a Kate Spain "Aria" layer cake and a couple of Kona solids.

By January 2017, I was quilting it. But then life got in the way and it sat unfinished until last month when I finally picked it up again and finished it off. Baby is nearly two. Doh!

Fortunately, mama was very understanding and graciously accepted my belated baby gift. As it turns out,baby toddler girl is a big fan of snuggling under blankets. So, yay!

I quilted it with Aurifil Mako 50/2 thread in 2710 (Light Robin's Egg blue) using an all-over design.

Hearts seemed appropriate. Since it is hard to see, I've highlighted the design I used in the photo below.

I was worried, especially since it was already half-quilted, that I would struggle to get going again. Thankfully, I quickly found my rhythm quickly and all went well. Phew!

I finished the quilt with a machine stitched binding, a personalized label, and a trip through the washer to get it all crinkled and snuggleable.

Hopefully, Lady M will enjoy her new quilt!
First up: a quilt! I started this quilt in the summer of 2016, when I learned that one of my friends was pregnant. The design is from a Moda Bake Shop tutorial, "Layers of Love," by Sterling LaBosky. I used a Kate Spain "Aria" layer cake and a couple of Kona solids.

By January 2017, I was quilting it. But then life got in the way and it sat unfinished until last month when I finally picked it up again and finished it off. Baby is nearly two. Doh!

Fortunately, mama was very understanding and graciously accepted my belated baby gift. As it turns out,

I quilted it with Aurifil Mako 50/2 thread in 2710 (Light Robin's Egg blue) using an all-over design.

Hearts seemed appropriate. Since it is hard to see, I've highlighted the design I used in the photo below.

I was worried, especially since it was already half-quilted, that I would struggle to get going again. Thankfully, I quickly found my rhythm quickly and all went well. Phew!

I finished the quilt with a machine stitched binding, a personalized label, and a trip through the washer to get it all crinkled and snuggleable.

Hopefully, Lady M will enjoy her new quilt!
Saturday, December 31, 2016
Hiatus
So, last spring I decided to take on the position of president of the PTA at my sons' school. The job really ramped up in early August, and since then-- I have pretty much found myself with a nearly full-time unpaid job. Crafting fell by the wayside. Like WAY by the wayside. While it just hasn't been in me to blog at all over the last few months, I have managed to make a few things:
A Concord Tee from Cashmerette Designs:

LOVE this design. I've purchased fabric for two more.
A cute, swingy dress from McCall's 6957:

Check out that stripe matching under my arm where no one can see it! But I know it is there. I don't think this is supposed to be a high-low hem (at least, not according to the line drawing), but that's how it ended up, despite the fact that I did a 1.25" swayback adjustment. It's fine though, because I like it.
An unintentionally sexy top from McCall's 6963:

I think the lowness of the drape is a result of the FBA I did. It is definitely a date night kind of top!
Some wizard vests (from Simplicity 8023), robes (from a lovely pattern from the SewingPatternPixie available through Etsy), and wands (no pattern there):

The accessories-- ties, scarves, glasses, Gryffindor patches, white button-down shirts, toad-- were all purchased.

I can't even get over my boys. They are awesome. And they just. keep. growing.
I also managed a few holiday gifts, including some Kismet Trinket Boxes from Sew Sweetness. (LOVE this design!!! These are seriously so fun to make!)

These are all the medium round size, measuring about 4.75" tall. I put little treats in them and gifted them to teachers and friends.
Finally, I also made some maxi-pads and panty-liners of my own design.

I feel like I should note that I do not generally make a habit of giving feminine hygiene products to my friends/family. My sister-in-law specifically requested these. :P
Relative to my usual output and craftiness... the last six months has been a serious dry spell, creativity-wise. PTA has kind of been all-consuming, leaving very little energy for anything else.
So! My new mantra starting a couple of days ago is "Life Balance." I am going to make a conscious effort to be present with my family, make my home a better place to be (cleaner, more organized), while at the same still doing my PTA job and also taking better care of myself by eating better, making time to exercise again (I miss running!), and plan dedicated crafty creative time-- including, hopefully, a little blogging. No problem, right? But, if I am conscious of these things, maybe it will help me to make better choices along the way. We'll see how it goes.
Hope you have had some wonderful holidays and I wish you a joyful start to 2017!
Subscribe to:
Posts (Atom)

