Showing posts with label round robin. Show all posts

Friday, December 16, 2011

My round robin returns!

Woo hoo!!! On Monday, I received my completed Once 'Round the Country round robin top from Kris. She wasn't able to post pictures, so I didn't know how it would look until I opened the box. Very exciting!!!


So cool!!! I absolutely love the way she echoed elements from previous rounds and really finished it off. This top just looks so modern and fresh to me.

Now I just need a quilting plan. I've got a few ideas floating around in my head, but they'll have to wait until the new year. I really think that quilting has the potential to really bring this design to life. I'm looking forward to the challenge!

Many, many thanks to all of the amazing women who worked on this quilt (and who trusted me to work on theirs!): Zonnah, Adrienne, Anne, and Kris. This round robin has been an amazing experience. You all inspire me.

Saturday, November 26, 2011

The Last Round

November 1st was the send-off date for completing the last round of the fabulous Once 'Round the Country round robin. Whoops! I didn't manage to make that date, but Zonnah was wonderfully understanding and let me know it was okay if I was a little late. Nearly a month later (what happened to November???), I finally finished. Yay!

This is how it looked once Kris finished her round:

Kris's round on Zonnah's quilt, photo courtesy of Kris
I spent a lot of time being stuck thinking about options. In my ideal world, I would have done some kind of awesome applique something. But I couldn't think of anything that really fit with what came before and there really wasn't enough fabric to create a cohesive background for the applique. So I started looking about the interwebs for inspiration and fell in love with the idea of a sort of "braided" border. I felt like it would sort of echo the style of the border around the center star without being the same.

Zonnah's quilt design planning
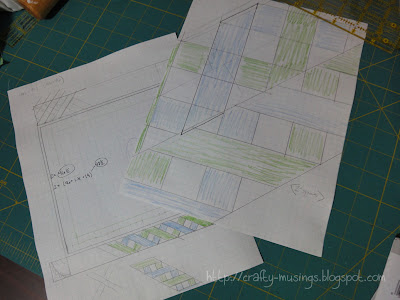
I got out my graph paper and got to work. My husband helped me with some of the math (there was a lot of Pythagorean theorem going on in this one) and I eventually got brave enough to start cutting fabric and sewing. I actually created the four sides first and then figured out the corner blocks (because, despite all of my math, I didn't want to commit to a size until I knew exactly how wide the borders would end up being). I went with Dresden plates because I liked the idea of a little bit of curve on the outside, and I also thought they would echo the center star points as well as the spiky flowers in Anne's border. And I had always wanted to do Dresden plates (I just love the look of them, and now I definitely want to do a whole quilt of them!).

The finished border:

Zonnah's quilt top complete with Little Bear
Oops! Someone sneaked in on that shot. Let's try again...

Zonnah's top complete!
Once 'Round the Country has been so much fun! I've gotten to really work my creative muscles, try some techniques that I otherwise may not have (like a braided border and Dresden plates), and shared in the creation of some amazing quilts with an awesome group of ladies. It has been such a great experience!

Wednesday, August 31, 2011

Round Robin: Organized Chaos

For this round of Once 'Round the Country, the round robin quilt bee in which I am participating, I worked on Adrienne's quilt. I actually went into this one with a "vision," thinking I knew exactly what I wanted to do. (I bet you know what's coming...) Unfortunately, the fabric allotment was not enough for me to confidently execute my idea and still leave enough for the next round. So, I sucked it up, took a picture, and started working on a new (improved!) plan:

Organized Chaos plan
The colors were really distracting to my eye and made it hard for me to focus on design, so I switched my photo to greyscale to "see" it better.

At the beginning, Adrienne told us that her vision for this quilt was "Organized Chaos"-- she really wanted to focus primarily on the prints, using the solids as just accents. The subsequent borders by Anne and Kris did a beautiful job doing just that, so I really wanted to follow their lead by keeping to straight piecing, using as many of the included prints as possible while still having a sense of some sort of organization. I got the idea for flying geese from the center block. It didn't use flying geese, but the outside edges of the block had that kind of flavor. I ran with it.

Organized Chaos, outside border by Robin
My border ended up being less "organized" than Kris's (the next one in-- if you look closely, you can see how wonderfully deliberate her use of color is), but maybe a slightly more organized than Anne's (the gorgeous fractured border surrounding the center block). Like Anne, I used every print available. Like Kris, I used very regular shapes throughout. I also tried to echo the center block (and Kris's border) by repeating the solid elements.

Overthink much, Robin? :P

I felt so out of my element with this one, wrapping my brain around it was a serious challenge. It was fabulous.

Monday, July 4, 2011

Applique adventure!

For the latest round of Once 'Round the Country, the online round robin bee I'm participating in, I had the privilege to work on Anne's quilt. I knew almost as soon as I saw her center block that I wanted to do some applique.

working on the design for Anne's quilt
I don't have the earliest design drawings, but these were the last ones. My goals:
  • Echo the organic symmetry of the print fabric (which was also captured so beautifully by Kris in her flying geese border).
  • Use the designs of the print fabrics to inspire the shapes that I would use.
  • Utilize some of the open space left in Kris's border to help create a sense of flow from hers to mine.
  • Make it look cool.
Once I felt I was in a good place design-wise, I went ahead and made a full-size template.

completed applique design template for Anne's quilt
I did it on freezer paper since that was the only paper I had that was big enough. Once I had it all drawn out, I used it to trace freezer paper templates for all of the leaf and flower shapes. I also created lots of bias tape to use for the vines. This was my first time trying out a continuous bias creation technique (I used a tutorial from Make It Modern and a video tutorial at Erin Compton Design as my guides-- both were super-helpful). It was a little bit labor-intensive, but it worked really well and I didn't have to cut a large diagonal swath from Anne's fabric-- I only had to cut off a small chunk (I think I used 1/3 yard). And there is a ton of bias left over (whoops!). So I guess if anyone else decides they want to do vines, some will be ready for them!

bulb flower
I started by reverse appliqueing the centers of the bulb-flowers.

pretty white flower
Then I needleturned all of the leaves and the other flowers to the background. Next I added the vines. Lastly, I added the base of the white flower and the bulb-flowers at the ends of each vine.

This was my first time designing and executing an applique border and I definitely learned a couple things.
  1. Don't use so many points! There were a lot of pointy-points in my design-- the leaves, the ends of the bulb-flowers, the petals on the white flowers... I'm not sure what I was thinking there as I'm not very good at executing pointy points. But, they got done (albeit, they maybe aren't as pointy as I'd originally intended).

  2. Create the border wider than needed and then trim down after completing the applique. I didn't do that, and my border is a little wavy because I pulled the fabric a little tight at some spots as I worked. It shouldn't cause a problem for Zonnah (who is adding the next border and has mad skillz), but I'll definitely keep it in mind for future projects.

And the big reveal:

Anne's completed applique border
Yay! I think it turned out pretty cool. Hopefully, Anne will like it too.

Thursday, April 28, 2011

Some Denyse Schmidt lovin'

In the first round of the Once 'Round the Country round robin bee, I got to work on this lovely block by Kris:

Kris's center block
Along with the block, she sent a beautiful stack of fabric, all cuts from Denyse Schmidt's recent Hope Valley line of fabrics. GORGEOUS!!!! Kris also offered a little bit of direction, requesting "simple shapes and white space."

The block was kind of on the small side, only 8" square, and I was having a hard time envisioning it as a central focus for a quilt. So my approach became one of enhancement: I wanted to make the block stronger and even more of a focal point.

my attempt to design around Kris's block
I printed a picture of the block and started drawing. The look I was happiest with was the one that sort of worked as an extension of the original block, echoing the shapes along the outside. My drawing was a little on the busy side, so I simplified it to create:

Kris's block with my added border
I am so pleased with how it turned out. Hopefully, Kris will be too!

Friday, February 25, 2011

Once 'Round the Country

A few of us who participated in the Snip.Sew.Send. virtual quilt bee have joined up again for more fun. This time, we're going Round Robin style, Once 'Round the Country!

Each of us is making a center block. Over the course of the bee, everyone will add borders to each of the center blocks. By the end, each of us will have a completed top. I'm so excited about the possibilities!

I had a tough time deciding what direction I wanted to go with my center block... modern? traditional? intricate piecing? applique? I finally ended up with this:

happy pink and orange Dutch Rose block
It is a take on a pattern sometimes called "Dutch Rose" or "Carpenter's Wheel." The traditional version involves lots of diamonds and inset seams. I went for a simpler version using half-square triangles using a pattern from McCall's Quilting to make my 12" block. It's not at all my usual thing (if I could even be said to have a usual thing). But I definitely love how it turned out!

fabrics for round robin
My fabric palette consists of a selection of fat quarters from Patty Young's Sanctuary collection from Michael Miller as well as an array of coordinating Kona solids (1 yard of Snow and 1/2 yard each of the others). Seriously bright and happy. Definitely pink and girly. With orange! I'm obsessed with orange lately.


stack o' fabric
I have no plan for this, no direction to give. I'm just going to trust in the creativity of Zonnah, Adrienne, Anne, and Kris and see where their whims take it. It is going to be so exciting to watch it grow!