Showing posts with label bags. Show all posts

Tuesday, February 17, 2015

Evening clutch

Another day, another Noodlehead Gathered Clutch! I'm thinking that should be my new motto. I do seem to make a lot of these. Truly, this design is awesomesauce fun!

Noodlehead Gathered Clutch, black and burgundy collage

This time around I went with a faux suede-textured fabric (leftover from a Halloween costume made a few years ago) for the outer and some pretty metallic burgundy cotton for the accents.

Noodlehead Gathered Clutch, back of flower pin

I also decided to add a bit of frill with a fabric flower pin. I purchased the "Gathered Petal Flowers" downloadable pattern from M.E.H. Designs on Etsy. The pattern is straightforward, but is not particularly detailed and assumes some sewing knowledge, and it kind of leaves a lot to the imagination in terms of finishing. While I'm not sure I would recommend the pattern, I gotta say-- it did result in a pretty spiffy looking flower. I made the flower entirely by hand and it ended up taking me close to an hour-and-a-half to complete (about twice as long as constructing the actual pouch did). But it was definitely worth it-- I think it totally takes this clutch to another level.

Noodlehead Gathered Clutch, flower pin detail

So fancy!

Monday, December 29, 2014

Holiday gifting

I hope you have been having a happy holiday season! It has been a crazy couple of weeks here. How do the holidays manage to slip by so quickly??? I haven't done a lot of crafting lately, but I did manage a couple of things.

Noodlehead Gathered Clutch teacher gift:

Noodlehead Gathered Clutch, aqua edition

Love this pattern!

And another:

Noodlehead Gathered Clutch, clock edition

I can't seem to stop making them.

Emmeline Apron hostess gift:

Emmeline Apron, holiday version collage

Having recently made one of these, this one went together very quickly (even the hand-stitching part!). My only complaint this time around has to do with the fabrics. I initially bought some American Made Brand solid in brick for the accent (straps, ties, etc.). But when I went to prewash it, there was bleeding. So I washed again. And again. After the fifth time (and it was still bleeding), I decided to go get some Kona. I've never had a problem with Kona solids bleeding, but sure enough-- when I went to prewash the Kona burgundy, it bled. And bled. And so on. Gah!

Finally, I took the time to do a little research and learned about Retayne. It is a wash additive that works to set colors and prevent bleeding. I ran to my LQS and picked up a small bottle. I used a couple of teaspoons in a load with both fabrics. After a dry cycle, I washed them both again with just a little detergent. The color catcher came out white. It worked!!!! This stuff is chemical magic! Suffice to say-- after the bleeding stopped, the project went very smoothly. And my friend loved it!

Iron-on transfer sweatshirt:

Big Bear wearing his new Rogue Legacy sweatshirt

Big Bear's favorite video game of late is Rogue Legacy. It is an indie game made by a small company. Unfortunately, because they are so small, they don't sell any cool game-related swag. So I created my own and gave it to my son for Christmas. I purchased a plain navy sweatshirt (it was a 50/50 poly/cotton blend), and then used Avery Dark Fabric Iron-On Transfer Sheets to print out the game title logo. I just followed the instructions with the sheets, and it worked great! My only complaint is that the colors in the transfer definitely dimmed and yellowed a bit in the ironing process. But it still looks okay. And he LOVES it. He has been wearing his new sweatshirt every day. Yay!!!

In addition to the above, I also gave my boys new pillowcases and gifted the "Serenitea Quilt" to my mother-in-law.

The projects were all pretty low-stress (excepting the apron... bleeding fabric stresses me out) and I gave myself plenty of time to get them finished (excepting the apron... finished a couple of hours before the event). (Of course, what kind of holiday would it be if there was no stressed-out crafting going on???) Overall, it was a good season for crafty gift giving!

Monday, November 17, 2014

Weekend sewing

It was a rather productive weekend! First up:

Noodlehead Gathered Clutch in aqua, collage of front view and inside

Another Noodlehead Gathered Clutch! I was not totally diggin' the contrast/strap fabric, but I had already cut it and didn't want it to go to waste. So I decided to try some fancy machine stitching on there to give it a little more oomph. I think it ended up being a really nice detail.

Having made this clutch five times now, I think it is pretty evident that I LOVE this pattern. I also have two more all cut and ready to assemble that I plan to give as gifts this Christmas along with this one.

Over the last week, I managed to get borders sewn onto three projects-- so that's three quilt tops complete! Woo! That meant it was time to start getting backings ready. This weekend, I put together one for my Heather Spence Designs Fall 2013 Mystery Quilt:


It took way longer than it probably should have. But, I successfully put it together using stash and I am actually quite happy with the result. So I guess that makes it worth the time. Now I just need to get it basted...

Wednesday, August 13, 2014

Small sewing

I just pin basted a big quilt and am not ready to dive in on quilting it at the moment, so I've been working on some smaller projects lately. Like these pillowcases:

3 new pillowcases

One for me, and a couple for my boys. I actually bought the pink fabrics to make this pillowcase 3 years ago. It has taken me this long to get it done. But at least I finally got there! I'm planning on giving the Hot Wheels ones to the boys as a Christmas gift. Another Christmas gift made not-at-the-last-minute-- woo hoo!

After toting around my new Mail Sack around and about, I determined I needed something smaller in which to put my phone/keys/cards. The bag is so huge, I was finding that those smaller things became very difficult to access. Essentially, it was the perfect excuse to make a Noodlehead Gathered Clutch for me!

Shark clutch, front view

I used the same fabrics for the clutch as I did in my bag. This is my fourth make of this design, and it just doesn't get old. Love it!

Shark clutch, back view with happy shark motif

Happy little shark!

Shark clutch, inside view

After carrying this for a couple of days, I have to say, that divider pocket feature is a winner. I am finding it very useful because I can put my phone on one side and my keys on the other, preventing any scratches.

Small projects for the win!

Friday, August 1, 2014

A Mail Sack for me!

For the last few months, I have been teaching a friend how to sew. We usually meet about once a week. For her first couple of projects, she made dresses for her baby girl. For her third project, she wanted something we could work on together. We chose the Mail Sack pattern from Pink Chalk Studio. We finished our bags this week!

Pink Chalk Studios Mail Sack, hanging

It was a great project for a budding sewist-- a straightforward (and fun!) design, great instructions, and a few more challenging bits to grow skills (zipper, accuracy, and lots of edge stitching). We made the Large/Adult size, resulting in a nice, roomy bag (perfect for outings with the boys).

Pink Chalk Studios Mail Sack, outside detail

For the main body of my bag, I used a gorgeous print ("Deep Sea Beauty Contest" by kayajoy) purchased from Spoonflower (back in 2011) in a linen/cotton blend. It is a great weight and quite nice. There was a bit of fading when I pre-washed it, but the colors, while not as vibrant, are still lovely. I pulled a couple of other fabrics from my stash for the straps and lining.

Pink Chalk Studios Mail Sack, inside view

Love the zipper pocket! I shortened the strap by 2" but made no other changes. I wish I had a picture to share of my friend's bag-- you'll just have to take my word for it that hers turned out great as well!

Pink Chalk Studios Mail Sack, me and my bag

I've made this bag twice before in the mini/child size for each of my boys (Big Bear and Little Bear). Both times I stated that I wanted one for me-- and now (finally!) I have one! Even better, it was a project I got to make with a friend.

Sunday, July 20, 2014

Fancy tote bag

A friend of ours recently turned four-- the perfect excuse for me to make something fun and frilly!

tote bag hanging from my hand

She had recently seen a tote bag at a local farmer's market and fallen in love with it. Her mama was not in love with the price and so they did not pick it up that day. I said, "Hey! I can make something like that!"

side-ish view of bag

Using purple fabrics from my stash (because that is her favorite color), and a couple yards of purchased trim, I designed and put this together. It is very similar to a bag I made for myself a few years ago-- just a wee bit smaller (and much fancier looking!).

detail view of stitching on the beaded trim

This girl is all about the bling, so I found some super-sparkly pink trim that I layered atop some ribbon for the mid-section of the bag. Then I used one of my machine's fancy stitches to attach the beaded trim along the top.

inside view of bag

Even the lining is purple. And, of course, I had to put a little pocket in there.

front view of tote bag

Best of all-- our friend LOVED it! Yay!!!

Monday, July 7, 2014

A couple more clutches...

At the beginning of this year, I signed up for one of those "Pay-It-Forward" gigs on Facebook wherein I committed to send out a friendly surprise sometime within the calendar year to peeps who agreed to do the same for others. Two people agreed. As I had so much fun making the Noodlehead Gathered Clutch for my son's teacher, I went ahead and made a couple more for my pay-it-forward friends.

Noodlehead Gathered Clutch, outer and inner views, Asian flower version

I purchased the swivel clasp hardware from Etsy seller, BeingBags. I gotta say-- the prices are reasonable, the shipping was fast (and free!), and the hardware is solid. I definitely recommend this shop!

Noodlehead Gathered Clutch, outer and inner views, red batik version

Bonus: All the fabrics are from my stash. Yay!

Also, I cannot recommend the Noodlehead Gathered Clutch pattern enough! The clutch is a great design, the instructions are easy to follow, it is quick to put together, and it offers a fun way to use up scraps or small cuts of fabric.

a pair of Noodlehead Gathered Clutches

I plan to mail these out this week-- hopefully my friends will enjoy them!

Friday, June 20, 2014

End of Year Teacher Gift

Stuff is still being stitched here in Crafty Musings land. I may have failed to post in time for the Sew Sweetness Jaybird Quilts sew along June 13 deadline, but I have been working on the quilt. In fact, I'm in the process of quilting it. Woo! And I have two other projects that are all quilted up and just waiting for binding. So, yes, stuff is happening-- I'm just a bad blogger. :(

Anyway, one of my recent projects was an end-of-year gift for Big Bear's 1st grade teacher:

Noodlehead clutch, front view

This is the Noodlehead Gathered Clutch. There is a free tutorial for the main body of the clutch, but I actually went ahead and purchased the pattern so I could also easily add the strap, inner divider, and card pockets. And knowing that my purchase is also supporting a fabulous independent blogger/designer made this purchase an excellent value, indeed!

Noodlehead clutch, back view

I used fabrics from my stash. The outer main body is an oh-so-pretty Lila Tueller floral print and the accent is from Julie Paschkis's "Folklorica" collection a few years ago. Really, this little clutch is a great scrap buster because it only requires small amounts of each fabric. I was easily able to do the main body with just a fat-eighth cut.

The pattern went together without a hitch. I was especially appreciative of the detailed instructions for cutting a zipper to size. I think this is the first time I really "got" the whole zipper tab thing right. (*Finally.*)

Noodlehead clutch, inside view

The inside is pretty and practical!

Noodlehead clutch, another front view

Big Bear presented it to his teacher on the last day and reported back to me that she loved it. Yay!

Monday, October 14, 2013

A belated gift...

I recently got to spend some time with a friend whom I hadn't seen in more than a year. Such a treat! Even better, it meant that I could finally give her a (very) belated birthday gift:

Sanctuary zip bag, front view

This happy little pouch is from Elizabeth Hartman of Oh! Fransson; it is the "Perfect Zip Bags" pattern. This is View C in the large size. I've actually made this view before, but this is the first time I tried the large size-- and it is BIG (you can see how I loaded it up below). Overall, it is a great pattern. But, there is one thing I didn't mention last time which would have been helpful for me as I completely forgot when I was making this one. This is a user error issue, not necessarily a problem with the pattern-- but definitely a problem for me (since I've done it twice now!).

For my bags, I've been using a canvas interlining to add stability (the canvas goes in-between the outer fabric and the lining, and is cut to size so as to not cause bulk at seams). It works really well. However, you need to be careful to make the topstitching along the the zipper far enough away such that the interlining is caught in the stitches as well. I topstitched about 1/8" away from the zipper; when I went to turn everything right-side-out, I realized that the interlining was not caught in the stitches (or it caught so close to the edge that it was starting to fray apart) because it had slipped a smidge in the whole zipper insertion/sewing process. The end result was a slightly loosey-goosey interlining at the top of the bag. It definitely wasn't horrible (certainly not enough to merit me doing a ton of unsewing and tearing out topstitching to fix it), and I don't think it will affect the shape or durability of the bag. But it bugs me-- especially since it is a simple fix: topstitch 3/8" to 1/4" away from the zipper, thus ensuring that the interlining will be caught as well. Had I noted this the first time, I might have remembered it and actually made the correction this time around. Sigh...

So. Now I have made a note. Listen-up self-- don't make this same mistake again! :)

Sanctuary zip bag, top zipper view

I used scraps from Patty Young's beautiful Sanctuary collection paired with Kona Coal. The lining is Kona Green Tea.

Sanctuary zip bag, shown with gifts to go inside

My friend enjoys a bit of wordsmithing at times, so I loaded it up with writing-related stuff-- like disposable fountain pens, a leather-bound journal, and some Haiku inspiration. And an amazon.com gift card. Just because.

Sanctuary zip bag, loaded up with gifty goodness

There is something about creating a holder and then filling it with special stuff that just makes me happy. Fortunately, it made her happy too! :)

Wednesday, September 11, 2013

Back to School: Part 2

This week it is Little Bear's turn to go back to school! This will be his third year of cooperative preschool. He decided that he wanted a school bag, just like his big brother. I was happy to oblige!

Mail Sack, front view

I used the Mail Sack pattern from Pink Chalk Studio. I actually made this same bag 3 years ago when Big Bear was in preschool.

Mail Sack, side view

He chose the fabrics. His favorite color is green. Again, it went together fabulously. I shortened the strap by 2" as Little Bear is on the smaller side. I think it is a great length for him that he can grow into some still.

Mail Sack, inside view

This time around, I interfaced everything (except for one pocket piece) resulting in the bag being a tad bit stiff. I figure as time passes, it will soften up. And as it belongs to Little Bear-- it needs all the durability it can get!

Mail Sack, Little Bear view

Sometimes, I look at him and it blows my mind. He's growing up so fast!

Thursday, September 5, 2013

Wednesday, May 8, 2013

The Lilium Laptop Bag

I recently had the opportunity to test a pattern for designer Sara Lawson of Sew Sweetness-- the Lilium Laptop Bag.

For my version, I went with a selection of happy teal-colored fabrics:


The exterior is a super cute kitty print by Julie Paschkis for In the Beginning Fabrics. The pattern called for a yard of fabric and that is what I had. What I didn't consider though until I started cutting was the scale and directionality of the fabric design. I tried to take advantage of the print as best I could with what I had, but I really could have used another 1/4 yard or so to allow me to do more with the design. The accent fabric is Kona cotton in Glacier.

Lilium Laptop Bag-- front view

Gah! I cut off my kitties heads with the back zip pocket! :P

Lilium Laptop Bag-- back view

But I'm pretty pleased with how I managed to center the design on the strap:

Lilium Laptop Bag-- side view

Also-- best slider strap instructions I've read. So easy!

The bag was not all smooth sailing for me, however. I faced a couple of challenges along the way. One was the interlining I chose to use. Sara suggests a product called Annie's Soft and Stable for her bags. I couldn't find it locally, so, based on a note in the pattern and the recommendation of the very knowledgeable associate I spoke with at Pacific Fabrics, I went with automobile headliner fabric. It is 1/4" foam that has a felt backing on one side. I was unhappy with it for two main reasons:
  1. It was challenging to sew as the foam just did not want to feed through the machine. There was a LOT of friction between the foam and the throat plate, and even using a walking foot I found myself having to pull the pieces through from the back to get it going. It resulted in uneven stitches, frustration, and a sore wrist.
  2. I'm just not happy with the finished structure of the bag. It just seems a little too floppy for me. I want it to have a little more body. I think the Annie's would have been both easier to work with and would have resulted in a more sturdy-feeling bag.
The pattern includes instructions for additional padding to provide more protection for a laptop. But the headliner fabric was thick enough, I felt comfortable not including any additional foam. So the headliner definitely wasn't all bad.

One other challenge was due completely to my own ineptness:

Lilium Laptop Bag-- my pieced flap lining

I somehow completely messed up the cutting of the lining flap. Believe me, it wasn't the instructions or the pattern piece-- those were very clear. But I still somehow managed to just mess it up. I don't even know how I did it. But I didn't have enough fabric to re-cut, so I ended up having to make it work by piecing it together. Doh! But The pattern in the fabric hides the seams pretty well, and it all worked out in the end. Phew!

Lilium Laptop Bag-- inside view

For the lining, I ended up using three different fabrics as I didn't have quite enough of any one (or two). I love the zipped divider pocket, and Sara's instructions were awesome!

laptop in Lilium

The large bag really is huge. It can easily accommodate our ginormous laptop. And, to give you a sense of the scale, this is me carrying it:

wearing the Lilium Laptop Bag

It really is a great design. Sara put a lot of thought into the instructions-- they are very clear and not overly wordy. She also includes lots of pictures to illustrate the steps. Her attention to detail is awesome. Seriously, if you are on the lookout for a good laptop bag-- this is a winner!

The Lilium Laptop Bag pattern is available now through the Sew Sweetness Pattern Shop.

Wednesday, April 24, 2013

Keeping busy

I've been having a lot of fun following my mojo! Now that I can breathe again (thank you antibiotics!!!), I'm actually doing some stuffs. I'm still working on the binding of the wedding quilt (finally in the home stretch on that), but I've also started working on a couple of UFOs.

quilting progress on my Eden baby quilt

Around Christmastime, I put together a cute little baby quilt top. Today, I started in on the quilting. It is small, so it should go pretty quickly.

I also have plans to quilt up my Fall Mystery Quilt top. I finally put together a back and got it basted the other night.

Fall Mystery Quilt basted and ready for quilting

I just realized that I never even showed the finished top. Now the mystery is revealed! Working on the new Spring Mystery Quilt is definitely motivating me to get this one finished.

Lastly, I've been shopping the stash and choosing fabrics to make a new bag.

gathering materials for a new project

Not sure when this will actually get made, but I'm happily planning away and gathering materials.

Go, mojo, go!!!

Thursday, January 3, 2013

Manly Messenger Bag

A few years ago, I made an Amy Butler High Street Messenger bag for my sister-in-law for Christmas (it was pre-blogging, but I posted a review of it on PatternReview.com). Since that time, my husband has not-so-subtly hinted that he would love to have a bag like that for himself. I finally managed to get it done and gave it to him for Christmas.

Amy Butler High Street Messenger Bag, front view

The exterior is a navy blue twill. The lining is a quilting weight cotton with a fun circuit board print. The pattern calls for home dec weight fabric for both the exterior and the lining. Since I chose a quilting cotton for the lining, I went ahead and used Pellon SF101 interfacing on every lining piece to provide a little more heft. I also (as per the instructions) used a canvas interlining for the entire exterior. I opted for the velcro closure since my husband is likely to haul about some electronic devices.
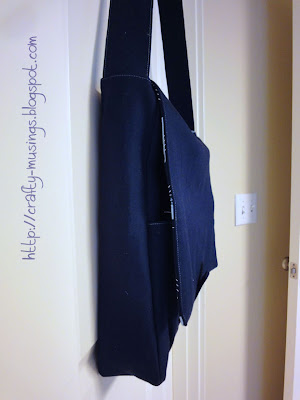
Amy Butler High Street Messenger Bag, side view

In an attempt to break up all of the plain navy, I did all of the topstitching in a light blue-grey thread. I kind of wish I had opted for a heavier duty thread so it would be even more pronounced, but my machine is sometimes persnickety about heavier threads and I just didn't want to fight. One thing to note about the design of this this bag is that the strap is NOT adjustable. Which isn't necessarily bad, but when trying to make it with no way to fit to the person for whom it is intended... it is kind of a crap shoot. In this case, I left it at the full cut length of the pattern, and it works perfectly on my husband. If it were for me, I would have needed to shorten it by a few inches.

Amy Butler High Street Messenger Bag, back view

This bag is a great size (15" tall, 12.5" wide, 3.5" deep) and includes 3 large zipper pockets. One on the exterior back, one on the inside flap, and one in the interior hanging tool pocket. I'm not sure why I always decide to follow Amy Butler zipper instructions, considering all of the negative experiences I've had with them, but I did it here too. As it turns out, the zipper instructions for this bag are relatively easy to follow. However, I am not a fan of the finished look.

close-up of zipper insertion

In the method used, the ends of the zipper tape (both above and below the zipper stops) are left visible, and there is a tiny opening left (really, really tiny-- nothing would ever be likely to escape it is so small, but knowing it is there kind of just bothers me). Pictured above is the inside flap zipper so you hopefully can see what I'm trying to describe. Should I make this bag again, I will definitely start with a longer-than-12" zip, trim to size, and use end tabs to make sure the zipper tape is covered and no holes remain. I feel kind of silly though because in my pattern review when I made this for the first time, I noted that I used longer zippers to avoid this very issue. Duh. Clearly, I should have read my own review before making it again!
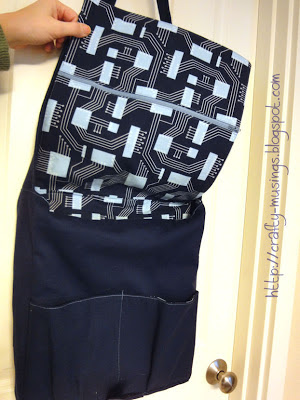
Amy Butler High Street Messenger Bag, flap view

I just love this lining print! With the flap open, you can get a good look at the nice open pockets on the front. I think they look snazzy, and seem like a nice easy spot to stash small things when you don't want to have to dig in the depths of the bag.

Amy Butler High Street Messenger Bag, hanging tool pouch

One interesting feature of this bag is the hanging tool pouch. It hangs down on the inside of the bag from the top of the front inside edge. It has a nice zipper pocket and a nice sized open pocket (perfect for a smart phone or even a portable gaming device) and some pen slots. The fact that it can be lifted out allows for easier access to the zipper pouch-- very practical!

A couple of notes about the pattern:

The instructions are very detailed. But they are a little frustrating as they refer to pieces by number in the cutting instructions, but then by name everywhere else-- which wouldn't be so bad except that all of the names sound very similar, and there are lots of pieces to keep track of. Painter's tape or sticky notes are definitely helpful for keeping track of what's what. Also of note: all of the pieces are square/rectangular. I found it easiest to measure the pattern and then rotary cut everything, rather than tracing and laying them out as per the instructions.


He was thrilled when he received the bag. And it suits him really well, both in style and fit. Yay!!!
