Success!
This time, with focused attention to accurate 1/4" seams and using the "no-waste flying geese" method (which meant less bias edge contention and increased accuracy), the finished block measures 18.5". And I like this turquoise fabric even better. So it is a win!
Meanwhile, I am nearly done with a sequin tank top made from the failed dress parts. A little bit of hand stitching and some hems to go. I'm feeling the garment bug right now, so I think I'll focus on clothing for a bit. I've traced a few patterns and look forward to getting some cutting done soon!
Showing posts with label blocks. Show all posts
Wednesday, February 25, 2015
Friday, November 21, 2014
Easily distracted
It has been kind of a quiet week thus far here in the quilt mines. I managed to baste two small wallhangings-- so hopefully, I'll manage to start quilting (finishing!) something soon. But not yet! Once again, I find myself distracted by something fun and new. Woo!
In my blog-reading travels I ran across a relatively recent sampler quilt along from Sea Breeze Quilts. She is calling it the "Chocolate Marshmallow Sampler." The way this one works, she is posting two blocks each month. They are available for free for one month on her blog. After that free month, the blocks become available for purchase as instant downloads in her etsy shop. At this point, there are six blocks, with blocks 1-4 available for purchase and 5-6 accessible on her blog until mid-December. There will be a total of twelve blocks for the quilt. I do enjoy samplers, and the timing just seemed right, so I ended up going to her etsy shop to purchase the first set of blocks and I pieced them together over the last couple of days:
I've decided to go with greens and browns. I have a lot of greens in my stash, and this seemed like it might be a fun way to utilize some of them. I've pulled a few fabrics, but I've decided I'm going to kind of pick and choose on a block-by-block basis to keep it fun and interesting. We'll see where it takes me...
In my blog-reading travels I ran across a relatively recent sampler quilt along from Sea Breeze Quilts. She is calling it the "Chocolate Marshmallow Sampler." The way this one works, she is posting two blocks each month. They are available for free for one month on her blog. After that free month, the blocks become available for purchase as instant downloads in her etsy shop. At this point, there are six blocks, with blocks 1-4 available for purchase and 5-6 accessible on her blog until mid-December. There will be a total of twelve blocks for the quilt. I do enjoy samplers, and the timing just seemed right, so I ended up going to her etsy shop to purchase the first set of blocks and I pieced them together over the last couple of days:
I've decided to go with greens and browns. I have a lot of greens in my stash, and this seemed like it might be a fun way to utilize some of them. I've pulled a few fabrics, but I've decided I'm going to kind of pick and choose on a block-by-block basis to keep it fun and interesting. We'll see where it takes me...
Thursday, October 6, 2011
Block exchange catch-up
Oh, my... again, blogging fell by the wayside. However, I think I'm finally starting to adapt to our new schedule. (Yay! ) Hopefully, this will allow for more crafting energy and blogging time. My to-do list is growing-- so I really need to start making time to visit the quilt mines!
But, I'll start with something small: my guild block exchange! I haven't shared for awhile, so I have four months worth of blocks to show you.
For July:

This is Julie's block. Halloween!!! It's definitely gonna be a fun quilt.
For August:

Pat's blocks were super-easy to put together, and have a great look. She requested that we sign our blocks.
For September:

This is Sue's block. Simple and happy. I love the bright colors in the Laurel Burch fabrics she chose.
For October:

This is Tammi's block. The block design is called "Card Trick"-- I've never made one before. It is pretty darn cool, I think! It probably helps that I love her fabrics.
Here's to a productive October!
But, I'll start with something small: my guild block exchange! I haven't shared for awhile, so I have four months worth of blocks to show you.
For July:

This is Julie's block. Halloween!!! It's definitely gonna be a fun quilt.
For August:

Pat's blocks were super-easy to put together, and have a great look. She requested that we sign our blocks.
For September:

This is Sue's block. Simple and happy. I love the bright colors in the Laurel Burch fabrics she chose.
For October:

This is Tammi's block. The block design is called "Card Trick"-- I've never made one before. It is pretty darn cool, I think! It probably helps that I love her fabrics.
Here's to a productive October!
Tuesday, June 14, 2011
A couple of blocks...
I just realized I haven't posted my most recent guild block exchange efforts.

This was my assignment for May. She included a plethora of different batiks to choose from, and I really enjoyed getting to pick out which ones to use.

This was my block exchange assignment for June. Easy peasy flannel nine patches (she even had all of the fabrics pre-cut). Her plan is to use the blocks to create a baby quilt or two for Eastside Baby Corner.

This was my assignment for May. She included a plethora of different batiks to choose from, and I really enjoyed getting to pick out which ones to use.

This was my block exchange assignment for June. Easy peasy flannel nine patches (she even had all of the fabrics pre-cut). Her plan is to use the blocks to create a baby quilt or two for Eastside Baby Corner.
Tuesday, May 3, 2011
Blocks for Margaret's Hope Chest
Carin, founder of the charity organization Margaret's Hope Chest, decided to put together a quilting bee. If you haven't read the story behind MHC, I recommend you check it out. The way they have been able to create something so positive and good from such a tragic event is very inspiring.
Not only was the bee for a great cause, but Carin also made it very easy to participate: just make two blocks and send them in. Easy peasy! So I signed myself up to help in making blocks for two different quilts.
For Jordan's quilt:

These were made using Cluck Cluck Sew’s Stack and Whack Block tutorial.
For Frankee's quilt:

Glittery, sparkly goodness! These were made using Crazy Mom Quilt’s Hourglass Block tutorial (but starting with a 9" square instead of a 6").
Contributing was such a simple thing, and fun to do too!
Not only was the bee for a great cause, but Carin also made it very easy to participate: just make two blocks and send them in. Easy peasy! So I signed myself up to help in making blocks for two different quilts.
For Jordan's quilt:

These were made using Cluck Cluck Sew’s Stack and Whack Block tutorial.
For Frankee's quilt:

Glittery, sparkly goodness! These were made using Crazy Mom Quilt’s Hourglass Block tutorial (but starting with a 9" square instead of a 6").
Contributing was such a simple thing, and fun to do too!
Saturday, March 12, 2011
March guild meeting
It has already been more than a week since the March meeting of my local quilt guild. But I made some blocks for the block lotto held that evening that I've been meaning to share.
Block lotto is an optional activity for guild members. We are each given a piece of fabric and a theme and we make blocks (supplementing the given fabric with our own). All of the blocks are collected and then grouped into sets. For every block one makes, one receives a ticket. Over the course of the meeting, there are drawings and winners receive a set of blocks.
This month, the themes were '30s and pinwheels and 8.5" blocks. I actually managed to make three!

Pinwheel blocks are so fun to make, I couldn't help myself.
Alas, I was not a winner this month. But there's always next time!
Block lotto is an optional activity for guild members. We are each given a piece of fabric and a theme and we make blocks (supplementing the given fabric with our own). All of the blocks are collected and then grouped into sets. For every block one makes, one receives a ticket. Over the course of the meeting, there are drawings and winners receive a set of blocks.
This month, the themes were '30s and pinwheels and 8.5" blocks. I actually managed to make three!

Pinwheel blocks are so fun to make, I couldn't help myself.
Alas, I was not a winner this month. But there's always next time!
Friday, February 26, 2010
House party!
The theme Kris chose for her Snip.Sew.Send. blocks this month is tiny houses. She requested 12.5" blocks with small houses (2"-4") centered in them. She sent the background fabric and requested we use our own scraps/stash for the rest.
Going in, I was a little worried because this kind of block is just so not my style (or so I thought) and rather out of my comfort zone. I knew I wanted to make some trees (because every neighborhood could use trees!). But then I was stuck. Fortunately, the deadline loomed ever closer helping me to get off my duff and just do it.

These were so much fun to do!!! I actually ended up making 3 blocks (well, nearly 3... I ran out of background to frame out the tree blocks-- hopefully Kris won't mind finishing them up). I'm sorely tempted to keep the little house, I'm so happy with how it worked out.
Here's a close-up of one of the trees:

I think the little kitty may have spied a birdie up there!
Based on the blocks I've seen so far, this is going to be a really fun quilt. I can't wait to see how they all come together.
I hope you enjoy your blocks, Kris!
Going in, I was a little worried because this kind of block is just so not my style (or so I thought) and rather out of my comfort zone. I knew I wanted to make some trees (because every neighborhood could use trees!). But then I was stuck. Fortunately, the deadline loomed ever closer helping me to get off my duff and just do it.

These were so much fun to do!!! I actually ended up making 3 blocks (well, nearly 3... I ran out of background to frame out the tree blocks-- hopefully Kris won't mind finishing them up). I'm sorely tempted to keep the little house, I'm so happy with how it worked out.
Here's a close-up of one of the trees:

I think the little kitty may have spied a birdie up there!
Based on the blocks I've seen so far, this is going to be a really fun quilt. I can't wait to see how they all come together.
I hope you enjoy your blocks, Kris!
Tuesday, April 28, 2009
Playtime: the bunting
I kept busy over the weekend working on my Playtime quilt (a fabulous BOM design from American Jane Patterns). This month's block was a row of gumdrop bunting that goes along the top of the quilt. I did it a little differently from the instructions, and I thought I'd share my process.
This is the template for the bunting shape:

The way the instructions would have one do it, you'd create a number of finished circles (much in the same way as I prepared the ball previously) and then you'd cut them into quarters and then pair them together to create the gumdrops. The problem with that is that, unless one wanted only 4 different colors in the bunting (which is not how it is pictured on the pattern), there would be a lot of wasted quarters. So I did it differently.

I cut sixteen 4" squares and eight 1" x 4" strips from a variety of fabrics and then stitched them together as shown in the photo above: square - strip - square. Then I cut eight 4.5" x 8.5" rectangles from a thin, white muslin.

I put the muslin on top of the template and traced a half circle. The muslin was supercheap thin, so I didn't even need a lightbox for tracing.

I put the muslin and the stitched squares right sides together, being careful to center the muslin on the squares, and then stitched on the traced line.

Next, I trimmed, leaving about 1/4" seam allowance.

Then I turned it right side out, pressed,

and trimmed the top edge down to size.

Ta-da! A finished gumdrop.

Then it was all a matter of appliqueing them to the background and adding the cherry on top (or below?).
The finished block:

It's 6.5" wide and 66" long.
With that completed, I was able to put together the whole top 1/3 of the quilt!

Yay, progress!
This is the template for the bunting shape:

The way the instructions would have one do it, you'd create a number of finished circles (much in the same way as I prepared the ball previously) and then you'd cut them into quarters and then pair them together to create the gumdrops. The problem with that is that, unless one wanted only 4 different colors in the bunting (which is not how it is pictured on the pattern), there would be a lot of wasted quarters. So I did it differently.

I cut sixteen 4" squares and eight 1" x 4" strips from a variety of fabrics and then stitched them together as shown in the photo above: square - strip - square. Then I cut eight 4.5" x 8.5" rectangles from a thin, white muslin.

I put the muslin on top of the template and traced a half circle. The muslin was super

I put the muslin and the stitched squares right sides together, being careful to center the muslin on the squares, and then stitched on the traced line.

Next, I trimmed, leaving about 1/4" seam allowance.

Then I turned it right side out, pressed,

and trimmed the top edge down to size.

Ta-da! A finished gumdrop.

Then it was all a matter of appliqueing them to the background and adding the cherry on top (or below?).
The finished block:

It's 6.5" wide and 66" long.
With that completed, I was able to put together the whole top 1/3 of the quilt!

Yay, progress!
Thursday, March 12, 2009
Playtime: the ball block
The next block in the Playtime quilt is the ball. There are a number of ways one can approach making this block. I thought I'd share how I decided to go about it.
Since the pattern was designed for fusible applique, I needed to set it up to do hand applique (because I like hand applique). I used a lightbox and traced to reverse the pattern and then numbered it in the order that I wanted to stitch stuff down. Next I traced all the pieces onto freezer paper and prepped my fabric. I then traced a vinyl overlay to help me with placement of my pieces.

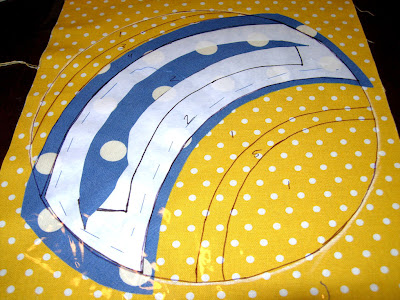
Here you can see that I traced the overall shape of the ball (the white line) onto the main ball fabric. I used this line to have a guide both for piece placement and for the overlay. I placed the vinyl and positioned my first piece. Then I removed the vinyl and basted it in place (I'm in the process of basting it the above photo).
I put the vinyl back on top to check my work (to make sure nothing moved during basting).
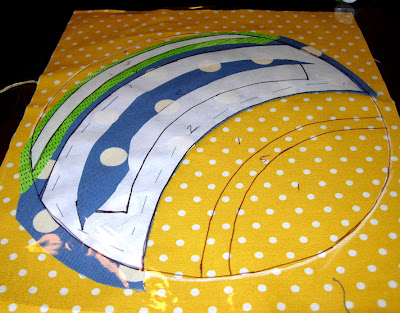
Here I'm positioning the next piece (the green one at the top). You can see that I've already appliqued the edge of the blue piece.

I continued in the same manner (position, baste, stitch) until all the pieces were done. It's hard to tell in my poorly lighted picture, but everything is lining up pretty nicely.
After all that, I was pretty intimidated at the thought of just cutting out and appliqueing the shape onto the background fabric (because it's a circle, because there are lots of seams). So I decided to try something different, inspired by a technique for circles that I saw on The Happy Zombie's blog.
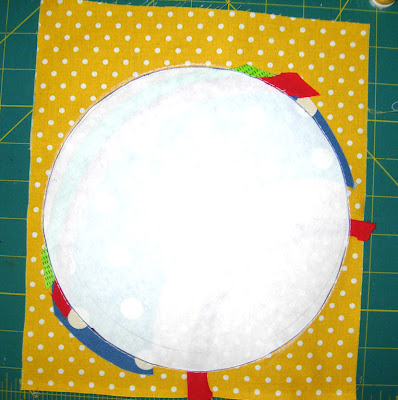
I traced the circle onto freezer paper and ironed it to the right side of my piece (I removed all the basting stitches and freezer paper from the previous applique work). Then I used my sewing machine and basted around the freezer paper shape so that I would have a reference line on the wrong side of the fabric.

I removed the freezer paper and then pinned the piece onto a plain piece of solid fabric (I just used Kona cotton) wrong sides together. (You can see my basting stitches in pink.)

Then I stitched with a normal stitch length just inside of the basted line, all the way around the shape. I backstitched when I got all the way around to secure my stitching.
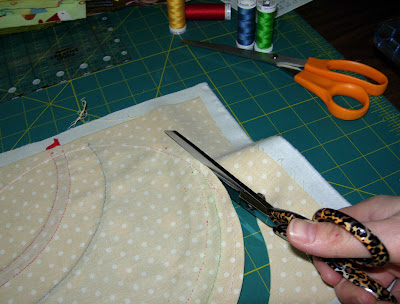
Then I cut out the shape, eyeballing the seam allowance (about 1/4").

I cut a slit in the solid fabric, being very careful to not cut the applique. And then I turned it all right side out, using my handy-dandy that purple thang to help push all the seams out and get the shape right.

After a press, I had a little ball shape ready to stitch onto the background fabric. Except that I forgot to do the appliqued stars. Doh! Fortunately, I didn't have any problems doing it after the fact. But it was definitely inconvenient.
The finished block:

You can't really tell in this picture, but because of the circle technique I used, the shape actually is kind of dimensional and puffs up from the background. The finished block looks pretty cool, I think.
Since the pattern was designed for fusible applique, I needed to set it up to do hand applique (because I like hand applique). I used a lightbox and traced to reverse the pattern and then numbered it in the order that I wanted to stitch stuff down. Next I traced all the pieces onto freezer paper and prepped my fabric. I then traced a vinyl overlay to help me with placement of my pieces.

Here you can see that I traced the overall shape of the ball (the white line) onto the main ball fabric. I used this line to have a guide both for piece placement and for the overlay. I placed the vinyl and positioned my first piece. Then I removed the vinyl and basted it in place (I'm in the process of basting it the above photo).

I put the vinyl back on top to check my work (to make sure nothing moved during basting).

Here I'm positioning the next piece (the green one at the top). You can see that I've already appliqued the edge of the blue piece.

I continued in the same manner (position, baste, stitch) until all the pieces were done. It's hard to tell in my poorly lighted picture, but everything is lining up pretty nicely.
After all that, I was pretty intimidated at the thought of just cutting out and appliqueing the shape onto the background fabric (because it's a circle, because there are lots of seams). So I decided to try something different, inspired by a technique for circles that I saw on The Happy Zombie's blog.

I traced the circle onto freezer paper and ironed it to the right side of my piece (I removed all the basting stitches and freezer paper from the previous applique work). Then I used my sewing machine and basted around the freezer paper shape so that I would have a reference line on the wrong side of the fabric.

I removed the freezer paper and then pinned the piece onto a plain piece of solid fabric (I just used Kona cotton) wrong sides together. (You can see my basting stitches in pink.)

Then I stitched with a normal stitch length just inside of the basted line, all the way around the shape. I backstitched when I got all the way around to secure my stitching.

Then I cut out the shape, eyeballing the seam allowance (about 1/4").

I cut a slit in the solid fabric, being very careful to not cut the applique. And then I turned it all right side out, using my handy-dandy that purple thang to help push all the seams out and get the shape right.

After a press, I had a little ball shape ready to stitch onto the background fabric. Except that I forgot to do the appliqued stars. Doh! Fortunately, I didn't have any problems doing it after the fact. But it was definitely inconvenient.
The finished block:

You can't really tell in this picture, but because of the circle technique I used, the shape actually is kind of dimensional and puffs up from the background. The finished block looks pretty cool, I think.
Wednesday, February 25, 2009
Playtime: the house block
The Playtime quilt has two blocks this month. The first was the airplane. The second is the house:

I've determined that this BOM is definitely not for the faint of heart. The first applique block was a huge challenge, and this pieced block was no cakewalk. It has been a long time since I've pieced something this intricate by machine (all those bars around the window finish at 1/4"). Thank goodness I managed to be accurate enough with my seam allowances that everything actually fit together! (My block is square, even if the picture isn't.) :)
The pattern didn't help. I actually didn't have enough of one of the backgrounds. I had thought all the backgrounds were cut in the first month, so I freely used the rest to do the little pieced setting blocks. Unfortunately, more pieces were needed. Ugh. On the bright side, I happened to have some of the exact same Moda marble in my stash. It seems like I have plenty extra of the rest of the backgrounds, so hopefully I won't run into this problem again (because if I do, my stash won't save me!).
The cutting instructions were also confusing for me. My mistakes resulted in me having just barely enough of the window frame fabric and the house siding fabric (I actually had to do some additional piecing to make the siding work). But it all worked out in the end. Phew!
Here's the progress thus far:

I can actually start putting the whole upper left corner together now!
If you haven't been over to Carrie's blog lately, you should check it out. Not only is there always wonderful eye candy, but she's also having a fabulous birthday/100th post giveaway.

I've determined that this BOM is definitely not for the faint of heart. The first applique block was a huge challenge, and this pieced block was no cakewalk. It has been a long time since I've pieced something this intricate by machine (all those bars around the window finish at 1/4"). Thank goodness I managed to be accurate enough with my seam allowances that everything actually fit together! (My block is square, even if the picture isn't.) :)
The pattern didn't help. I actually didn't have enough of one of the backgrounds. I had thought all the backgrounds were cut in the first month, so I freely used the rest to do the little pieced setting blocks. Unfortunately, more pieces were needed. Ugh. On the bright side, I happened to have some of the exact same Moda marble in my stash. It seems like I have plenty extra of the rest of the backgrounds, so hopefully I won't run into this problem again (because if I do, my stash won't save me!).
The cutting instructions were also confusing for me. My mistakes resulted in me having just barely enough of the window frame fabric and the house siding fabric (I actually had to do some additional piecing to make the siding work). But it all worked out in the end. Phew!
Here's the progress thus far:

I can actually start putting the whole upper left corner together now!
If you haven't been over to Carrie's blog lately, you should check it out. Not only is there always wonderful eye candy, but she's also having a fabulous birthday/100th post giveaway.
Wednesday, May 28, 2008
Block Lotto!
Last month, I attended my first quilt guild meeting ever. It’s a new guild in the area that started-up earlier this year. There were a lot of great people there and I had a fun time and so I went ahead and joined up!
One of the guild activities is a block lotto. A theme is chosen. Members can pick up a fat-eighth of theme fabric and then use it along with their own coordinating fabrics to create a 12” block (or as many blocks as they’re inclined to do). At the next meeting, participants turn in their blocks. The blocks are put together into sets (of nine, I think). Then names are drawn and winners get to take home a set and make a quilt! For every block you turn in, your name goes in the bucket (so to speak). So the more blocks you make, the better your chances of winning.
I decided to give it a shot because it sounded like fun and it's not something I've ever done before. I took my fat-eighth and created these two blocks with fabrics from my stash. (Yay for stash usage!)

The theme is “Independence!”

The theme fabric is the blue star print.
The meeting is next week. Wish me luck!
One of the guild activities is a block lotto. A theme is chosen. Members can pick up a fat-eighth of theme fabric and then use it along with their own coordinating fabrics to create a 12” block (or as many blocks as they’re inclined to do). At the next meeting, participants turn in their blocks. The blocks are put together into sets (of nine, I think). Then names are drawn and winners get to take home a set and make a quilt! For every block you turn in, your name goes in the bucket (so to speak). So the more blocks you make, the better your chances of winning.
I decided to give it a shot because it sounded like fun and it's not something I've ever done before. I took my fat-eighth and created these two blocks with fabrics from my stash. (Yay for stash usage!)

The theme is “Independence!”

The theme fabric is the blue star print.
The meeting is next week. Wish me luck!
Sunday, February 3, 2008
Excess foam
After I completed the windowseat cushion, I found myself with a number of leftover chunks of foam. None of the pieces were particularly large. Just small blocks.Hmmmm.... blocks, eh?
So I made myself a bunch of colorful blocks! I shopped my stash. I used cotton primarily, but I was also able to integrate some different textures on a few of them (minkee, flannel, fleece, and organza). They were really simple to make too. Yay!I think they're really fun looking, and that the boy will enjoy them (or, if nothing else, he will enjoy throwing them). I was even thinking it might be fun to go out and buy foam so that I can make a few baby gifts. There are just so many options. Alphabet, animals, colors, numbers... and one could integrate embroidery designs too. Fun stuff. :)
Subscribe to:
Posts (Atom)


