Showing posts with label 2010 finishes. Show all posts

Sunday, October 31, 2010

Halloween Crazy Jack

I finally took down my nativity quilt! (Please don't judge me... I just didn't have another quilt to replace it, so I didn't want to take it down and stare at a blank wall all year.) It has now been replaced by this:

Crazy Jack front
This much more seasonally appropriate little wallhanging was made from a pattern by Pieces of My Heart called, "Crazy Jack." It was super quick and easy to make. The front is made entirely from one charm pack of "Pumpkins Gone Wild" by Sandy Gervais (it used 44 charm squares plus a little extra for the nose).

Crazy Jack label
After making the front, there was one charm square remaining. I used it to make the label. I was able to pull the binding and backing from my stash. You can get a glimpse of the backing behind the label above. It is a fun Michael Miller print.

Crazy Jack label
Here it is on it's spot on the wall. The hanging rod is fixed, so a regular sleeve wouldn't work. I added three button tabs to the top edge of the quilt to use for hanging.

A couple of nights ago, Keith and I carved up our pumpkins. Mine was inspired by "Crazy Jack." So I had to take a picture:

glowing pumpkins
Happy Halloween!!!

Friday, October 29, 2010

Blogger's Quilt Festival: Autumn House

Amy's Creative Side - Blogger's Quilt Festival

Last month, I finally completed "Autumn House," a BOM quilt from Bunny Hill Designs! Woo hoo! I've been super excited to share the finished quilt with y'all, but decided to wait until Blogger's Quilt Festival for the big "reveal."
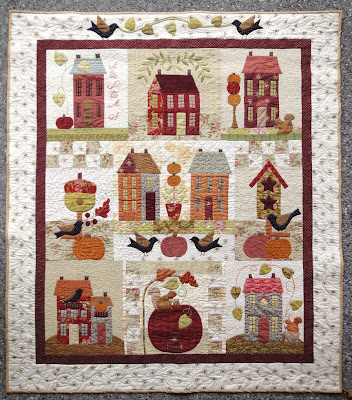
Autumn House quilt completed
The BOM subscription from Shabby Fabrics was a Christmas gift from my awesome husband. I started as soon as the first block arrived in January 2009. All of the blocks are hand appliqued. The top was finished in January 2010. But I didn't manage to quilt it until last month.

This is my first completed hand applique quilt, and I was really, really nervous about messing it up by quilting it. I spent a long time working out a quilting plan. I spent some time practicing. Then I finally just took a deep breath and did it.

Autumn House block 1 quilted
I started with straight lines, outlining the blocks and the borders. Then I outlined all of the appliques. Next I focused on all of the details in the appliques (the pumpkins, doors, roofs, etc.). I did the background quilting next, starting with cross-hatching in the center block.

Autumn House quilted center block
I was initially going to cross-hatch 5 blocks, but after finishing the center block (shown above), I was done. Holy cow, not only was it time consuming, but it was hard! So, I tried a couple other things with the remaining blocks.

Autumn House block 3 quilting
In blocks 1, 3 (shown above), 7, and 9, I used a curly-cue motif.

Autumn House block 8 quilted
In blocks 2, 4, 6, and 8 (shown above), I did the leafy-viney motif.

Autumn House border quilting detail
Lastly, I completed the borders. I quilted the inner border with a leaf pattern. Then I did the outer border with vines and a little pumpkin at the bottom that was inspired by Lynn's beautiful quilting.

Almost all of the quilting (straight lines, outlining, backgrounds, borders) was done using King Tut 40 weight thread in a pretty variegated color, "Sands of Time." I quilted the details with Mettler 50 weight in colors to match the area I was quilting.

Autumn House quilt label
And, here's the label I created for it. There's a peek at the backing too. It is an old Moda print I had in my stash.

I am so proud of this quilt. Thanks so much for taking time to visit and letting me share it with you!

Friday, October 1, 2010

Pinwheel Flowers

Quilted? Check! Edges finished? Check! Label? Check!

My Pinwheel Party Quilt Along quilt, "Pinwheel Flowers," is complete. Woo hoo!!!

Pinwheel Flowers quilting detail
I started by quilting arcs inside each of the pinwheels. This was actually really challenging for me as my presser foot kept getting hung up in the center of the pinwheels (where there was a lot of bulk). So they aren't as neat and tidy and consistent as I would have liked, but after tearing out a number of attempts, I finally just decided to persevere. I'm really happy that I decided to go for it.

Pinwheel Flowers quilting detail 2
In the colored squares, I did some free-motion flowers. Then I stippled all of the background up to the outermost border. All of the colored areas are quilted in variegated thread (King Tut #916, "Mummy's Dearest") and the background stipple is in white (Mettler #2, 40 weight). I just love all of the wonderful texture resulting from the stippling.

Pinwheel Flowers border quilting detail
After I finished all of the edges, I went back and did a little flower vine in the final border area in the same variegated thread that I used in the colored areas of the quilt. I had thought about just continuing the stipple, but decided that the flowers had a little more fun and whimsy to them. I used the variegated thread so the vine would stand out on the white background. It is not perfect, but I think the little flower vine turned out pretty cute.


Here's the label and a little peek at the backing fabric. The backing is nothing special, just something I pulled from my stash. It doesn't exactly match the front, but I think it works well enough.

Pinwheel Flowers hanging
It is a very bright and happy looking quilt! Mmmm... prairie points. Love 'em!

Many, many thanks to the fabulous Anina for hosting this wonderful quilt along. It is such a fun design and was a lot of fun to make. I'm really looking forward to giving this one to baby Abigail. I think she and her mama are going to love it.

Wednesday, June 9, 2010

Happy pants dance!

My older son (age 3) needed some new pants. He wears cloth diapers. Apparently, after age 2, most clothing companies seem to assume that either all boys are potty trained or that they all wear super-thin disposable diapers, because finding pants that will fit over the cloth diaper bulb has become increasingly challenging. Then add this to the fact that it is nigh impossible to buy pants at this time of year (it seems that one can only purchase pants from about July through January... then it's all shorts, all the time).

So I decided to try and make him a pair of pants (keep in mind, my last attempt at pants did not work out so well). During the baby's naptime the other day, I managed to sneak into the sewing room for a couple hours and put a pair together.

Kwik Sew 3211 - toddler pants
So quick and easy! I used Kwik Sew pattern 3211 in a size T4. I actually started by making a muslin to make sure they would fit over the diaper bulb. The muslin (which I did indeed make out of muslin) seemed to fit well, if a little loose. I figured since I was using denim for the real thing, that the thickness of the denim would compensate for the looseness. As it turns out, these are a little on the big side (oddly enough, they fit looser than the muslin did), but not so large that he can't wear them.

I also made a couple modifications to the pattern. The pattern includes some funky knee pleat inserts. I left those out. And then I added the pockets (I took them from another pattern, Simplicity 2907). I also shortened the pants by about 1". Then I also decided to break out my machine embroidery attachment and add some airplane flair using a design from Designs by Juju (it is in the "Things That Go" applique set).

airplane embroidery
That was pretty exciting as I do not make use of that attachment nearly as much as I should (considering how much it cost). Doing this little bit of embroidery really makes me want to make use of it more often. So I count that as a good thing.

Here's a back view:

KS 3211 back view

And here is a very happy boy, wearing his new pants:

boy models airplane pants
And, best of all, he LOVES them!

Sunday, April 11, 2010

The joy of instant gratification

Another project I managed to complete during my camera's demise was a little quilt for Project Linus using the dreaded (seemingly neverending) roll o' fabric. It was awesome because I started cutting on a Saturday afternoon, and had it quilted and bound by Sunday evening. Truly, it was instant gratification!

Happy Charms quilt front
The pattern is by Elizabeth Hartman of Oh! Fransson, created for Sew, Mama, Sew! The free pattern is called "Charm Squares Baby Quilt." It was simple and fun to put together, and it let me use up a little of my stash.

Happy Charms quilting detail
It's a small quilt (about 30" x 40") and it was a perfect little weekend project. I was really feeling the need to actually finish something, as all of my current projects are pretty long-term affairs. So no fancy quilting here-- just some happy stippling.

Happy Charms quilt label
I was able to turn it in at today's Project Linus workshop. Woo hoo!

Friday, April 2, 2010

Dragon's Moon

I mentioned before that I am entering two quilts in my guild's first-ever show this month. The first is "Tyger! Tyger! Burning Bright" (my Star Quilt Along quilt). The second is called "Dragon's Moon."

Dragon's Moon, front view
This quilt was started in a class I took back in 2002. The design is from the Marge Edie book, Bargello Quilts, and is called "Fractured Rhapsody." I finished the quilt top pretty quickly, but then was feeling really uninspired by it. Later that year, I took a beading class from Nancy Eha at the Houston International Quilt Festival. That's when I decided the quilt needed BEADS!

Dragon's Moon, dragon body close-up
The Asian fabrics prompted me to check out a Dover clip art book titled, Chinese Designs, from which I adapted the dragon design.

Dragon's Moon, dragon head close-up
Then, thinking the quilt seemed a little unbalanced, I decided that the dragon needed something on which to focus his rapt attention...

Dragon's Moon, moon close-up
And so the moon appeared. It's an appliqued organza circle surrounded with beads.

I completed all of the beadwork and quilting in 2005. (I have no idea how many beads are in that dragon... but there are a LOT and it took a LONG time to do.) I even got most of the binding sewn down. But then I stalled, and the quilt sat in my UFO pile until I decided to enter it into the show. Last month, I finally finished the binding, got the sleeve sewn, and made the label.

Dragon's Moon, label
It only took me 7 years!

Dragon's Moon, full front view
It's funny... looking at this quilt now, there are a lot of things I would have done differently. The moon would be bigger and have a lot more beading (it's just way to subtle compared to the dragon). I would have added a weight to the bottom right corner to balance the weight of all the beading. I would have done a lot more quilting (the quilting is pretty minimal on this... just following the wave pattern of the bargello design, and pretty sparsely at that. The weight of the beading really called for more quilting, I think). But one thing I wouldn't change is the dragon. I just think he's pretty darn cool. And that's why I want to show off this quilt at the quilt show.

Monday, February 8, 2010

February Project Linus

Yesterday was the February workday for the local Project Linus chapter. And I even had a quilt to bring along with me!

Beaded Curtain quilt
I call this quilt "Beaded Curtain" because that's kind of what all those long lines made me think of, which also inspired the quilting.

Beaded Curtain quilting detail
I used white thread in the white areas and did three wavy vertical lines in each section. Then I quilted the colored areas with a bright variegated thread in a wavy criss-cross design that kind of resembles beads.

Beaded Curtain view of backing
The pattern came from the book, M'Liss Rae Hawley's Fat Quarter Quilts. The design is called "Parallel Paths." My white bars are wider than what she called for in the pattern, since I wanted to take advantage of the whole width of the roll o' fabric I was using. My quilt ended up at 62" by 67". I used the white print to bind it as well. It wasn't my first choice, but I have a lot of it and want to use it all up. It was a little challenging to work with because it is more of a home dec/canvas weight-- but it got the job done.

Beaded Curtain label
And the label.

The focus of this month's workday was to pack up blankets to send to Haiti. We packed 300 blankets and quilts for the cause. Wow! My quilt isn't making the trip to Haiti (it was a little too bulky), but I know it will find a happy place somewhere closer to home.

Monday, January 25, 2010

Birthday boy!

Today is my little boy's third birthday! I can hardly believe it.

boy and birtday balloons
We celebrated the event yesterday by inviting over family and having snacks and cupcakes.

boy eating cupcake
Mmmm... cupcakes.

And, of course, there were many gifts, including this one:

Maisy quilt all folded up
A quilt made by mama!


My little dude loves Maisy Mouse. I love the bright, happy colors, simple art, and sweet stories about Maisy and her friends. When I saw this beautiful kit being offered by the Fat Quarter Shop, it was an easy decision. The kit included the pattern and all of the fabrics needed for the top and binding. I purchased the backing fabric separately (it is also from Andover's Maisy collection).

Maisy quilt center
I started working on it at the quilt retreat in November, and finished it last Friday evening. It was washed and ready to go for the party on Sunday. I was a little nervous about washing it, because none of the fabrics (or the batting) had been prewashed. Usually, I am a prewash fanatic, but as the kit suggested not to prewash, I didn't. Fortunately, everything washed beautifully with no bleeding. The quilt has a lovely, comfy crinkled look to it too!

Maisy quilting detail
I'm really pleased with how the quilting turned out. In the center, I did a long, horizontal stipple in the "sky" areas, outlined and then stippled the house, and did a swirl in the sun. Then I did an all-over freemotion design in the outside borders that involved stars and loops (inspired by a quilt I saw on Quilt Hollow's blog recently).

Maisy quilt back
I just love the backing fabric. So cool!


And the label.

I even made a little pillowcase to go with it:


Happy Birthday, little dude!!!! Mama loves you. :)

Tuesday, January 12, 2010

First quilt finish of 2010!

Over the weekend, I finally completed the Project Linus quilt that has been basted since last October.

Garden Squares quilt, front
The design comes from a tutorial offered by Amanda Jean of crazymomquilts, Elia's Quilt. (I'm missing her blog already! *sniff*)

Garden Squares quilt, quilting detail
I had a lot of fun trying out a new quilting design on this one. It is from Leah Day's blog, 365 Days of Free Motion Quilting Filler Designs, and is called "Super Daisy." My daisies are far from perfect (or consistent... the flowers have anywhere between 5 and 8 petals), but I think they are fun and I feel like I learned a lot from doing them. I'm excited to try some more of her designs in the future. She's got some great alternatives to the just a plain ol' stipple!

Garden Squares quilt, textural view
After I washed/dried the quilt, it crinkled up quite nicely. My friend Evelyn commented that she was really surprised at how soft the quilt was, considering all of the dense quilting. The batting is Hobbs Heirloom 100% Organic Cotton.

Garden Squares quilt, binding
Another new trick I learned in making this quilt is machine finished binding. Wanting to get the quilt finished up in time for the Project Linus workday, I used the binding tutorial from Red Pepper Quilts (fabulous, fabulous tutorial!), and was really happy with the results, especially considering this was my first attempt. It will take a little bit of practice before my bindings are as pretty and clean as Red Pepper Quilts's. But I'll definitely be using this technique in the future.

Garden Squares quilt, back view
The back is a print that I've had in my stash for a few years. I think I still have another 4 yards, so it will probably make another backing appearance in the future.


And, of course, the label. In some ways, it seems kind of weird that I put a label on my donation quilts. But I feel a connection to the quilts I make, as well as pride. I think that if I were ever to receive a quilt from an organization like PL, it would be kind of neat to have a little insight into its origins. And so I label. But I try and keep it simple.

I finished the quilt just in time for the January Project Linus workshop and was able to turn it in then. Woo hoo!
