Another pincushion!
This was the December kit from the Shabby Fabrics Pincushion Club I received last year. The pattern is the "Peace...Love...Joy Pincushion" from Primitive Gatherings.
The kit included the pattern, all of the required fabrics, as well as beautiful Valdani threads for the embroidery. It was great! (And if you are interested, Shabby Fabrics still has some kits available.) The pattern itself was pretty bare bones-- it assumed embroidery knowledge and, as I am not well-practiced, that involved some research on my part. And let me just say that trying to mark on black wool is a challenge-- by the end, I was just kind of free-stylin' it (the oddly angled tree trunk under the star is evidence of that). But it sure is a cute design!
It took me a long time to stitch this one up. My husband commented that this has to be the most elaborate pincushion I've done to date. I don't know about that, but it definitely gave me the opportunity to work on my stitchery skills.
Happy snowman!
Monday, July 23, 2012
Saturday, July 21, 2012
On the design wall...
...for the moment, anyway:
My Moda Greenpiece quilt! I was in the mood to sit and sew at the machine the other night, but didn't have any current projects ready to go. So I went to the project box pile and pulled this one out. I just looked and am shocked to find that it has been nearly two years since I last touched this project (September 2010, to be exact). Whoa.
Anyway, I trimmed all of the applique blocks and added corner triangles to them. I even managed to stitch a few blocks together. I'm not sure I'm committed to getting it all put together right now, but it feels good to have taken at least a few more steps in the process.
My Moda Greenpiece quilt! I was in the mood to sit and sew at the machine the other night, but didn't have any current projects ready to go. So I went to the project box pile and pulled this one out. I just looked and am shocked to find that it has been nearly two years since I last touched this project (September 2010, to be exact). Whoa.
Anyway, I trimmed all of the applique blocks and added corner triangles to them. I even managed to stitch a few blocks together. I'm not sure I'm committed to getting it all put together right now, but it feels good to have taken at least a few more steps in the process.
Monday, July 16, 2012
A new quilt along adventure!
It feels like it has been awhile since I've participated in a quilt along. But I could not pass this one by:
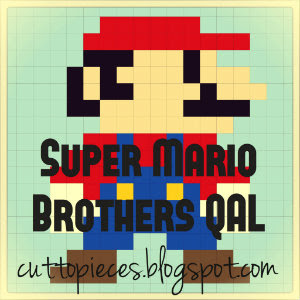
It is the Super Mario Brothers Quilt Along hosted by Angela of Cut to Pieces. So fun! I have fond memories of a weekend spent playing Super Mario Bros. 3 with my best friend when we were in high school... we stayed up nearly two days straight playing through that game together. And we never did beat it. Ha! But we had a ton of fun. So when I saw this QAL, I knew I wanted to participate.
Yesterday, I shopped the stash and chose my fabrics:
The only one I am undecided on is the sashing... not sure what I'll do about that one yet. But I figure I have time to decide.
The only hiccup in my preparations was in finding the suggested stabilizer, Pellon 542. It is a paper-backed, sticky wash away stabilizer. The only one I could find in any local shops was Pellon 541-- similar, but not paper-backed and not sticky. My plan was to use a basting spray to act as the "sticky." Unfortunately, I had problems.
The first issue was that without the paper backing to stabilize the stabilizer (ha!), drawing a grid was kind of challenging-- the stabilizer kept shifting and stretching in odd ways. I got the grid on there, but it was not as accurate as I would have liked. The second problem was that, though the basting spray technically worked (and didn't dissolve the stabilizer like I was afraid it might)-- it didn't work well enough. The fabric squares shifted and shimmied at the slightest handling. They were not stable enough to be able to stitch any accurate seams.
You can see in the picture above how so the squares aren't "flush" against the stabilizer. As soon as I lifted it up to take it to the machine, squares started slipping and falling. Alas!
I know could go without stabilizer and just sew all those tiny (1.5") squares together. But knowing there is an easier, more efficient method, makes me very reluctant to sew all those tiny little seams. So bit the bullet and went online and purchased the suggested stabilizer. I decided to go with a Sulky product (Sulky® Sticky Fabri-Solvy) instead of Pellon, because it was a lot less expensive. But I feel confident it will work the same way.
Now Mario and I just have to exercise some patience and wait for it to arrive. Hopefully next week!
It is the Super Mario Brothers Quilt Along hosted by Angela of Cut to Pieces. So fun! I have fond memories of a weekend spent playing Super Mario Bros. 3 with my best friend when we were in high school... we stayed up nearly two days straight playing through that game together. And we never did beat it. Ha! But we had a ton of fun. So when I saw this QAL, I knew I wanted to participate.
Yesterday, I shopped the stash and chose my fabrics:
The only one I am undecided on is the sashing... not sure what I'll do about that one yet. But I figure I have time to decide.
The only hiccup in my preparations was in finding the suggested stabilizer, Pellon 542. It is a paper-backed, sticky wash away stabilizer. The only one I could find in any local shops was Pellon 541-- similar, but not paper-backed and not sticky. My plan was to use a basting spray to act as the "sticky." Unfortunately, I had problems.
The first issue was that without the paper backing to stabilize the stabilizer (ha!), drawing a grid was kind of challenging-- the stabilizer kept shifting and stretching in odd ways. I got the grid on there, but it was not as accurate as I would have liked. The second problem was that, though the basting spray technically worked (and didn't dissolve the stabilizer like I was afraid it might)-- it didn't work well enough. The fabric squares shifted and shimmied at the slightest handling. They were not stable enough to be able to stitch any accurate seams.
You can see in the picture above how so the squares aren't "flush" against the stabilizer. As soon as I lifted it up to take it to the machine, squares started slipping and falling. Alas!
I know could go without stabilizer and just sew all those tiny (1.5") squares together. But knowing there is an easier, more efficient method, makes me very reluctant to sew all those tiny little seams. So bit the bullet and went online and purchased the suggested stabilizer. I decided to go with a Sulky product (Sulky® Sticky Fabri-Solvy) instead of Pellon, because it was a lot less expensive. But I feel confident it will work the same way.
Now Mario and I just have to exercise some patience and wait for it to arrive. Hopefully next week!
Monday, July 9, 2012
One Thing, One Week Challenge: Catch-up edition
This last week, Amy at Amy's Creative Side hosted another One Thing, One Week Challenge, and I decided to take the plunge and commit.
This time, my goal was to catch up on my Adventures of Harrington & Hannah block-of-the-month.
I needed to finish April, and then complete May and June. That worked out to about 2.25 blocks (because April was all done but for the sashing). And I did it!
April:
May:
June:
I really wanted to be caught up before the next block is posted, so this challenge came at a really good time. And I love that I've finally been feelin' the handwork again lately. Woo!
If you have the chance, check out some of the other inspiring challenge finishes for the week over at Amy's Creative Side!
This time, my goal was to catch up on my Adventures of Harrington & Hannah block-of-the-month.
I needed to finish April, and then complete May and June. That worked out to about 2.25 blocks (because April was all done but for the sashing). And I did it!
April:
May:
June:
I really wanted to be caught up before the next block is posted, so this challenge came at a really good time. And I love that I've finally been feelin' the handwork again lately. Woo!
If you have the chance, check out some of the other inspiring challenge finishes for the week over at Amy's Creative Side!
Thursday, July 5, 2012
Navy blue + Linen = Happy!
I took some time in the quilt mines this week to focus on garment sewing. I bought a lovely navy blue linen four years ago, intending to re-make a skirt pattern I had tried. Well. That didn't happen. So then it sat, languishing away in my stash. Until now!
This skirt is Simplicity 4086, View E (the pattern is out-of-print). I cut a size 16 and (based upon how my last Simplicity skirt fit) used 1/2" seams for the sides and back instead of 5/8"-- and I feel like this one fits perfectly. Yay!
The only other changes I made were to cut the tie-belt longer (I cut a size 22 length) and then I did an invisible zipper.
My invisible zipper skills continue to improve-- but still not perfect. Again, I used the invisible zipper tutorial from sewing.org. I got the top nice and even this time, but somehow I managed to mess up the yoke seam alignment. It bothers me, but not enough to go back and fix it. Besides, it's covered up by the tie-belt, so it is hardly noticeable, right?
I really like this skirt-- the tie front and pockets give this simple A-line design some fun interest. I LOVE the look and feel of the linen-- truly comfortable and fabulous. I was a little worried the length would look a bit dowdy, but I find that I am liking this just-below-the-knee style. I really like how it fits as well. My only qualm is that with this style and silhouette is that I have to wear my shirt tucked, otherwise I look like a giant block (not to mention you can't see any of the details that make this skirt interesting). Tucking is definitely not a bad thing, it is just different for me as I traditionally have always been trying to hide my figure rather than show it off. So I think this skirt is a good change for me, style-wise. It's making me get out of my box a bit.
Now I am envisioning another skirt like this for fall in a microsuede... maybe view B with the buttons? Or view F with some embroidery accents on the ties and hem? I love thinking about the possibilities!
This skirt is Simplicity 4086, View E (the pattern is out-of-print). I cut a size 16 and (based upon how my last Simplicity skirt fit) used 1/2" seams for the sides and back instead of 5/8"-- and I feel like this one fits perfectly. Yay!
The only other changes I made were to cut the tie-belt longer (I cut a size 22 length) and then I did an invisible zipper.
My invisible zipper skills continue to improve-- but still not perfect. Again, I used the invisible zipper tutorial from sewing.org. I got the top nice and even this time, but somehow I managed to mess up the yoke seam alignment. It bothers me, but not enough to go back and fix it. Besides, it's covered up by the tie-belt, so it is hardly noticeable, right?
I really like this skirt-- the tie front and pockets give this simple A-line design some fun interest. I LOVE the look and feel of the linen-- truly comfortable and fabulous. I was a little worried the length would look a bit dowdy, but I find that I am liking this just-below-the-knee style. I really like how it fits as well. My only qualm is that with this style and silhouette is that I have to wear my shirt tucked, otherwise I look like a giant block (not to mention you can't see any of the details that make this skirt interesting). Tucking is definitely not a bad thing, it is just different for me as I traditionally have always been trying to hide my figure rather than show it off. So I think this skirt is a good change for me, style-wise. It's making me get out of my box a bit.
Now I am envisioning another skirt like this for fall in a microsuede... maybe view B with the buttons? Or view F with some embroidery accents on the ties and hem? I love thinking about the possibilities!
Saturday, June 30, 2012
Pincushion o' plenty
It has been awhile since I finished one, but don't think for a second that I have left my pincushion obsession behind! This latest beauty was the November kit from the Shabby Fabrics Pincushion Club.
It is the Cornucopia pattern from Mary Jo Hiney Designs. (And I just noticed that she has a whole slew of other gorgeous pincushion designs available as well... oh, my!)
As much as I love the finished pincushion, I have to say that of all of the kits in the Pincushion Club I received, this one was my least favorite. The kit for this one included only the fabrics. Albeit, they were gorgeous silk fabrics, but in order to complete the pincushion as designed, additional embellishments are not just enhancements-- they are required to cover up holes and the like. I really wish that the kit had included some of those elements. Fortunately, I have a nice stash of beads, and I was able to procure some buttons and wired ribbon without too much difficulty. But it really felt like the "kit" was incomplete.
That said, if you want to make this gorgeous pincushion with these same lovely silk fabrics, Shabby Fabrics does still have kits available. Just be warned that you're gonna need more than silk to make this one.
The instructions were concise and clear and there wasn't anything too tricky. Turning the cornucopia right side out was a challenge as it was a very narrow opening, and then there was a bit of handwork (mostly long running stitches for gathering) and lots of hot glue involved. Hot glue is not my forte. I accidentally made a little glue puddle. It looked horrible and so I tried to cover my mistake with seed beads. That looked weird, so then I ended up adding little piles of seed beads all over to make it look less like a mistake. I think it was a pretty good save. Yay! My only other variance from the pattern was that I didn't use any paper products as she did (the original has a little paper fan and paper tag embellishments); instead I just added additional fabric and ribbon leaves to fill in those spaces.
I really do love this design. Not only is it beautiful, but it also brings to mind thoughts and memories of autumn and Thanksgiving-- my favorite times of year!
It is the Cornucopia pattern from Mary Jo Hiney Designs. (And I just noticed that she has a whole slew of other gorgeous pincushion designs available as well... oh, my!)
As much as I love the finished pincushion, I have to say that of all of the kits in the Pincushion Club I received, this one was my least favorite. The kit for this one included only the fabrics. Albeit, they were gorgeous silk fabrics, but in order to complete the pincushion as designed, additional embellishments are not just enhancements-- they are required to cover up holes and the like. I really wish that the kit had included some of those elements. Fortunately, I have a nice stash of beads, and I was able to procure some buttons and wired ribbon without too much difficulty. But it really felt like the "kit" was incomplete.
That said, if you want to make this gorgeous pincushion with these same lovely silk fabrics, Shabby Fabrics does still have kits available. Just be warned that you're gonna need more than silk to make this one.
The instructions were concise and clear and there wasn't anything too tricky. Turning the cornucopia right side out was a challenge as it was a very narrow opening, and then there was a bit of handwork (mostly long running stitches for gathering) and lots of hot glue involved. Hot glue is not my forte. I accidentally made a little glue puddle. It looked horrible and so I tried to cover my mistake with seed beads. That looked weird, so then I ended up adding little piles of seed beads all over to make it look less like a mistake. I think it was a pretty good save. Yay! My only other variance from the pattern was that I didn't use any paper products as she did (the original has a little paper fan and paper tag embellishments); instead I just added additional fabric and ribbon leaves to fill in those spaces.
I really do love this design. Not only is it beautiful, but it also brings to mind thoughts and memories of autumn and Thanksgiving-- my favorite times of year!
Monday, June 18, 2012
End of year gifts
The end of the school year has come and gone. Big Bear is officially a preschool graduate-- Kindergarten, here we come! I'm still a little dumbstruck. While he is definitely ready to move on, I'm not sure I am. Ha!
Anyway, I managed to make a few end of year gifts for class coordinators and a couple of special friends. The gift of choice: The Circle Zip Earbud Pouch!

This awesomely smart and practical tutorial is from Erin of Dog Under My Desk. It is one of those, "Why didn't I think of that???" ideas that is quick, easy and fabulous. The instructions were clear and well illustrated.

I made the first one (pictured above), from cutting to last stitch, in 40 minutes; the others were even faster. The trickiest part of the process was sewing the outside edge of the circle such that when it was turned right-side-out, it actually resulted in a circle. My advice is to just take it slowly and focus on small, even turns as you sew the seam on the outside edge. By the last one, I had finally figured it out and was feeling pretty pleased with the resulting shape.

I had fun picking out fabrics. I decided to go with a print for the outside and then solids for the tab and lining.
Best of all, everyone loved the pouches. Yay! I was so pleased with the tutorial, I went ahead and purchased the pattern for Erin's Two-Zip Hipster. It looks like it will be an awesome going-to-the-park bag (a summer necessity!), so I hope to make one soon!
Anyway, I managed to make a few end of year gifts for class coordinators and a couple of special friends. The gift of choice: The Circle Zip Earbud Pouch!

This awesomely smart and practical tutorial is from Erin of Dog Under My Desk. It is one of those, "Why didn't I think of that???" ideas that is quick, easy and fabulous. The instructions were clear and well illustrated.

I made the first one (pictured above), from cutting to last stitch, in 40 minutes; the others were even faster. The trickiest part of the process was sewing the outside edge of the circle such that when it was turned right-side-out, it actually resulted in a circle. My advice is to just take it slowly and focus on small, even turns as you sew the seam on the outside edge. By the last one, I had finally figured it out and was feeling pretty pleased with the resulting shape.

I had fun picking out fabrics. I decided to go with a print for the outside and then solids for the tab and lining.
Best of all, everyone loved the pouches. Yay! I was so pleased with the tutorial, I went ahead and purchased the pattern for Erin's Two-Zip Hipster. It looks like it will be an awesome going-to-the-park bag (a summer necessity!), so I hope to make one soon!
Subscribe to:
Posts (Atom)