Sunday, May 15, 2016

A pair of Jenna Cardis

Also left unblogged in 2015 were a couple iterations of the Muse Patterns Jenna Cardi.

Jenna version 1, wearing with top two buttons undone

The first one, completed in early December was from a hatchi sweater knit purchased from Fabric.com awhile back.

Jenna version 1, button placement

This print makes me so happy. My only regret: I wish I had used some sparkly buttons. There is gold threading through the fabric, and some crystaline buttons would bring that element out a little more and look so fun! If I run across the right buttons, I may still change 'em up.

Jenna version 1, back view

I made Variation A, the hip length with long sleeves. Alterations included:
  • 1" FBA, after which I removed the darts by following Maria Denmark's "How to: Removing Bust Darts from a Pattern."
  • Shortened sleeves 2".
  • Used 9 buttons (spaced ~2/25" apart) instead of the 8 suggested in the pattern (as I had added length when doing the FBA).
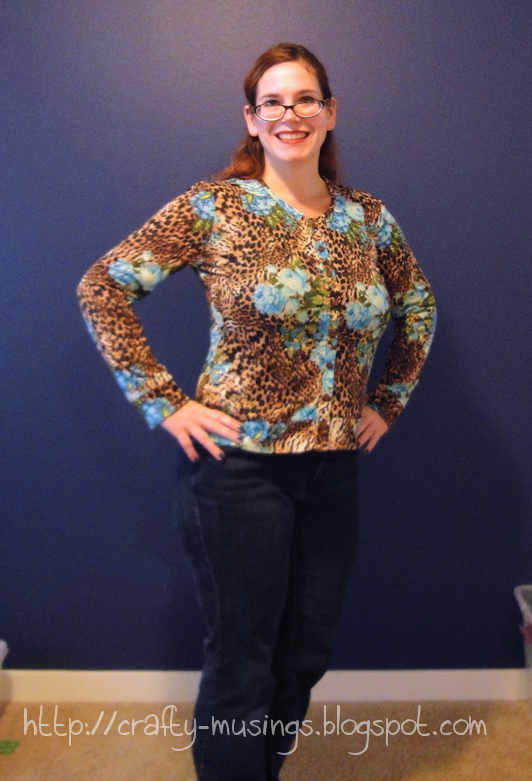
Jenna version 1, buttoned view

I wasn't sure how removing the darts would work, but, as it was only a 1" FBA, I decided to give it a go. And I am super happy with the result! I am not sure how effective it would be if the FBA was any bigger though.

Jenna version 2, front view

The second version (also Variation A with long sleeves) is from a chocolate brown poly/lycra sweater knit from Fabric Mart. It was finished toward the end of December.

The only change to this one from the first was that I narrowed the sleeve width a bit. I just felt like my first one, the sleeves were looser than I wanted.

Jenna cardigans, sleeve comparisons

I very unscientifically trimmed, tapering the width starting from about 1" below the armscrye, ending at the hem where about 1.25" of fabric was removed from the width (and then I adjusted the sleeve bands accordingly before attaching). The picture above shows a comparison of the sleeves between the two versions.

Jenna version 2, back view

Construction on these was straightforward and the instructions were great. It is a very quick project to construct!

Jenna variation 2, side view

I wear these cardigans quite often. The chocolate one is already starting to pill as it has been in such regular rotation. LOVE.

Jenna version 2, full view

Recently, Muse released an add-on for the Jenna that includes a V-neck and collar variations. I snatched it up! More Jennas are definitely in my future.

Tuesday, May 10, 2016

Fall 2013 Mystery Quilt

Basted and ready to go, this one sat for nearly a year before I finally figured out how I wanted to quilt it. But, I finally got it quilted and bound in December:

Fall 2013 Mystery Quilt, front view

It is the Heather Spence Designs Fall 2013 Mystery Quilt.

Fall 2013 Mystery Quilt, side front detail

The fabrics all came from stash. (Yay for stashbusting projects!) It actually was a lot of fun putting this one together.

Fall 2013 Mystery Quilt, quilting detail

On this one I decided I wanted the center to have the feeling of waterlilies or lily pads or somesuch to help tie it and the border together design-wise. I ended up going with this super, labor-intensive approach of using the pinwheels as the basis of a flower, and then, to emphasize it, I did microstippling in the areas between. It creates a sort of trapunto-esque effect.

Fall 2013 Mystery Quilt, quilting detail 2

So. Much. Quilting. I think I listened to two books on CD. So 20 hours or so? Yikes!

Aurifil 50/2 in Light Sand/Beige (2000) throughout the center was perfect-- the 2-ply thread works so nicely for tight quilting.

Fall 2013 Mystery Quilt, quilting detail 3

Then, in the border, I just did some watery wavy lines. I used a slightly heavier-weight thread, Mettler (40/3) in a dark brown.

Fall 2013 Mystery Quilt, back view

I do love me a pieced back!

Fall 2013 Mystery Quilt, quilting detail, back view

So I haven't put a label on it.... yet. I'm kind of on the fence with this one. I really love the quilting and the overall look of the quilt. But I don't need it and it doesn't really fit with our decor at all. So I am thinking I want to donate it, but am having a hard time letting it go.

Fall 2013 Mystery Quilt, side front view

I need to give it a wash still. Maybe then I'll decide. :)

Monday, May 9, 2016

Reversible Embroidered Quilt

This quilt was started with a class I took back in 2008 through a (now closed) local Bernina dealer. The class and project were meant to highlight machine embroidery as a quilting option as well as to teach a quilt-as-you-go method of construction.

Reversible Embroidered Quilt, frontview

I actually completed the quilt itself back in 2008. I just didn't get the binding on it until December 2015. :P

Reversible Embroidered Quilt, detail of some embroidery

To be honest, I'm not a huge fan of this quilt. But I learned a good number of things through the making, including that I'm really just not a fan of quilt-as-you-go. I also like more quilting in my quilt. I learned that machine binding can be an awesome thing (and nowadays, I machine bind many of my quilts... though I don't use the exact technique that was taught in this class). Also-- machine embroidery, while lovely, is really boring to do.

Reversible Embroidered Quilt, side back view

I plan to donate this one, so no label.

Reversible Embroidered Quilt, front side view

While it is maybe not my cup o' tea, the colors are happy and overall, I think it is a pretty quilt.

Reversible Embroidered Quilt, back view

I am happy that the quilt is finally finished!

Saturday, May 7, 2016

"Watch the Clocks"

The top for this quilt was completed in 2014. I finally got it quilted last fall. Then it took two months to get the binding and buttons sewn. But-- it was technically completed just before the new year:

Watch the Clocks, front

The quilt is from a kit my husband gifted me in 2013 from the Fat Quarter Shop. Though the fabric is no more, the design is still available as a free project from Windham Quilts and is called "Tick Tock." I call my rendition, "Watch the Clocks."

Watch the Clocks, quilting detail

Pardon my dark and dreary pictures. My front hallway in the darkness of winter is not very photo-friendly.

Watch the Clocks, another detail of quilting

Since it involved only simple piecing and fusible applique, this was a super quick and fun quilt to put together. In fact, I constructed nearly all of the top one morning during a quit-the-day-away event I attended.

Watch the Clocks, yet more quilting detail

It took awhile before I decided how to go about quilting it. I kind of wanted to create a feeling of gears running behind the clock faces. I think the wavy-line-circle design running across the background captures that pretty well.

Watch the Clocks, hanging tabs

Since the hanger I intended to use is closed, I needed to devise a plan to be able to take the quilt on and off of it. I decided on simple buttonhole tabs sewn in with the binding and placed the buttons on the back. It works quite well.

Watch the Clocks, back

And the label.

Watch the Clocks, label

We have a beautiful grandfather clock in our hallway, just across from where the quilt hangs. It is a happy pairing!

Friday, May 6, 2016

Warm Welcome: "Small Checks"

Whoa. It has been awhile! Frankly, not a lot of crafting has been happening here thus far this year. But I seem to have a backlog of finished projects from the end of 2015 that I haven't posted yet-- so let's just start with that.

Small Checks, front view

This 42" square quilt is from the book, Warm Welcome: Cozy Quilts for Baby by Mary Hickey. The design is called, "Small Checks."

Small Checks, another front detail view

I started on this quilt last May, but found myself struggling with fabric choices. I'm still not thrilled (the checks are so washed out color-wise that the piecing is lost), but considering my decision to leave the check-framed blocks as-is (rather than re-do them), I think it turned out as well as could be expected. And towards the end of the year, I finally managed to finish up the project.

Small Checks, front detail

The quilting is inspired by an Angela Walters Craftsy class, "Dot-to-Dot Quilting." I am really happy with how the quilting worked out in this one. Yay!

Small Checks, back detail

All of the quilting was completed using Aurifil Mako 50/2 thread. I used two different colors: 2710 (Ice Blue) and 2130 (Pale Yellow).

Small Checks, back view

The back is pieced from scraps. I actually like the back better than the front! (As I said, I struggled with fabric choices on this one.) There is no label on this one as it is destined for donation.

Small Checks, another view of the front

This week I have been busy taking pictures of other finished quilts to share. I am determined to get caught back up with my blogging!

Friday, January 1, 2016

2016!

With the start of a new year, I like to take a little bit of time to reflect. It went in spurts, but overall, 2015 was a pretty darn productive year for me:

Collage of Crafty Musings 2015 finished projects


Seeing it all in a collage is always so cool. I feel like I've accomplished a lot! And that's not even all of it-- that's just the stuff I managed to take pictures of! There are a few more 2015 clothing and quilt finishes I hope to share on the blog as well. Soon!

How'd I do on my goals?

2015 Goals:
  • Use more fabric than I buy.
    • Fabric In: 127.070 yards
    • Fabric Used: 120.791
    Close. But not quite. But you know what? I'm not feeling bad about this one. I purchased with mindfulness and purpose on nearly everything-- I just didn't get to sewing it all up. I'm going to turn this around next year for sure.

  • Finish at least 2 UFOs, including my Bargello Reflections quilt.-- I did finish a couple of UFOs: my reversible embroidered quilt from 2008 (still not blogged) and Sunrise Coins. But Bargello Reflections remains in its unfinished state.
  • Finish the recent WIPs pile.-- This includes:
    • A little kit quilt that is basted and ready for quilting;-- DONE! (not blogged yet)✔
    • An Edyta Sitar wallhanging that is basted and ready for quilting;-- DONE! (not blogged yet)✔
    • My Fall 2013 mystery quilt that is ready for basting;-- DONE! (not blogged yet)✔
    • My nine-patch quilt that is also ready and waiting for basting.-- Nope. It's just so dang big. I am feeling intimidated.
    So-- 3 out of 4. I say, yay!
  • Complete the 26 Books in 2015 Challenge.-- I read 51 books this year, across a broad spectrum of genres and subjects, both fiction and non-fiction. So I feel like I was definitely in the spirit of this. In addition, I took this to my book group and we each chose books based on the list. So the list was indeed used. Just not in the conventional way. I'm calling this one a win.
  • Get back on the self-care/fitness train.-- This year I joined a local Fit-4-Mom group and started taking Body Back classes. I have been going twice a week since March and it has been amazing. I feel so lucky to have found an awesome group of women to work-out with twice a week. I have managed to lose 18 pounds over the course of the year. Now if I could just get running again...

Overall-- lots of good things goal-wise.

Here's what I'm feeling for 2016:
  • Fitness!-- Keep going with fitness and work on reaching a goal weight of 150. I'm already signed up for the next session of Body Back as well as for a 10K in the spring to help motivate me to get running again.
  • Use more fabric than I buy.-- All that apparel fabric I bought last year? I want to use it. I have a number of things I know I want to sew, including some activewear pieces, two dresses, and a skirt. Maybe some me-made activewear might help motivate me with my first goal too!
  • Finish my Bargello Reflections Quilt-- Since this one has apparently been such a struggle for me, I'm making it a goal of its own. I'm going to do it. For reals this year.
  • Scrapbook/Blog-- This last year I really dropped the ball not only on blogging, but also on my family scrapbook. And I found myself really sad and frustrated at the end of the year that we didn't have anything to look back on and reminisce about during the holidays. So I've spent much of the last week focused on scrapbooking-- finishing 2014 and getting started on 2015. Going forward, I want to work on maintaining it, as opposed to frantically doing it a year later. My goal is to a.) catch-up by doing one month a week for the month of January; and, going forward, take at least 2-4 hours each month to work on the family scrapbook. As an incentive, I got a new scrapbooking software program, My Memories 7. I'm excited to explore the possibilities with this software! The program I've been using (StoryBook Creator Plus) is many years old, runs very slow, and the company is defunct-- so it is definitely a good time to change. In conjunction with that is I want to be better at taking the time to blog my projects as I finish them. This blog is my crafting journal and I need to get back on track. Definitely a post a week.

Four goals. I'm looking forward to attaining all of them in 2016!

Happy New Year!!!

Saturday, December 26, 2015

Cute kitty skirt!

Cute kitty skirt, tucked front view

This was a skirt I have been thinking about for a long time-- ever since I first saw this happy Lizzie House Catnap print nearly two years ago! The print just spoke to me. And I could not get it out of my head. But I didn't pull the trigger on buying the fabric until I saw that Hawthorne Threads had put it on sale, at which point it immediately went into my cart (along with a coordinating Denyse Schmidt print).

Favorite Things Cute Skirts pattern cover
Now it is a Cute Skirt! Literally. The design is from a pattern from Favorite Things called "Cute Skirts." I made the view with contrasting gores. It is a simple design, and it showcases fabrics so happily. This is actually the third skirt I've made from this pattern (the previous ones were pre-blogging). So clearly, it works for me.

Construction was straightforward. My only quibble was with the instructions for the gores.

Cute kitty skirt, inside view

The instructions have you sew the gores from hem through the point all the way to the edge of the gore fabric. As a result, they just look a bit janky. I mean, from the outside, all is well, but they could be much cleaner on the inside. If one stitched from the hem and stopped at the seam allowance at the top (rather than stitching all the way through to the raw edge), I think the gores would not only look prettier inside, but also sit a bit flatter overall. It had been so long since I made this view (I made my first one in 2005) that I just didn't remember. So-- I'm writing this down so I remember for next time!

Cute kitty skirt, hanging

My only tweak to the design was to add a line of stitching through the elastic in the back waistband. I didn't do that once, and was constantly fighting with elastic getting all twisted up in there (I really hate twisty elastic-- it's just not comfy!).

Cute kitty skirt, tucked back view

I sewed up the size 14 based on my measurements, which I think worked out well. But the sizing is also pretty forgiving since you can easily adjust the elastic during construction.

Cute kitty skirt, how I wore it

Here I've styled the skirt with a cozy sweater and boots. Comfy, cozy, with kitties!