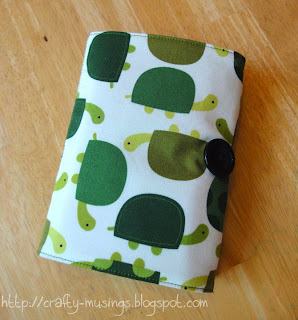
I did some sewing! First up, the last-minute birthday gift for a super-awesome 1-year-old:
It is the "Child's Coloring Wallet" by JCasa Handmade-- my go-to toddler gift! This little dude is apparently into turtles, so I went with it. Because of its white background, I went ahead and interfaced to give it some additional opacity. As a bonus, it got a little more heft, too! Going forward, I'll probably adding interfacing to the outer every time.
The inside features a fun Michael Miller bug-in-jars print with some random stash stripes.
I also finished up a dress:
Here is Vogue 1351 hanging prior to hemming. There will be pics showing it in all of its hemmed glory soon!
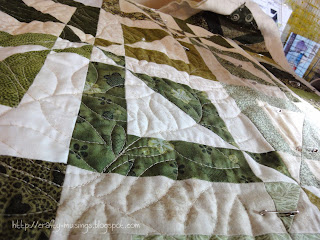
With the dress complete, I was feeling the quilting mojo return:
It's a big one, so it is going to take me awhile (quality quilting time is at a premium right now as we're getting ready for back-to-school). But at least it is started. That seems like a big part of the battle for me, just getting the quilting process going.
Wednesday, August 27, 2014
Saturday, August 23, 2014
A KwikSew skirt!
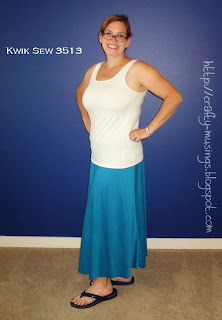
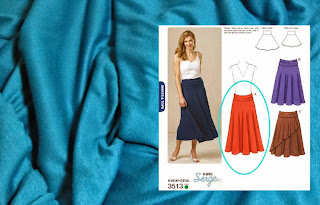
I finished this skirt, KwikSew 3513, last weekend:
This is View A, the longest version using a poly/rayon blend interlock from Fabric.com purchased in 2011. (Woo! More stash usage!). I just love the color.
I made it in a size Small(!!!). Here's the thing: the sizing on this is whackadoodle. Thankfully, reading the reviews of the skirt on PatternReview.com prepared me for this and helped me make an informed sizing choice.
I looked at the pattern piece for more information, pictured above. As an example, my waist is about 32" which would put me in the Large sizing according to the envelope. But then I looked at the finished waist measurement for the Large and saw it was 35.5". This skirt has no elastic and is dependent on the stretch of the fabric to hold it up. If there is no elastic, I'd be swimming in it at the waist, and it might just pull itself off with the weight of the skirt. So I went ahead and chose a size that had negative ease, meaning it would finish smaller than my waist, so the fabric would have to stretch to fit and thus provide the resistance needed to stay up. I picked the Small, which finishes at 28.5", and it resulted in a good fit for me.
I LOVE it. It went together quickly and easily. I chose not to hem it because I didn't want to lose any length, and I like the flowy-ness of the skirt without the weight a hem would add. I've already worn it twice!
I'm keeping my eyes peeled for the perfect striped fabric (I'm just feeling the stripes lately!) to make another one of these skirts!
Tuesday, August 19, 2014
My first Style Arc!
It was a productive weekend! I managed to get two projects cut and sewn. Woo! Today I'm going to focus on the less successful of the two, the Style Arc Ann-T Top.
Style Arc is a pattern company I've had my eye on for quite some time. They create patterns that reflect very current fashion trends (many inspired by celebrities) and have a reputation for excellent pattern drafting. However, they are in Australia and shipping to the U.S. is quite spendy and they only sell single size patterns, which made me hesitant to invest not knowing how their sizing would work for me. Then I saw they were having a limited time offer in conjunction with Gorgeous Fabrics, offering their Ann-T Top as a free download if you sign up for their newsletter (check it out here!). Score!!! Not only that, but in addition to your requested size, they send the size above and below as well. Double score!!!
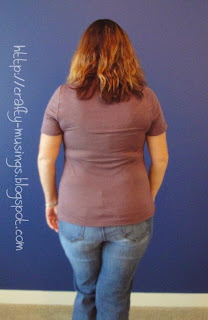
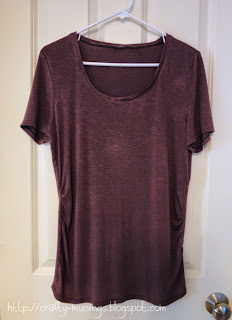
Here's my finished top (with apologies for the fuzzy pics... I seemed incapable of taking a clear photo today):
I cut a straight size 12 and did no alterations. The fabric is a rayon/lycra jersey from Fabric.com ("Arianne Stretch Slub" they call it), very lightweight and super stretchy. The description calls it brown, but it is definitely more mauve than brown to me.
Overall, it is not bad. I rather like how it fits, and the side rouching is a nice detail. But I had a tough time working with this fabric-- it just didn't seem to want to do what I wanted. I also struggled with technique. The directions are sparse and there is no detail to any aspect of construction. I should have looked up a video or something to help me with the side rouching, but I just kind of went for it with clear elastic, and it is not awesomely executed.
The neckline also has issues, as you can see in the detail pic above. Me and neckline stabilization! Ugh! This time I tried a clear elastic all the way around. But I put it on the band, so it is a) super obvious and b) touches my skin. Not sure what I was thinking there. Also, I seemed to be incapable of sewing an even seam along there, so some parts of the neckband are narrower than others. I stitched and re-stitched three times in some areas and finally decided it was good enough. But I'm not happy about it.
On the bright side, there was definitely some learning with this one! Next time will be better. I am envisioning stripes...
Thursday, August 14, 2014
Prepping patterns
Inspired by my recent dress success, I'm finding I want to sew some more clothes (and use more stash!). I've prepped some patterns and am hoping to cut fabric for these projects today:
- StyleArc Ann-T. I am so excited to try a StyleArc pattern and this one looks like it could potentially be a wardrobe staple (and it is available for free right now if you sign up for their mailing list)! This is going to be a (hopefully) wearable muslin to test it out before I go and buy the fabric I really want. Here's hopin' it works!
- Vogue 1351-- a pretty cowl-neck dress. I bought this fabric from fabric.com in 2011 kind of on a whim, and am finally feeling inspired to use it. But, I have to admit, I am also feeling a bit intimidated by this one. It is a pattern designed for a woven, but I'm using a knit (which seems fine-- I've looked at many reviews and it seems that is kind of the norm on this one)-- and I'm concerned about making sure I stabilize everything the right way. Clear elastic? Stay tape? Knit stay tape? Applying said stabilizers? Neckline. Shoulders. Waistline??? It is a rabbit hole, I tell you! Sigh... totally overthinking it. I just need to get in there and do it.
- Kwik Sew 3513-- I've been wanting a flowy knit skirt for quite some time. I ran across this pattern over the weekend and decided I needed to give it a go.
Wednesday, August 13, 2014
Small sewing
I just pin basted a big quilt and am not ready to dive in on quilting it at the moment, so I've been working on some smaller projects lately. Like these pillowcases:
One for me, and a couple for my boys. I actually bought the pink fabrics to make this pillowcase 3 years ago. It has taken me this long to get it done. But at least I finally got there! I'm planning on giving the Hot Wheels ones to the boys as a Christmas gift. Another Christmas gift made not-at-the-last-minute-- woo hoo!
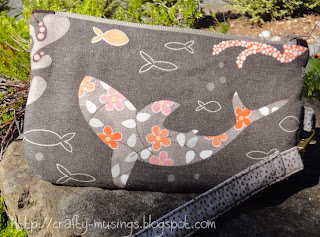
After toting around my new Mail Sack around and about, I determined I needed something smaller in which to put my phone/keys/cards. The bag is so huge, I was finding that those smaller things became very difficult to access. Essentially, it was the perfect excuse to make a Noodlehead Gathered Clutch for me!
I used the same fabrics for the clutch as I did in my bag. This is my fourth make of this design, and it just doesn't get old. Love it!
Happy little shark!
After carrying this for a couple of days, I have to say, that divider pocket feature is a winner. I am finding it very useful because I can put my phone on one side and my keys on the other, preventing any scratches.
Small projects for the win!
Monday, August 4, 2014
In progress - a spring wallhanging
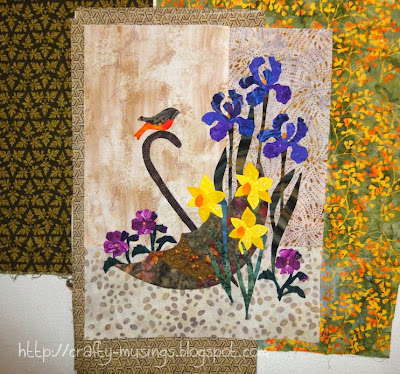
I started this piece back in May (or maybe late April?) and finally completed the applique over the weekend. It took me awhile as I am waaay out of practice and had to take it pretty slowly.
The design is by Edyta Sitar and can be found in her book, Seasonal Silhouettes. This is the "April" block. Bonus: I didn't have to reverse the pattern for hand applique! Included in the book are full-size placement diagrams, so I was able to trace all of my pieces from that.
In the picture above, you can see a couple of the fabrics I'm auditioning for borders. I'm not quite ready to decide, so I'll muse a bit longer. I plan to finish this up and hang it in my entryway. I think this will work as a "generic" wallhanging so now it won't just be Christmas/Easter/Halloween all year! My ultimate goal is to try and have a nice collection of seasonal wallhangings to display through the year.
Sunday, August 3, 2014
Another McCall's 6612
Feeling inspired by the Sew Crafty Chemist and her recent finishes, I decided I needed to sew something. It needed to be a low-impact kind of project-- one that would not require lots of fitting or fussing. I was looking through my patterns and McCall's 6612 caught my eye. I had made View B previously and knew it was a good fit. So I decided to go with view C for a fun summer dress:
I cut a size 16 and didn't make any real fit adjustments, but I did veer from the instructions construction-wise. The fabric is an ITY knit bought a couple of years ago from Fabric.com.
The most challenging part of this dress was the neckline. I determined that I needed to do more than just turn and hem, because I felt certain it would just stretch and get all funky if left to its own devices. So, taking my cue from the last time I made the dress , I used a tip from PatternReview as my guide, "Using Clear Elastic to Stabilize Necklines," except this time I attempted to stabilize the entire neck and not just the back. (And now I just have to take a moment to celebrate the fact that I actually thought to look at my blog post on the dress to see what, if anything, I should adjust! Woo!) Anyway-- the whole clear elastic thing was challenging for me! It took probably ten times as long as it should have. I mean, it seems pretty straightforward, but the actual doing of it really just was not clicking for me. My fabric was not holding a press at all well, the elastic made turning the hem weird, and even with a ton of pins, I just couldn't keep everything in place.
As a result, my neckline is not beautifully finished (as you can see above). But it is done. And the ugly parts are on the inside where no one can see.
Other than the whole neckline extravaganza, the dress came together very quickly! To save a few steps, I attached the top of the sleeve to the body and then sewed one long seam from the bottom hem all the way to the sleeve hem instead of setting in the sleeve. I also used a 1/2" seam there instead of 5/8" just to give a little extra room. I did a lot of extra pinning throughout the process to help ensure the stripes aligned. The hemming was done with my coverstitch machine.
Overall, I am thrilled with my new comfortable, flattering and happy dress!
Friday, August 1, 2014
A Mail Sack for me!
For the last few months, I have been teaching a friend how to sew. We usually meet about once a week. For her first couple of projects, she made dresses for her baby girl. For her third project, she wanted something we could work on together. We chose the Mail Sack pattern from Pink Chalk Studio. We finished our bags this week!
It was a great project for a budding sewist-- a straightforward (and fun!) design, great instructions, and a few more challenging bits to grow skills (zipper, accuracy, and lots of edge stitching). We made the Large/Adult size, resulting in a nice, roomy bag (perfect for outings with the boys).
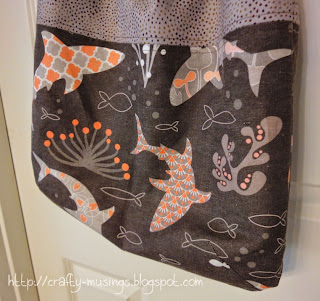
For the main body of my bag, I used a gorgeous print ("Deep Sea Beauty Contest" by kayajoy) purchased from Spoonflower (back in 2011) in a linen/cotton blend. It is a great weight and quite nice. There was a bit of fading when I pre-washed it, but the colors, while not as vibrant, are still lovely. I pulled a couple of other fabrics from my stash for the straps and lining.
Love the zipper pocket! I shortened the strap by 2" but made no other changes. I wish I had a picture to share of my friend's bag-- you'll just have to take my word for it that hers turned out great as well!
I've made this bag twice before in the mini/child size for each of my boys (Big Bear and Little Bear). Both times I stated that I wanted one for me-- and now (finally!) I have one! Even better, it was a project I got to make with a friend.
Subscribe to:
Comments (Atom)

