Big Bear is coming up on his 6th birthday this week, and we are getting ready to party! We're branching out from just family this year and are inviting some of his friends, so we're trying to plan a couple of games/activities for them to do together. The theme is: Volcano! One idea I thought of for an activity was a "lava rock" toss into a "volcano." So our first step is to make a volcano. We decided to try paper mache. It's not something either my husband or I have any experience in, so I thought it might be fun to document our adventure. Here's hoping it is successful, too!
We made a family trip to Home Depot yesterday for the main supplies: a big bucket, duct tape, a piece of plywood for the base, chicken wire, and bolts/nuts/washers. Then I made a trip to the grocery store to get some newspapers and flour.
My husband started by drilling two holes into the plywood and the bottom of the bucket. Then we secured the bucket to the plywood using the bolts/nuts/washers. Next we used chicken wire to build a sort of cage around the bucket.
Duct tape was used to cover the edges of the board and the inside of the bucket where the chicken wire ended-- to cover up all the pointy edges.
As we worked, my husband tried to shape the chicken wire and create some contours. I used a staple gun to help secure the wire to the base as well.
Then came the fun part: paper mache!
Using the recipe we found at cockeyed.com of 3 cups of water to 2-1/2 cups of flour, we made our goopy paste.
Then we used strips of torn newspaper and got to work.
Paper mache is a seriously messy business.
Big Bear didn't help because he was in bed-- but as he hates getting his hands dirty, I suspect he wouldn't have wanted anything to do with this process anyway. LOL!
After about 2 hours of focused paper mache work, we finally had something resembling a volcano.
Now we're crossing our fingers that it will be dry by Wednesday or Thursday night.
I made some cookies today to help warm up the kitchen and facilitate dry time. (Mmmmm.... chocolate chip!!!)
There may still have to be some blow dryer action involved. Or maybe more cookies.
Tuesday, January 22, 2013
Wednesday, January 16, 2013
Thursday, January 10, 2013
Making lists...
Not a lot of crafting has been going on the last few days (eep! need to get quilting!). So in lieu of actual crafty productivity, I have resorted to list-making.
Main Project List:
And then there is the Ongoing Project List:
And, of course, I have a pile of other projects I'd like to get to as well, including UFOs, new quilts, and sewing. But I'm trying not to get too ahead of myself. With all of the busy in my life right now, at the forefront of my mind is the idea of prioritization. Now that I have a list to work from, hopefully I'll be able to make some time so I can start crossing stuff off!
Main Project List:
- Kevin & Colby's Wedding Quilt -- need to finish quilting this!
- Fuchsia and Grey Baby Quilt -- it's not looking too hopeful for completion by the shower, but once I get to a stopping point with the wedding quilt, this is the priority. My friend is due at the end of February. I can definitely get it done by then.
- Placemats -- we need new ones. I've chosen the fabrics and the pattern, so hopefully they'll go together quickly once I get started.
- Baby Quilt -- this one is for my trainer's baby boy due in April... don't have a plan yet, but I have some great fabrics in my stash that I think will be perfect.
- Mystery Quilt -- the top is done and it is waiting to be quilted. I'd like to donate this one to one of my quilt guild's charities.
- Eden Baby Quilt -- during the holiday break, I pieced a quick and easy top thinking I'd give it to my friend due in February... but then I heard she was planning on the fuchsia and grey nursery so I went ahead started moving in that new direction. But I have this top (pictured above) and I'd like to finish it up.
- Tweed Skirt -- a sewing project for me! I have some gorgeous Tweed-look RPL that I want to make into a skirt.
- Aprons for the boys -- both of my boys could really use some new aprons. They love to help me in the kitchen, but neatness is generally not a priority for them-- so an apron helps a lot! I have the fabric and the patterns, I just need to do it.
- Daytripper Bag -- I recently picked up this pattern from Dog Under My Desk and I really, really want one for me! I think I've got the perfect fabric for it too.
And then there is the Ongoing Project List:
- Adventures of Harrington and Hannah -- I have three blocks left to make in this super cute BOM from The Raspberry Rabbits.
- Jane Stickle Quilt -- I want to try and start quilting a couple of blocks a week (at least) and make it a habit. That's how I made the quilt, just a couple blocks a week, so it seems like a good way to work on getting it done.
And, of course, I have a pile of other projects I'd like to get to as well, including UFOs, new quilts, and sewing. But I'm trying not to get too ahead of myself. With all of the busy in my life right now, at the forefront of my mind is the idea of prioritization. Now that I have a list to work from, hopefully I'll be able to make some time so I can start crossing stuff off!
Saturday, January 5, 2013
New year, new project #1
While I work on quilting Kevin and Colby's wedding quilt, I am also starting work on my first new project of the year-- a happy, girly baby quilt!
The nursery is going to be fuchsia and grey, so that is what I'm going with for baby's quilt. I'm using a pattern from Elizabeth Hartman called the "Birthday Cake Quilt." I think the colors really lend themselves to this modern quilt design.
So far I've managed to complete most of the cutting. Once I get to a good stopping point on the wedding quilt, I'll start the piecing on this new project. The baby shower is in just three weeks, so I need to get crackin'!
Edited to Add: It's not me! The baby quilt is for a friend's baby. :)
The nursery is going to be fuchsia and grey, so that is what I'm going with for baby's quilt. I'm using a pattern from Elizabeth Hartman called the "Birthday Cake Quilt." I think the colors really lend themselves to this modern quilt design.
So far I've managed to complete most of the cutting. Once I get to a good stopping point on the wedding quilt, I'll start the piecing on this new project. The baby shower is in just three weeks, so I need to get crackin'!
Edited to Add: It's not me! The baby quilt is for a friend's baby. :)
Thursday, January 3, 2013
Manly Messenger Bag
A few years ago, I made an Amy Butler High Street Messenger bag for my sister-in-law for Christmas (it was pre-blogging, but I posted a review of it on PatternReview.com). Since that time, my husband has not-so-subtly hinted that he would love to have a bag like that for himself. I finally managed to get it done and gave it to him for Christmas.
The exterior is a navy blue twill. The lining is a quilting weight cotton with a fun circuit board print. The pattern calls for home dec weight fabric for both the exterior and the lining. Since I chose a quilting cotton for the lining, I went ahead and used Pellon SF101 interfacing on every lining piece to provide a little more heft. I also (as per the instructions) used a canvas interlining for the entire exterior. I opted for the velcro closure since my husband is likely to haul about some electronic devices.
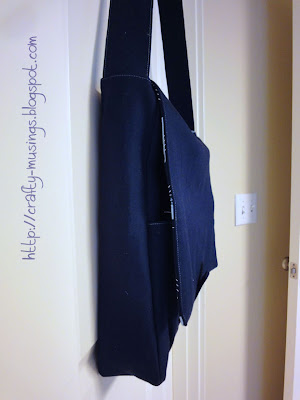
In an attempt to break up all of the plain navy, I did all of the topstitching in a light blue-grey thread. I kind of wish I had opted for a heavier duty thread so it would be even more pronounced, but my machine is sometimes persnickety about heavier threads and I just didn't want to fight. One thing to note about the design of this this bag is that the strap is NOT adjustable. Which isn't necessarily bad, but when trying to make it with no way to fit to the person for whom it is intended... it is kind of a crap shoot. In this case, I left it at the full cut length of the pattern, and it works perfectly on my husband. If it were for me, I would have needed to shorten it by a few inches.
This bag is a great size (15" tall, 12.5" wide, 3.5" deep) and includes 3 large zipper pockets. One on the exterior back, one on the inside flap, and one in the interior hanging tool pocket. I'm not sure why I always decide to follow Amy Butler zipper instructions, considering all of the negative experiences I've had with them, but I did it here too. As it turns out, the zipper instructions for this bag are relatively easy to follow. However, I am not a fan of the finished look.
In the method used, the ends of the zipper tape (both above and below the zipper stops) are left visible, and there is a tiny opening left (really, really tiny-- nothing would ever be likely to escape it is so small, but knowing it is there kind of just bothers me). Pictured above is the inside flap zipper so you hopefully can see what I'm trying to describe. Should I make this bag again, I will definitely start with a longer-than-12" zip, trim to size, and use end tabs to make sure the zipper tape is covered and no holes remain. I feel kind of silly though because in my pattern review when I made this for the first time, I noted that I used longer zippers to avoid this very issue. Duh. Clearly, I should have read my own review before making it again!
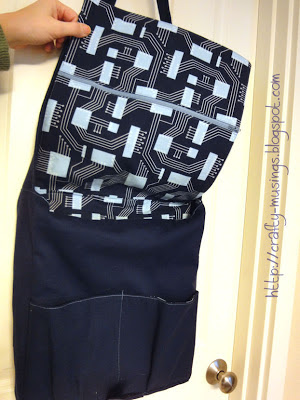
I just love this lining print! With the flap open, you can get a good look at the nice open pockets on the front. I think they look snazzy, and seem like a nice easy spot to stash small things when you don't want to have to dig in the depths of the bag.
One interesting feature of this bag is the hanging tool pouch. It hangs down on the inside of the bag from the top of the front inside edge. It has a nice zipper pocket and a nice sized open pocket (perfect for a smart phone or even a portable gaming device) and some pen slots. The fact that it can be lifted out allows for easier access to the zipper pouch-- very practical!
A couple of notes about the pattern:
The instructions are very detailed. But they are a little frustrating as they refer to pieces by number in the cutting instructions, but then by name everywhere else-- which wouldn't be so bad except that all of the names sound very similar, and there are lots of pieces to keep track of. Painter's tape or sticky notes are definitely helpful for keeping track of what's what. Also of note: all of the pieces are square/rectangular. I found it easiest to measure the pattern and then rotary cut everything, rather than tracing and laying them out as per the instructions.
He was thrilled when he received the bag. And it suits him really well, both in style and fit. Yay!!!
The exterior is a navy blue twill. The lining is a quilting weight cotton with a fun circuit board print. The pattern calls for home dec weight fabric for both the exterior and the lining. Since I chose a quilting cotton for the lining, I went ahead and used Pellon SF101 interfacing on every lining piece to provide a little more heft. I also (as per the instructions) used a canvas interlining for the entire exterior. I opted for the velcro closure since my husband is likely to haul about some electronic devices.
In an attempt to break up all of the plain navy, I did all of the topstitching in a light blue-grey thread. I kind of wish I had opted for a heavier duty thread so it would be even more pronounced, but my machine is sometimes persnickety about heavier threads and I just didn't want to fight. One thing to note about the design of this this bag is that the strap is NOT adjustable. Which isn't necessarily bad, but when trying to make it with no way to fit to the person for whom it is intended... it is kind of a crap shoot. In this case, I left it at the full cut length of the pattern, and it works perfectly on my husband. If it were for me, I would have needed to shorten it by a few inches.
This bag is a great size (15" tall, 12.5" wide, 3.5" deep) and includes 3 large zipper pockets. One on the exterior back, one on the inside flap, and one in the interior hanging tool pocket. I'm not sure why I always decide to follow Amy Butler zipper instructions, considering all of the negative experiences I've had with them, but I did it here too. As it turns out, the zipper instructions for this bag are relatively easy to follow. However, I am not a fan of the finished look.
In the method used, the ends of the zipper tape (both above and below the zipper stops) are left visible, and there is a tiny opening left (really, really tiny-- nothing would ever be likely to escape it is so small, but knowing it is there kind of just bothers me). Pictured above is the inside flap zipper so you hopefully can see what I'm trying to describe. Should I make this bag again, I will definitely start with a longer-than-12" zip, trim to size, and use end tabs to make sure the zipper tape is covered and no holes remain. I feel kind of silly though because in my pattern review when I made this for the first time, I noted that I used longer zippers to avoid this very issue. Duh. Clearly, I should have read my own review before making it again!
I just love this lining print! With the flap open, you can get a good look at the nice open pockets on the front. I think they look snazzy, and seem like a nice easy spot to stash small things when you don't want to have to dig in the depths of the bag.
One interesting feature of this bag is the hanging tool pouch. It hangs down on the inside of the bag from the top of the front inside edge. It has a nice zipper pocket and a nice sized open pocket (perfect for a smart phone or even a portable gaming device) and some pen slots. The fact that it can be lifted out allows for easier access to the zipper pouch-- very practical!
A couple of notes about the pattern:
The instructions are very detailed. But they are a little frustrating as they refer to pieces by number in the cutting instructions, but then by name everywhere else-- which wouldn't be so bad except that all of the names sound very similar, and there are lots of pieces to keep track of. Painter's tape or sticky notes are definitely helpful for keeping track of what's what. Also of note: all of the pieces are square/rectangular. I found it easiest to measure the pattern and then rotary cut everything, rather than tracing and laying them out as per the instructions.
He was thrilled when he received the bag. And it suits him really well, both in style and fit. Yay!!!
Wednesday, January 2, 2013
Resolution in action!
I started quilting this yesterday.
Woo!
I also went out and bought some fabric. My local quilt shop was having their once-a-year sale. Once a year! It might be better to just not talk about that. LOL!
Woo!
I also went out and bought some fabric. My local quilt shop was having their once-a-year sale. Once a year! It might be better to just not talk about that. LOL!
Tuesday, January 1, 2013
Welcome, 2013!!!
Whew! That sure went by fast. I still can't believe that it is already a new year and 2012 is officially in the past. Wow!
Frankly, I wasn't even going to write this post, but then I went and looked back at my 2012 goals and was shocked to find that I actually followed through on them. While I had a good year overall, it did not feel like a great crafting year. There were many dry spells and not much blogging as a result. I made some great stuff though!
Looking at that collage really makes me smile. I may not have been crazy-productive, but I made some things I am really proud of!
Here were my goals for 2012:
Here's to a crafty and fabulous 2013!
Frankly, I wasn't even going to write this post, but then I went and looked back at my 2012 goals and was shocked to find that I actually followed through on them. While I had a good year overall, it did not feel like a great crafting year. There were many dry spells and not much blogging as a result. I made some great stuff though!
Looking at that collage really makes me smile. I may not have been crazy-productive, but I made some things I am really proud of!
Here were my goals for 2012:
- Use more fabric than I buy.-- This is a biggie. I list this as a goal every year, and it usually falls by the wayside. But NOT THIS YEAR!
Fabric In: 74.681
That's right-- I used more than I bought!!!! Woo!
Fabric Used: 81.826
- Get my Jane Stickle quilt basted and start quilting it!-- Basted, check! As for quilting, I have managed to quilt two blocks so far. Not much, but it is a start.
- Complete the Amy Butler Style Stitches challenge.-- Alas, this one was a no go. While I definitely want to complete one of those bags (I have the fabric for it and everything), I just wasn't in the mood for bags most of this year. I did just finish a different Amy Butler bag though-- a Christmas present for my husband! I'll share pictures soon.
- Finish some UFOs-- I specifically listed Hop to It (began 2011), Playtime (began 2008), and my wedding quilt (began 2002). I finished the Playtime quilt top (woo!) and now it is waiting for quilting. Hop to It and my wedding quilt are DONE! Another UFO I managed to finish was the Paintbox Quiltalong (began 2010). So I'm feeling like 2012 was a pretty good year for UFO completion for me!
- Keep exercising!-- Woo! I'm still going! I completed two half-marathons in the last 4 months, and have started to regularly work on my strength and core-training by going to boot camp twice a week. I haven't lost much weight this year (only about 10 pounds), but my body has changed a LOT-- I can see that my hard work is paying off, even if the scale isn't showing it (yet!).
- Use more fabric than I buy.-- I made it this year, but it was close. I need to really make an effort to buy what I need (as opposed to stash-building) and work to use what I already have.
- Finish at least 2 UFOs.-- Carrie P. over at A Passion for Applique has declared 2013 to be the year of the UFO. Now she is super hard core and is focusing her efforts on all UFOs, all the time. I know that is beyond me. I need fresh projects every so often to keep me motivated. So it won't be "Nothing but UFOs in 2013" for me. But, I'd really like to move some of my unquilted tops out of the closet and finish a couple tops that have been languishing. I think the top two need-to-be-quilted on my list are my Bargello Reflections top (unblogged) and my recent Mystery Quilt top. The top two on my wanna-finish-that-top list are my Greepiece project and my most recent block exchange. But really, whatever I can get done will be a good thing. I might even pick a couple of months to play along with everyone participating in Carrie's challenge-- I'll need all the motivation I can get!
- Sew more clothes for me!-- I had some great sewing successes last year, and I want to keep the ball rolling. One project I know I want to do is a coat or jacket. It will definitely stretch my skills, but I think if I can focus myself to get it done right, it would be so worth it.
- More handwork.-- I miss my handwork! I have really lost focus on this aspect of my sewing life, and I want to make an effort to bring it back in. I have a number of projects I can work on (including Harrington and Hannah and quilting my Jane Stickle) and (hopefully) I'll be doing lots of binding this year too to finish those UFOs I'll be quilting up!.
- Lose that last 15 pounds.-- On one level, I realize that this magic number I've set for myself is arbitrary and meaningless. But on another level, it is a goal, and I want to see what my body is like at that goal. I want to be healthier and weight is a part of that. I've been working hard, the key now is to keep doing that and work to get the whole food thing in balance. That is tough. I really (really) like food. But I can do this!
Here's to a crafty and fabulous 2013!
Subscribe to:
Posts (Atom)


