Happy Holidays!!! I hope you and yours have had a wonderful holiday season. Our house has been full of fun and joy. My boys were definitely into Christmas this year. It was awesome!
This year, I went pretty light on the crafty gifts. I did make a few things, however, including these cute wristlets:
I used the "Perfect Zip Bags" pattern from Elizabeth Hartman of Oh, Fransson! and made style "C"-- the version that can stand upright.
Well-illustrated with clear, concise directions, the instructions were great. My only quibble is that they involve a bit of navigation. If you go to the page where the "C" style bag instructions begin, it only gives you cutting instructions for the bag itself and informs you to go back and figure out what other pieces you need to cut based on style choices you can make (e.g., zipper, style of handle). So before I started, I made a list of the pieces I needed to cut. Just that little bit of pre-planning definitely made the process go more smoothly. But still, the flipping back and forth took a little bit of extra patience.
I especially appreciated the detailed zipper instructions. Insertion worked like a charm! Yay!
Then, of course, I filled them with goodies:
Those worked out so well, that I went ahead and made a couple more. This time though, I chose to skip the patchwork element and just go with one fabric for the exterior (time was of the essence at this point!).
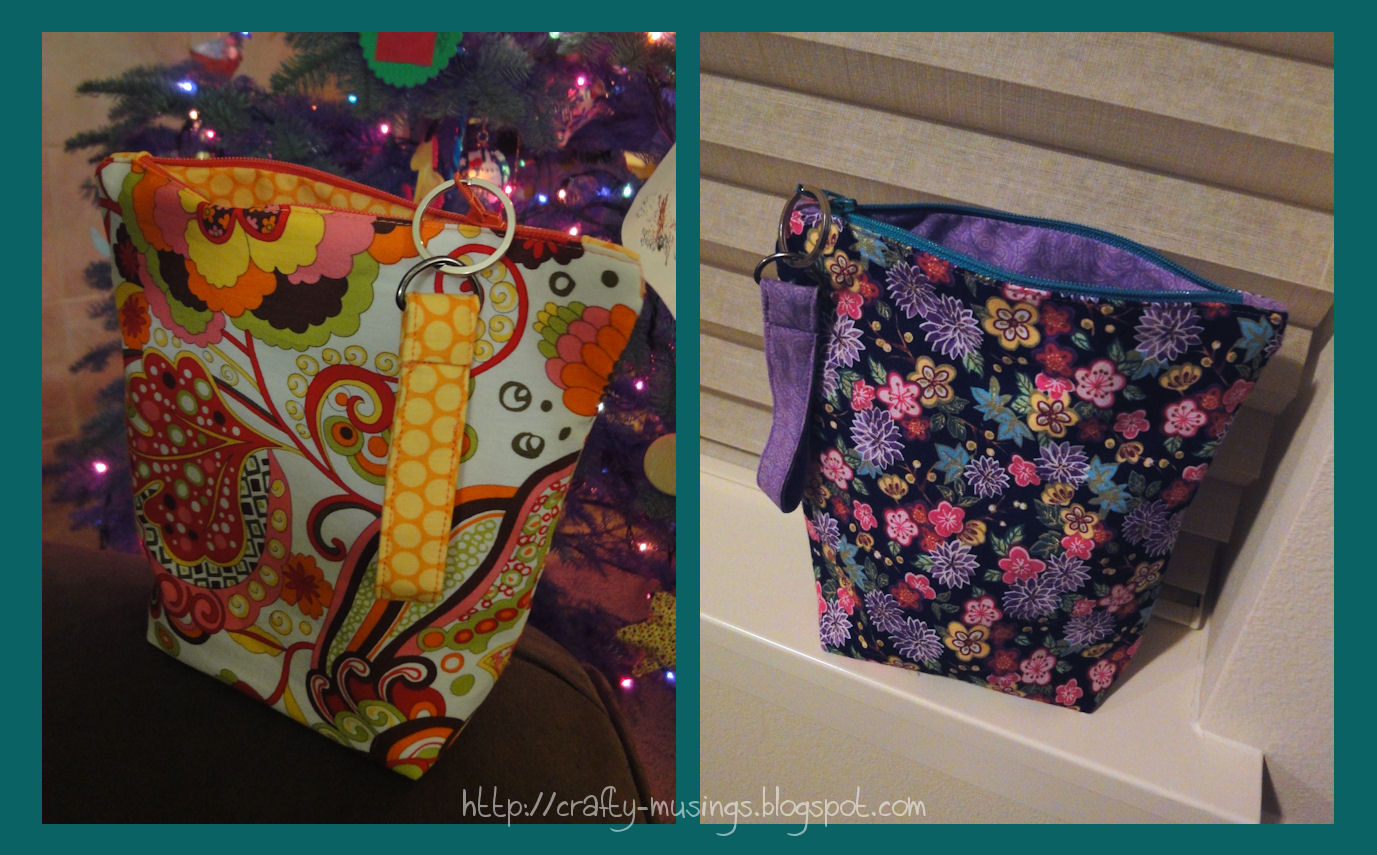
Making these is kind of addictive! I'm sure I'll find more reasons to make some soon.
Thursday, December 27, 2012
Saturday, December 15, 2012
Simplicity 3754
And here is the third project for me:
This is Simplicity 3754, view F (the shortest). It is actually the second time I've made this pattern (last time, I did view E). Back when I made the previous version, I said I wanted one in corduroy. Now I have it!
The striped corduroy was initially purchased a couple of years ago to make a pair of pants for Little Bear. But the fabric just kept calling to me-- I just love these colors! Unfortunately, I only had about 7/8 yard. So I had to do a bit of Franken-skirting.
I cut the waist/yoke from a solid brown corduroy-- technically, it doesn't really "match" since that color of brown is nowhere in the main fabric. But it seems to work okay nonetheless. But I didn't have enough of that to do the yoke facings, so I found a quilting cotton in my stash that matched pretty closely. And then the pocket facings are made of yet another quilting cotton. It is a motley skirt, for sure!
This time around I made a size 16. After reviewing my notes from last time, I decided to omit the binding along the top edge of the pocket. But, I forgot to add a little to the top to make up for the seam allowance I had to take, so I feel like the pockets sit a little lower than I'd like. But, I think they look okay still. The only other change I made was I used some hem tape. The skirt is so short, I didn't want to take a full 1-1/4" hem. Using the tape allowed me to turn up less fabric, putting the skirt at a length that works for me. It is the first time I've tried applying hem tape, so I found a tutorial and just went for it. It is definitely not perfect, but it accomplished what I wanted and the hem is extra pretty on the inside. Yay!
After three successful projects for me in a row, I'm feeling really motivated to make some more! But, the holidays are upon us, and I do have a couple of projects I want to complete before Christmas. Hopefully, I'll be able to get to some more sewing for me in the New Year.
This is Simplicity 3754, view F (the shortest). It is actually the second time I've made this pattern (last time, I did view E). Back when I made the previous version, I said I wanted one in corduroy. Now I have it!
The striped corduroy was initially purchased a couple of years ago to make a pair of pants for Little Bear. But the fabric just kept calling to me-- I just love these colors! Unfortunately, I only had about 7/8 yard. So I had to do a bit of Franken-skirting.
I cut the waist/yoke from a solid brown corduroy-- technically, it doesn't really "match" since that color of brown is nowhere in the main fabric. But it seems to work okay nonetheless. But I didn't have enough of that to do the yoke facings, so I found a quilting cotton in my stash that matched pretty closely. And then the pocket facings are made of yet another quilting cotton. It is a motley skirt, for sure!
This time around I made a size 16. After reviewing my notes from last time, I decided to omit the binding along the top edge of the pocket. But, I forgot to add a little to the top to make up for the seam allowance I had to take, so I feel like the pockets sit a little lower than I'd like. But, I think they look okay still. The only other change I made was I used some hem tape. The skirt is so short, I didn't want to take a full 1-1/4" hem. Using the tape allowed me to turn up less fabric, putting the skirt at a length that works for me. It is the first time I've tried applying hem tape, so I found a tutorial and just went for it. It is definitely not perfect, but it accomplished what I wanted and the hem is extra pretty on the inside. Yay!
After three successful projects for me in a row, I'm feeling really motivated to make some more! But, the holidays are upon us, and I do have a couple of projects I want to complete before Christmas. Hopefully, I'll be able to get to some more sewing for me in the New Year.
Wednesday, December 5, 2012
Kwik Sew 3765
I've been wanting a simple, black pencil skirt for quite some time. It's one of those things that I see in stores all the time, but think to myself, "I should make that." Finally, I did! Kwik Sew 3765 is the second of three projects-for-me that I've been working on. The description: "Straight pull-on skirts in three length have side seams, center back, seam, and elastic in casing at waist."
I made view C (the shortest one) in a size M. The fabric is a black double-knit from Hancock Fabrics that I've had in my stash since 2007 (bought at the same time as the fabric I used in my recently-completed dress!). It is truly a wonderful weight and hangs beautifully. I referenced More Fabric Savvy by Sandra Betzina, and decided on a 75/11 Stretch needle; it worked perfectly.
No alterations were necessary for this one. The one change I made was to do a 1/2" seam instead of 5/8" for the center back seam. I decided on a blind hem for the skirt. While it is not the first time I have done a blind hem on my machine (I used it awhile back to make some curtains), it is the first time I've used it on something I intend to wear. I think it turned out pretty well, and love the clean finish at the hem.
It is a great basic wardrobe piece that can be dressed up or down (as I've attempted to show in the pictures above... it is magical what a belt and high heels can do to change it up!). It is a big bonus that it is comfy, stretchy, and soft. The design is super simple (I'm sure I probably could have found a tutorial that would have led me to the same result, but I do like the security and confidence a pattern gives me), but it is exactly what I was wanting. And now I want more skirts like this!
I made view C (the shortest one) in a size M. The fabric is a black double-knit from Hancock Fabrics that I've had in my stash since 2007 (bought at the same time as the fabric I used in my recently-completed dress!). It is truly a wonderful weight and hangs beautifully. I referenced More Fabric Savvy by Sandra Betzina, and decided on a 75/11 Stretch needle; it worked perfectly.
No alterations were necessary for this one. The one change I made was to do a 1/2" seam instead of 5/8" for the center back seam. I decided on a blind hem for the skirt. While it is not the first time I have done a blind hem on my machine (I used it awhile back to make some curtains), it is the first time I've used it on something I intend to wear. I think it turned out pretty well, and love the clean finish at the hem.
It is a great basic wardrobe piece that can be dressed up or down (as I've attempted to show in the pictures above... it is magical what a belt and high heels can do to change it up!). It is a big bonus that it is comfy, stretchy, and soft. The design is super simple (I'm sure I probably could have found a tutorial that would have led me to the same result, but I do like the security and confidence a pattern gives me), but it is exactly what I was wanting. And now I want more skirts like this!
Monday, December 3, 2012
McCall's 6612
I've been wanting to do some sewing for myself for quite some time, but more pressing projects always seem to get in the way. So, once I got the wedding quilt basted, the mystery quilt top completed (pictures coming soon), and my sewing area picked up some, I decided to take the plunge and do some cutting.
This dress is the first of three projects I cut. It is McCall's 6612. I made View B, but shortened it to View A's length. I cut a size 16 with no alterations.
The fabric is from my stash, a super-stretchy textured knit that I bought from Hancock Fabrics back in 2007. The picture above shows the front neckline and is the best representation I could get of the actual colors in the fabric-- pretty burgundy, taupe, and black.
I probably should have done a full-bust adjustment (FBA), but the knit was so stretchy, I decided to take the lazy way and go without. It looks fine, but I wish maybe it didn't pull quite so much across the front.
The knit was textured on one side and smooth/slinky-ish on the back. After referencing the book More Fabric Savvy by sewing guru Sandra Betzina, I decided on a size 75/11 Stretch needle and a Teflon foot. No skipped stitches! Yay!
I made a couple of deviations from the pattern instructions. The first was to add the step of stabilizing the shoulder seams and back neck edge with clear elastic (I used a tip from PatternReview as my guide, "Using Clear Elastic to Stabilize Necklines"). The second deviation was to avoid sewing a set-in sleeve by sewing everything in the flat-- I attached the top of the sleeve to the body and then sewed one long seam from the bottom hem all the way to the sleeve hem. Much simpler!
The one other minor change I made was in using a 3/4" seam allowance for most of the sleeve, because of a little cutting mishap that left a notch a little too close to the 5/8" seamline for my comfort. But I tapered back in to a 5/8" seam a couple of inches before the underarm seam.
Overall, I'm thrilled with this dress. I already have plans to wear it for a couple of holiday events, and I can even see myself making another one in the future. Success!
Monday, November 19, 2012
Basting it up!
I kind of lucked out. The last time I had to baste a queen-sized quilt, I had to do it in sections because we didn't have a large enough area of floorspace to do it. But as we are having some interior walls painted this week, we had to clear out our loft area. It is the perfect size to lay out a large quilt. And (even luckier!), my husband helped me with the basting, making it a much speedier process. Woo!
I've been thinking hard about what to do with this one, and have a plan in mind. My thought is that I want some curves in the center area to help give all those straight lines some movement and a stronger sense of flow. Then in the outer border, I kind of want to do straight lines, mostly because I think it will look cool. Ha! Still not quite sure about the inner border... maybe a ribbon-candy type of thing? Or some vine-ish action? I guess I'll decide when I get to it. Hopefully, I'll be able to start quilting it later this week!
Wednesday, November 14, 2012
A festive pincushion!
I made myself another happy pincushion. Yay! This is another kit I received in the Shabby Fabrics Pincushion Club last year. It is one of their exclusive designs and is called the "Christmas Tree Pincushion."
It is a biggie! At the base it is about 6" wide and it stands 10" tall. As it is filled with crushed walnuts, it is pretty darn heavy too. Essentially, it is made of a series of stacked, stuffed yo-yos. It is put together nearly entirely by hand (the exception being the stitching on the star topper-- I did that on my machine). All of the fabrics were included in the kit, as well as the happy colored pearl-topped pins. I love those! Unfortunately, I don't see either the pattern or the kit available at Shabby Fabrics at this point. It might have even been a pincushion club exclusive kit. But, if you are interested, you could always contact Shabby Fabrics and ask (they are really friendly there!).
My only challenge in putting this one together was in cinching my yo-yos closed... I kept breaking my thread. Gah! Eventually, I figured the whole tension thing out though. And now I have a happy tree pincushion, just in time for the holiday season. Woo!
It is a biggie! At the base it is about 6" wide and it stands 10" tall. As it is filled with crushed walnuts, it is pretty darn heavy too. Essentially, it is made of a series of stacked, stuffed yo-yos. It is put together nearly entirely by hand (the exception being the stitching on the star topper-- I did that on my machine). All of the fabrics were included in the kit, as well as the happy colored pearl-topped pins. I love those! Unfortunately, I don't see either the pattern or the kit available at Shabby Fabrics at this point. It might have even been a pincushion club exclusive kit. But, if you are interested, you could always contact Shabby Fabrics and ask (they are really friendly there!).
My only challenge in putting this one together was in cinching my yo-yos closed... I kept breaking my thread. Gah! Eventually, I figured the whole tension thing out though. And now I have a happy tree pincushion, just in time for the holiday season. Woo!
Wednesday, November 7, 2012
Finished: Paintbox Quilt Along!
After finishing up my wedding quilt, I was feeling motivated. So I grabbed my basted Paintbox Quilt Along sandwich, and got to work. And now I have another UFO complete. Woo!
The pattern is from Elizabeth Hartman of Oh, Fransson! She hosted a quilt along in 2010 for her Paintbox Quilt design.
I made quick work of the quilting by doing a simple, all-over stipple using King Tut thread in White Linen (#971). I am thrilled with how it looks, especially after washing it!
For the binding, I used Kona cotton in Navy from my stash.
I didn't do the fancy back suggested by the quilt along on this one. Instead, I used this happy blue-striped stars fabric from Sandy Gervais. It worked perfectly, as the front was completed using one of her collections (a layer cake of her Zippety Doo Dah line from Moda).
When I started this quilt, I was planning on giving it to my guild for donation to one of our chosen charities, so I did not include a label, as per guidelines. It feels weird to finish a quilt and not have a label! But there are some good reasons for keeping it anonymous, so I can respect that.
Last Thursday I gave the quilt to our Charity Committee at the monthly guild meeting. Hopefully it will end up in a happy new home!
The pattern is from Elizabeth Hartman of Oh, Fransson! She hosted a quilt along in 2010 for her Paintbox Quilt design.
I made quick work of the quilting by doing a simple, all-over stipple using King Tut thread in White Linen (#971). I am thrilled with how it looks, especially after washing it!
For the binding, I used Kona cotton in Navy from my stash.
I didn't do the fancy back suggested by the quilt along on this one. Instead, I used this happy blue-striped stars fabric from Sandy Gervais. It worked perfectly, as the front was completed using one of her collections (a layer cake of her Zippety Doo Dah line from Moda).
When I started this quilt, I was planning on giving it to my guild for donation to one of our chosen charities, so I did not include a label, as per guidelines. It feels weird to finish a quilt and not have a label! But there are some good reasons for keeping it anonymous, so I can respect that.
Last Thursday I gave the quilt to our Charity Committee at the monthly guild meeting. Hopefully it will end up in a happy new home!
Subscribe to:
Posts (Atom)


