Amy over at Amy's Creative Side is again hosting the One Thing, One Week Challenge. Yay! I love these challenges. They work really well for me as motivation to accomplish something (especially those somethings that maybe I'm not so motivated to do otherwise).
Remember this project?
Ha! Even I only vaguely remember this project. I actually completed the top way back in June and it has been languishing on top of my needs-to-be-quilted pile ever since. The baby I'm making it for is now 7 months old, so I need to get going!
So, for this week's challenge, my goal is to get the Whimsy quilt basted and (fingers crossed) maybe even start quilting it.
Monday, January 9, 2012
Friday, January 6, 2012
This week in the quilt mines...
There was a lot of cutting and a even a little bit of sewing as I started in on quarter-square triangles for the sashing in my Hop to It quilt.
I got my glue on making some fun nametags for a quilt guild event.
And I even dug out the grandmother's flower garden and built a little more of the path (with kitty in my lap!).
Variety is the spice of life!
I got my glue on making some fun nametags for a quilt guild event.
And I even dug out the grandmother's flower garden and built a little more of the path (with kitty in my lap!).
Variety is the spice of life!
Wednesday, January 4, 2012
Cute and practical!
The September pincushion from the Shabby Fabrics Pincushion Club was the "Abbey Bag" from Abbey Lane Quilts (Shabby Fabrics still has some kits available if you're interested in making one).
There was a lot to this one-- the flower, the connector, the bag.
It all went pretty smoothly until I went to stuff the flower and got confused. In this one, there is a separate liner stuffed and cinched tight and then you put that inside the flower. I read it wrong and tried stuffing the flower and then spent lots of time trying to cinch it, but it just wasn't happening and was looking horrible. Whoops! Then I figured out the liner thing-- and suddenly it was working just like the instructions said it would. Sigh. Reading and following instructions is definitely not my forte. I guess the lesson is read carefully.
My biggest frustration with this pattern was the gluing involved (the flower to the connector, the connector to the bag, the top band to the bag, the shelf liner to the bottom of the flower). I'm just not a glue girl, not to mention the fact that I didn't actually have any fabric glue on hand, so it was just inconvenient. But it works and (to be fair) glue was probably easier than attempting to sew the parts together.
The best part about this pincushion project is that not only is it super cute, but it is very practical. Having the little bag right there next to my machine to toss clipped threads into is awesome, and the pincushion is nice and heavy (I stuffed it with crushed walnut shells) and does not slip or move around at all thanks to the shelf liner on the bottom.
The Abbey Bag would make a great gift for any sewist. But I'm keeping this one for me!
There was a lot to this one-- the flower, the connector, the bag.
It all went pretty smoothly until I went to stuff the flower and got confused. In this one, there is a separate liner stuffed and cinched tight and then you put that inside the flower. I read it wrong and tried stuffing the flower and then spent lots of time trying to cinch it, but it just wasn't happening and was looking horrible. Whoops! Then I figured out the liner thing-- and suddenly it was working just like the instructions said it would. Sigh. Reading and following instructions is definitely not my forte. I guess the lesson is read carefully.
My biggest frustration with this pattern was the gluing involved (the flower to the connector, the connector to the bag, the top band to the bag, the shelf liner to the bottom of the flower). I'm just not a glue girl, not to mention the fact that I didn't actually have any fabric glue on hand, so it was just inconvenient. But it works and (to be fair) glue was probably easier than attempting to sew the parts together.
The best part about this pincushion project is that not only is it super cute, but it is very practical. Having the little bag right there next to my machine to toss clipped threads into is awesome, and the pincushion is nice and heavy (I stuffed it with crushed walnut shells) and does not slip or move around at all thanks to the shelf liner on the bottom.
The Abbey Bag would make a great gift for any sewist. But I'm keeping this one for me!
Tuesday, January 3, 2012
Bundle fun!
Fat Quarter Shop recently began selling fat quarter bundles that have been put together by famous quilt/sewing bloggers. Quokka Quilts thought it would be fun to pretend to be a famous blogger and create her own "Blogger's Choice" bundle and has put together an awesome contest for all of us aspiring bundle-makers. Create a bundle (including 12 prints and 3 solids) using fabrics available at Fat Quarter Shop. Winners will actually receive 1/2-yard cuts of all the fabrics in their bundle! Pretty darn cool! Not to mention it is a fun excuse to go browse about Fat Quarter Shop (one of my favorite online stores!).
Since I have little boys, my bundle is definitely inspired by them:
Fabrics included:
If you're thinking that you might want to join in on the fun, there's still time! The contest runs through January 15th.
Since I have little boys, my bundle is definitely inspired by them:
Fabrics included:
- Writer's Block Earth Symbols Yardage SKU# 11860-169
- Espresso Petite Dots Yardage SKU# 39065-222
- Sew Geared Up Golden BrownMetal Garage Flooring Yardage SKU# 0977-4
- Mechanical Genius Navy Hexagon Geo Yardage SKU# C8997-NAVY
- Robot Factory Brown Robot Connections Yardage SKU# 11533-16
- Hall of Fame Olive Game Plaid Yardage SKU# DC5365-OLIV-D
- Hall of Fame Mustard Game Turf Yardage SKU# DC5367-MUST-D
- Retro Basics Retro Slender Stripe Yardage SKU# CX4844-RETR-D
- Alexander Henry Brown Bumper 2 Bumper Yardage SKU# 7463-A
- Little One Organic Light Green Multi Star Dots Yardage SKU# 11480-130
- Hall of Fame Yellow Game Jersey Yardage SKU# DC5363-YELL-D
- Coming Home Pebble Sand Barn Siding Yardage SKU# 19501-19
- Michael Miller Sailor Cotton Couture Solid Yardage SKU# SC5333-SAIL-D
- Kona Cotton Olive Yardage SKU# K001-1263
- Kona Cotton Banana Yardage SKU# K001-1481
If you're thinking that you might want to join in on the fun, there's still time! The contest runs through January 15th.
Sunday, January 1, 2012
Happy 2012!
The start of a new year is always an exciting time for me. New year = fresh starts in my mind. Really though, 2011 was a pretty awesome year for me, and I have no complaints-- so really, I'm just kind of hoping for more of the same. Is that weird?
My goals for last year:
Only 5 quilts (and one of those was a little wallhanging), but lots of bags, pincushions, and even a fair amount of clothes.
My goals for 2012:
I'm looking forward to a happy and healthy 2012!
My goals for last year:
- Use more fabric than I buy.-- Ha!
Fabric In: 148.700
Fabric Used: 88.801
I feel like I did exercise a lot of self restraint though. So that's something, right? - Finish at least one UFO-- Only one UFO finished, but it was a biggie-- "Forest Canopy" for the win!
- Put together my Jane Stickle top.-- So close on this one... I've stalled out on adding the final outside border (the narrow 2.5" one that I'll cut the scallops from after quilting). But the center is otherwise done. Woo!
- Have fun with being creative and making stuff!-- This one was a total win! I have had lots of fun this year branching out from just quilting-- I did a lot more sewing and made lots of clothes, bags, and pincushions (my new addiction). I've also been pretty good about keeping up with our family scrapbook, which I'm feeling really proud about.
Only 5 quilts (and one of those was a little wallhanging), but lots of bags, pincushions, and even a fair amount of clothes.
My goals for 2012:
- Use more fabric than I buy.-- Someday, I'm going to actually meet this goal. Maybe this is the year? :)
- Get my Jane Stickle quilt basted and start quilting it!
- Complete the Amy Butler Style Stitches challenge.-- The actual challenge group is seemingly retired, but I still really want to make those last two bags in the book.
- Finish some UFOs-- Specifically, I'd really like to finish Hop to It, Playtime, and (highest priority!) my wedding quilt (started in 2002... as this year will be our 10th anniversary, it seems like it is time).
- Keep exercising!-- Last summer I started exercising regularly (primarily running) and it is not only helping me physically (I've lost nearly 30 pounds in the last 4 months), but it is also so beneficial to my mental well-being. I feel so much more hopeful, refreshed, and energetic after I run. More energy = more crafting! I gotta make sure I keep going!
I'm looking forward to a happy and healthy 2012!
Thursday, December 29, 2011
"Forest Canopy"
Hello! It feels like a long time since I've blogged. As you know, this time of year tends to be on the busy side. We had a wonderful Christmas spent with friends and family (with, of course, much feasting!). I hope you have had a wonderful holiday season as well!
There was a fair amount of handmade gifting this year. I gave my mother-in-law the Blossom Bag I made, and my sister-in-law received the Fringed Hobo Bag. In addition, I made a pair of nifty pajama pants for my husband (more on those later-- I'm still hoping to get some pictures of him actually wearing them!). And, finally, completed just in time for Christmas:

Woo! It took three-and-a-half years, but my Prairie Pinwheels quilt (which has now been officially titled "Forest Canopy") is finally finished. As I technically gave it to my father-in-law two years ago (via an IOYAQ (I Owe You A Quilt) card), it was definitely time. The pattern is from the July/August 2008 issue of McCall's Quilting. It is a large quilt measuring 85 1/2" x 109 1/2" (making it very difficult to take good pictures of it-- so many thanks to my intrepid quilt-holding volunteers!).
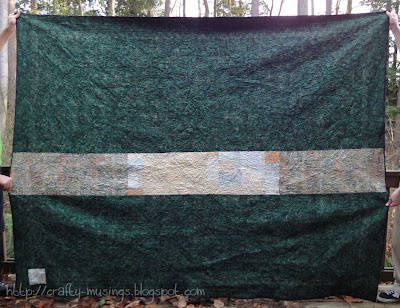
Ahhh.... *happy sigh* I just love this pieced back. And I love how well the quilting shows all over.

Quilting it was a slow process. I started by stitching-in-the-ditch to stabilize the layers and then did all of the free-motion work. Since all of my quilting designs were independent motifs, it involved a LOT of starting and stopping. Slooow process.

I did the cream-colored areas first using a King Tut 40/3 variegated thread, "Sands of Time" (#920). I love how the weight of the thread really makes the quilting pop.

Then I completed all of the green areas, including the outside border, using Aurifil Mako Cotton 50/2 (in dark green, #4026). As much as I loved quilting with it, I'm not thrilled with how subtle it is. The lighter weight really blends in with the background and the quilting is nigh invisible. For all of the effort I put into it, I really kind of wish I had used a heavier weight thread that showed a little better.
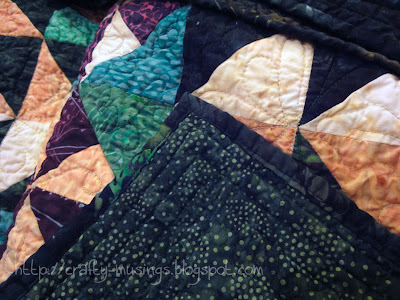
As it was getting down to the wire, I decided on a machine binding. I'm glad I did! I've had enough practice now that it looks good and I was able to accomplish it in about two-and-a-half hours. I do my machine binding using Red Pepper Quilts' method. It took a little practice, and it maybe isn't as fast as other methods, but I love the finished look (invisible from the front, as a hand-stitched binding would be), it works for me, and it allowed me to finish the quilt in time for gift-giving. (Yay!)

On the label, I repeated the wreath quilting motif I used throughout the center and in the outside border. The motif was designed with the idea of a tree's canopy-- how you stand below and look up and see the outline of the edges of the canopy, and it all looks kind of connected and of one piece with the light filtering through it and putting the canopy itself in shadow... you don't see individual leaves, but rather the outline of it all.

Not only was the quilt completed in time to give it to my father-in-law for Christmas, but it was also kitty approved!
There was a fair amount of handmade gifting this year. I gave my mother-in-law the Blossom Bag I made, and my sister-in-law received the Fringed Hobo Bag. In addition, I made a pair of nifty pajama pants for my husband (more on those later-- I'm still hoping to get some pictures of him actually wearing them!). And, finally, completed just in time for Christmas:

Woo! It took three-and-a-half years, but my Prairie Pinwheels quilt (which has now been officially titled "Forest Canopy") is finally finished. As I technically gave it to my father-in-law two years ago (via an IOYAQ (I Owe You A Quilt) card), it was definitely time. The pattern is from the July/August 2008 issue of McCall's Quilting. It is a large quilt measuring 85 1/2" x 109 1/2" (making it very difficult to take good pictures of it-- so many thanks to my intrepid quilt-holding volunteers!).

Ahhh.... *happy sigh* I just love this pieced back. And I love how well the quilting shows all over.

Quilting it was a slow process. I started by stitching-in-the-ditch to stabilize the layers and then did all of the free-motion work. Since all of my quilting designs were independent motifs, it involved a LOT of starting and stopping. Slooow process.

I did the cream-colored areas first using a King Tut 40/3 variegated thread, "Sands of Time" (#920). I love how the weight of the thread really makes the quilting pop.

Then I completed all of the green areas, including the outside border, using Aurifil Mako Cotton 50/2 (in dark green, #4026). As much as I loved quilting with it, I'm not thrilled with how subtle it is. The lighter weight really blends in with the background and the quilting is nigh invisible. For all of the effort I put into it, I really kind of wish I had used a heavier weight thread that showed a little better.

As it was getting down to the wire, I decided on a machine binding. I'm glad I did! I've had enough practice now that it looks good and I was able to accomplish it in about two-and-a-half hours. I do my machine binding using Red Pepper Quilts' method. It took a little practice, and it maybe isn't as fast as other methods, but I love the finished look (invisible from the front, as a hand-stitched binding would be), it works for me, and it allowed me to finish the quilt in time for gift-giving. (Yay!)

On the label, I repeated the wreath quilting motif I used throughout the center and in the outside border. The motif was designed with the idea of a tree's canopy-- how you stand below and look up and see the outline of the edges of the canopy, and it all looks kind of connected and of one piece with the light filtering through it and putting the canopy itself in shadow... you don't see individual leaves, but rather the outline of it all.

Not only was the quilt completed in time to give it to my father-in-law for Christmas, but it was also kitty approved!

Friday, December 16, 2011
My round robin returns!
Woo hoo!!! On Monday, I received my completed Once 'Round the Country round robin top from Kris. She wasn't able to post pictures, so I didn't know how it would look until I opened the box. Very exciting!!!

So cool!!! I absolutely love the way she echoed elements from previous rounds and really finished it off. This top just looks so modern and fresh to me.
Now I just need a quilting plan. I've got a few ideas floating around in my head, but they'll have to wait until the new year. I really think that quilting has the potential to really bring this design to life. I'm looking forward to the challenge!
Many, many thanks to all of the amazing women who worked on this quilt (and who trusted me to work on theirs!): Zonnah, Adrienne, Anne, and Kris. This round robin has been an amazing experience. You all inspire me.

So cool!!! I absolutely love the way she echoed elements from previous rounds and really finished it off. This top just looks so modern and fresh to me.
Now I just need a quilting plan. I've got a few ideas floating around in my head, but they'll have to wait until the new year. I really think that quilting has the potential to really bring this design to life. I'm looking forward to the challenge!
Many, many thanks to all of the amazing women who worked on this quilt (and who trusted me to work on theirs!): Zonnah, Adrienne, Anne, and Kris. This round robin has been an amazing experience. You all inspire me.
Subscribe to:
Posts (Atom)