Tuesday, December 13, 2011

Hop to It: "Garden Grace"

I couldn't help myself. I've been on such a roll lately with these Hop to It blocks that I just had to keep going and finish up the last one.

Block 9, "Garden Grace":

Hop to It block 9, Garden Grace
Techniques used:
  • Bias bars for the stems;
  • Karen Kay Buckley's Perfect Circles for the berries;
  • Needleturn with freezer paper on top for everything else.
This one was a lot of fun and I love the way it turned out. The neutrals in this one with the sparks of bright color really appeal to me. Happy! I also can't help but feel that I found the perfect fabric in my stash for that center bud-- love it! And...

Hop to It, completed blocks
All the blocks are complete! Woo hoo!!! Now I just need to figure out sashing. Here's hoping I don't fall into my recent pattern of finishing the applique and then stalling out on putting it all together (ahem... I'm talking about you, Greenpiece!).

Monday, December 12, 2011

Hop to It: "Rose Hip Wreath"

Block 12 of Edyta Sitar's Hop to It quilt, "Rose Hip Wreath":

Hop to It block 12: Rose Hip Wreath
Techniques used:
  • Bias bars for the stems;
  • Needleturn with freezer paper on top for the leaves and buds;
  • Freezer paper on bottom and starch for the ovals;
  • Karen Kay Buckley's Perfect Circles for the flower centers.
Frankly, I'm a little disappointed in this one. I think the applique itself looks great, and I love the fabrics I chose-- but they kind of blend in with the background a little too much. How is it I never notice these things until I'm already done? Sigh. Fortunately, the more I look at it, the less horrified I am. So that's good, right? And block one has a similar look, so really, it lends a certain balance to the overall quilt. Maybe. Either way, I'm not re-doing it!

Saturday, December 10, 2011

A little bit of this, a little of that

Handmade by Heidi

Last night was my first Friday Night Sew-In. Yay!

I started out my stitchin' evening around 7:00 p.m. with the September pincushion from the Shabby Fabrics Pincushion Club.

pincushion project A
I managed to complete all of the sewing. I was a little bummed that all of the final, finishing steps involved fabric glue. As I had no fabric glue on hand, I was unable to finish it. But, it will be ready to go once I get some glue!

pincushion project B
Next up was the October pincushion. I got the initial piecing done and traced all of the embroidery designs-- so it will be ready to go when I'm ready for some handwork. (This one is gonna be super cute, I think!)

pajamas for Big Bear, all cut and ready to be sewn
Then I moved on to some pajamas for Big Bear for Christmas. I managed to trace the pattern and get all of the pieces cut. At the same time, I also cut out another Christmas gift item (that will have to remain a mystery for now) and even got it all sewn up.

seam ripper
Since I can't share a picture of the completed project just yet, here's a picture of my trusty scalpel-like seam ripper which saw way more than its fair-share of use last night. Sigh... two long stitched and serged (4-thread overlock, no less) seams. For I bit, I was feeling like I was spending more time unsewing than actual sewing. But I did finish (eventually!). That's what I get for sewing so late at night!

It was 1:45 a.m. when I finally closed up the quilt mines. I admit that I wasn't working that entire time (had to stop for some snack-and-stretch breaks!). But it was still a fun and productive evening!

Friday, December 9, 2011

Friday Night Sew-In!

I've seen this button floating about the blogosphere for awhile and have finally decided to give it a go myself:

Handmade by Heidi

Tonight is Friday Night Sew0-In time! Once a month, Handmade by Heidi hosts a virtual get together wherein participants all set aside their Friday night to sew. So my plan is that I shall focus myself in my quilty cave with my sewing machine this evening and see how much I can get done. The husband has even agreed to take charge of boy duty! Woo!

I have lots of things to choose from in terms of stuff-to-do, but here is my kinda-sorta priority list:
  • Pincushion(s)-- I've got some catchin' up to do with my Pincushion Club from Shabby Fabrics;
  • Pajamas for Big Bear;
  • Quilting on the "Prairie Pinwheels" quilt (someday I will finish it!);
  • Other????
Those should keep me plenty busy and offer some good variety. And tomorrow I'll post about what I managed to accomplish. We'll see how it goes! :)

Thursday, December 8, 2011

Another bag...

...and it's NOT Amy Butler! *gasp!*

This is my version of the Trendy Faux Leather Handbag:

Faux leather handbag, front view
I found this tutorial via Stacy Sews and have had it in the back of my mind for a little while now. Then when I went to Hancock Fabrics in search of my sparkly cami fabric, I saw this pretty brown/copper-shimmery vinyl on one of their remnant tables. On sale. I snatched it up!

faux leather handbag, inside view
For the lining, I found a happy brown Laurel Burch fabric. I love me some kitty heads!

This was actually a pretty quick project. But sewing with the vinyl involved a couple of challenges for me. The main one: when I made a mistake and had do some unsewing? Holes. This vinyl had zero self-healing properties. Fortunately, the holes are not terribly visible. But I know they are there. The other big challenge was the thickness of the vinyl-- there were a couple of points when the bulk just didn't fit under my presser foot. Fortunately, having faced that challenge before with a previous project (I'm talking about you, Blossom Bag!), I knew I could take off the foot and make it work. But it is so hard to control and not the cleanest look.

My biggest frustration though was in sewing in the handles. I just couldn't get rid of that funky "bump" along the top of the bag and get it even all around. I tore out stitches a couple of times, and it just wasn't happening (and I was ending up with more and more holes!). I think it was in large part because I didn't have the small binder clips that the tutorial recommends. The vinyl-covered paperclips I was using just weren't cutting it in terms of keeping everything in position. Clearly, having the right tools makes a difference!

faux leather handbag, side view
On the bright side, at least both sides have the same issue. So now it is a design feature!

All-in-all, a very cute bag! I think now I need to make a matching wallet.

Tuesday, December 6, 2011

Hop to It: "Enchanted Garden"

Another Hop to It block:

Hop to It, block 10
This is block ten, "Enchanted Garden." I think this one turned out really beautifully. I love the background fabric; so much so that I bought some in another colorway to make a skirt (not made yet, but it's on the list!).

Techniques used:
  • Bias bars for the stems;
  • Karen Kay Buckley's Perfect Circles for the flowers;
  • Needleturn with freezer paper on top for everything else.
This makes ten complete and only two blocks to go!

Monday, December 5, 2011

Saturday night

On Saturday I went out on the town with some of the moms from preschool. Of course, I needed something to wear! I bought some fun, sparkly knit at Hancock Fabrics and dug out McCall's 4923 (now out-of-print) from my stash.

M4923, pattern envelope
The pattern includes six variations of cardigans plus a lined cami, which was perfect since the sparkly knit was sheer. I made a size XL and added 2" to the length (if I make it again, I might add a little more length... maybe 1/2"-1"?). I found a black polyester knit in my stash to use for the lining.
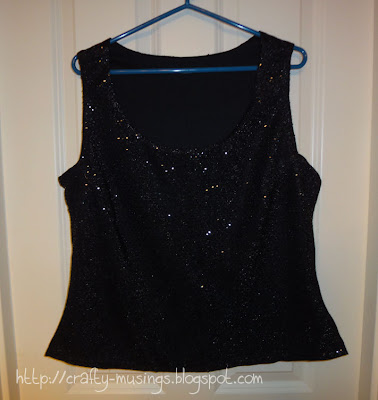
completed M4923, front view
Based on the finished garment measurements listed on the pattern envelope, I didn't do an FBA. As it turns out though, I did need to make an adjustment to make it work:

M4923, dart detail
When I tried it on, I found that though it fit around my bust, it also gaped significantly at the armhole. So I added darts at the armhole on each side to take in the extra fabric there. It isn't perfect, but the fabric is black-- so it's not very visible-- and it gets the job done, so I'm happy.

The pattern instructions were pretty basic and very easy to follow. The only real downside was that the method they used for the lining involved a bit of hand sewing. It wasn't bad, though it was a little time-consuming and my hand stitches with the knit were not pretty. But they're on the inside, so I'm the only one who has to look at them.

M4923, full-length view
I paired the top with some new jeans. Woo! Sparkly!

M4923, side view
Ready for a fun night on the town!