Yesterday, we had the family over for Big Bear's "official" birthday party. This year we let him chose what kind of party he wanted to have, and we were a little surprised that he decided he just wanted to invite his grandparents and his aunt and have an at-home gathering. His only hard and fast stipulation was that there had to be a birthday cake. And it had to be blue. And it had to have Toby the Tram Engine on it (who is one of Thomas the Tank Engine's friends).
On Friday afternoon, I baked the cake (a traditional white cake using a recipe from the cookbook, Baking Illustrated) and applied the white icing base. That evening, my husband and I got to work on the decorating. I mixed the icing colors, Keith drew Toby and piped him onto the top of the cake, and then I finished it off with some border work and lettering.
This was the inspiration picture (photo from here):
And this is the completed cake:
Keith did an amazing job! Big Bear was completely thrilled. And not only was Toby on top, but the inside was, as requested, blue:
It was quite pretty, really. I used food coloring paste ("sky blue") in the batter to get the color.
And then there was one last gift from Mama:
Ever since I made the name pillows a few weeks ago, Big Bear has been clamoring to get one of his own. In blue. How could I refuse? I smudged the name in the picture above so as to maintain Big Bear's secret identity, but I can tell you that the letters were all blue. And much to my joy, he LOVES it! Yay!
Sunday, January 29, 2012
Friday, January 27, 2012
Big Bear turns 5!!!
How the time has flown! Oh, my gosh. On Wednesday, we celebrated Big Bear's fifth birthday. Since it was in the middle of the week, it was a pretty low-key celebration, involving just Mama, Papa, Big Bear and Little Bear, and some cupcakes.
As per his request, I made blueberry cupcakes. I found the recipe at Cate's World Kitchen. And they were good-- they definitely qualify as one of the most successful cupcakes I've ever made. Shape, texture, taste-- the whole package-- YUM! And the recipe yields 6 cupcakes, which was perfect.
And, most importantly, Big Bear loved them! (Especially the one with the big "5" in the center!)
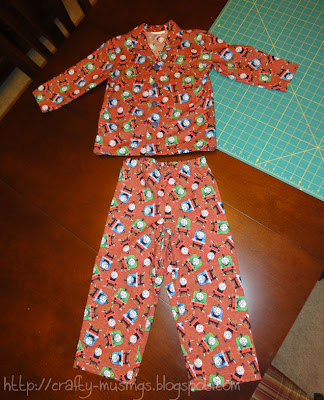
Of course, there was some present-opening as well, including a new pair of Thomas the Tank pajamas, made by Mama.
They are from Kwik Sew 3604. Both the top and the bottom are a size XS. I took 2" off the length of the pants and they are a great fit, but I probably should have made a bigger top. It fits right now, but probably won't for much longer. The pants were super simple and easy to put together. The top wasn't too bad, though the collar illustrations were a little confusing and threw me off. It took doing it wrong once to know for sure how to do it the right way, and then I had to scrap my first attempt. But the second time was the charm.
Did you notice the hat? His new favorite show is "Phineas and Ferb" which features a character named Perry the Platypus. Perry wears a hat when he is in secret agent mode. Big Bear was very excited to receive a hat of his own for his birthday. And yes, he wore it to bed that night.
Happy birthday, Big Bear!!!
Monday, January 23, 2012
A change of pace
After putting all of those quarter-square triangles together for Hop to It, I decided I needed to take a break from the machine and do a little bit of handwork.
Playtime is back!
Playtime is back!
Saturday, January 21, 2012
Snowed in, stalled out
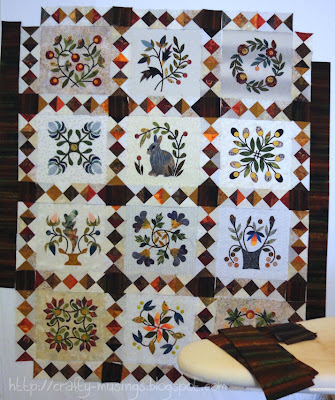
This week I spent a fair amount of time working on my Hop to It quilt, piecing the sashing. I finished all of the pieced sashing bits (yay!) and started to lay the quilt out on my design wall to get the placement just right.
It was then that I realized that the seemingly happy border fabric that I chose a few weeks ago just wasn't working for me. It just felt too cool and pinky for my taste.
So I moved on to plan B and shopped the stash. I found a potentially awesome candidate-- similar to the first, but in warmer colors. Maybe the best option wasn't to chop it up right away, but I was feeling confident and went ahead and did it. The warmer tones did work much better, but it still wasn't quite right.
Above is a comparison of the two border options. What do you think? A or B?
I called in my husband for another perspective. As he thought they both looked pretty much the same, he ended up being no help at all! Though, to be honest (and I do strive to be honest!), he's kind of right. They really do look remarkably similar unless one is standing very close. Hmmmm...
So then I spent awhile gazing at my wall and then at the pictures I took. Looking at them kind of shrunk-up in the computer helped me figure it out: the real problem is that they're just too dark. I need something lighter. I must find an option C.
On the down side-- I have to go shopping for the perfect fabric. Again. Which means I can't finish NOW.
On the bright side-- I get to go fabric shopping! And really, after having been snowed in for the last four days, any excuse to go out and about is a good one in my mind at this point! :)
Friday, January 20, 2012
Pumpkin pie!
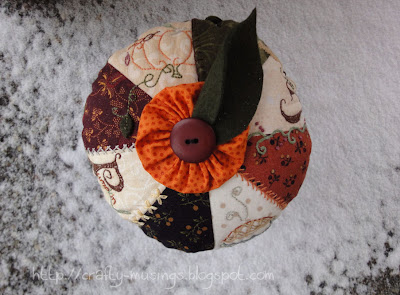
The October pincushion from the Shabby Fabrics Pincushion Club was from Pine Mountain Designs. The Pumpkin Pie Pin Cushion is actually the second pincushion I've completed by them. The first was the Love Pin Wheel Pastry-- the very first kit I received from Shabby Fabrics. And, once again, I love the results. Their patterns are so dang cute!
The combination of embroidery and patchwork is a happy one. I really enjoyed putting it together.
The instructions were easy to follow and I really appreciated that directions for all of the stitches used in the embroidery sections were included.
Rick-rack on the side...
...with a little yo-yo, a wool leaf, and a button on top to finish it off. I stuffed mine with crushed walnuts, so it has a nice heft to it as well.
*happy sigh* I do love me a cute pincushion!
Shabby Fabrics still has some kits available if you're in the mood for a little bit of Pumpkin Pie for yourself.
Wednesday, January 18, 2012
Pillow party!
Recently, Stacy Sews reviewed the Personalized Name Pillow pattern from Kimberbell Kids. Hers turned out so cute that I decided to go ahead and pick up the pattern for myself.
The pattern is good-- the instructions are very clear and there are lots of photos throughout to illustrate the steps. It is true that this project is not rocket science, and I didn't really need a pattern to tell me how to go about making one. However the pattern also includes an alphabet-- capital and lower case letters, perfectly sized and already reversed for fusible applique-- making it more than worth its $6.95 price tag. (I don't even want to think about how long it would take me to accomplish the whole sizing/reversing thing... ugh!)
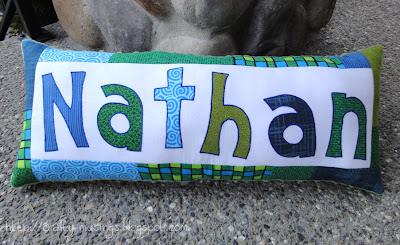
I've made two pillows so far, both for preschool friends of Big Bear. First up was Nathan:
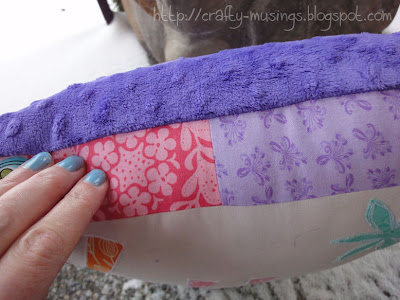
The only deviation I made from the pattern on this one was to use the minkee dimple dot fabric on the back (so I also used 1/2" seam allowances when I sewed the front and back together).
It ended up about 12" high and 21" wide.
For Kyra, I got a little more creative:
I decided to go for a more square look and use diagonal letters mostly because her name is so short, it would have resulted in a pretty tiny pillow otherwise. Then I added the flowers to just fill in some of the open space.
Again, I used dimple dot micro-fleece on the back. This one ended up about 15" high and 14" wide.
Making these pillows is quick, easy, and a lot of fun (and a great way to use some scraps!)! And the kids seem to like them too!
Labels:
2012 finishes,
applique,
name pillows,
scraps,
sewing
Monday, January 16, 2012
This week in the quilt mines...
...was a little on the slow side. First Little Bear got sick, followed by Big Bear and Papa. It was not a healthful week here in the Crafty Musings house!
On the bright side:
I did manage to meet my goal for this week's One Thing, One Week Challenge at Amy's Creative Side! Woo! I am very happy to report that I managed to get the basting done on my Whimsy quilt. I had hoped to maybe start quilting it, but it was not meant to be last week. Maybe this week?
If you get a chance, check out what some of the other intrepid One Weekers accomplished this week-- it is always very inspiring!
Tuesday, January 10, 2012
For the man who has everything...
Well. My husband doesn't exactly have everything. More like, he just doesn't want anything. It makes for a serious gift-giving challenge. So this year, I didn't even try to shop. Instead, I found a super-cool fabric (the totally awesome mini robots from Caleb Gray which I purchased from Pink Chalk Fabrics) and decided to make some pajama pants for him.
I used Kwik Sew Pattern #3793. I took his favorite pair of pj pants and held them against the pattern to determine size and any other adjustments that might be needed. I ended up with a size Large and took 1.5" off the leg length. The pattern is designed for beginners and the instructions truly were very clear and easy to follow. And (bonus!) they were quick and easy-- I got them cut and sewn in one evening, no problem (well, other than the problems I had with my own brain, resulting in a massive un-sewing session). But, even with the unsewing, I got them done in one evening!
And they were a total hit when my husband opened them on Christmas! So much so that he even agreed to model them for the blog:
His only complaint about them is that the fly kind of pops open when he sits down. He thinks a button in that area would be a good idea. As that is a very do-able and easy adjustment to make, I feel like I can definitely call this gift (and pattern) a success. Yay!
Monday, January 9, 2012
One Thing, One Week Challenge returns!
Amy over at Amy's Creative Side is again hosting the One Thing, One Week Challenge. Yay! I love these challenges. They work really well for me as motivation to accomplish something (especially those somethings that maybe I'm not so motivated to do otherwise).
Remember this project?
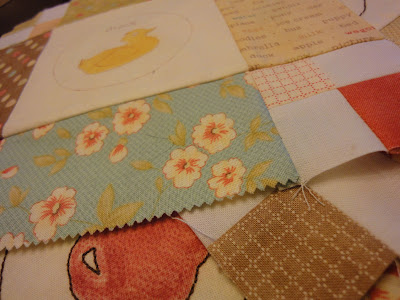
Ha! Even I only vaguely remember this project. I actually completed the top way back in June and it has been languishing on top of my needs-to-be-quilted pile ever since. The baby I'm making it for is now 7 months old, so I need to get going!
So, for this week's challenge, my goal is to get the Whimsy quilt basted and (fingers crossed) maybe even start quilting it.
Friday, January 6, 2012
This week in the quilt mines...
There was a lot of cutting and a even a little bit of sewing as I started in on quarter-square triangles for the sashing in my Hop to It quilt.
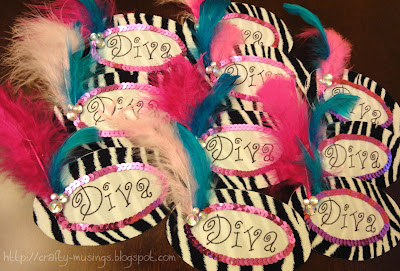
I got my glue on making some fun nametags for a quilt guild event.
And I even dug out the grandmother's flower garden and built a little more of the path (with kitty in my lap!).
Variety is the spice of life!
I got my glue on making some fun nametags for a quilt guild event.
And I even dug out the grandmother's flower garden and built a little more of the path (with kitty in my lap!).
Variety is the spice of life!
Wednesday, January 4, 2012
Cute and practical!
The September pincushion from the Shabby Fabrics Pincushion Club was the "Abbey Bag" from Abbey Lane Quilts (Shabby Fabrics still has some kits available if you're interested in making one).
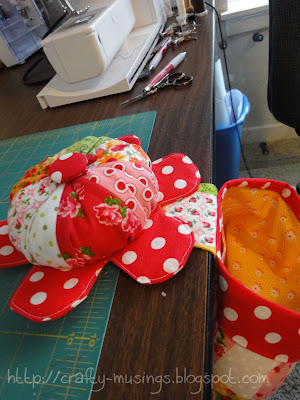
There was a lot to this one-- the flower, the connector, the bag.
It all went pretty smoothly until I went to stuff the flower and got confused. In this one, there is a separate liner stuffed and cinched tight and then you put that inside the flower. I read it wrong and tried stuffing the flower and then spent lots of time trying to cinch it, but it just wasn't happening and was looking horrible. Whoops! Then I figured out the liner thing-- and suddenly it was working just like the instructions said it would. Sigh. Reading and following instructions is definitely not my forte. I guess the lesson is read carefully.
My biggest frustration with this pattern was the gluing involved (the flower to the connector, the connector to the bag, the top band to the bag, the shelf liner to the bottom of the flower). I'm just not a glue girl, not to mention the fact that I didn't actually have any fabric glue on hand, so it was just inconvenient. But it works and (to be fair) glue was probably easier than attempting to sew the parts together.
The best part about this pincushion project is that not only is it super cute, but it is very practical. Having the little bag right there next to my machine to toss clipped threads into is awesome, and the pincushion is nice and heavy (I stuffed it with crushed walnut shells) and does not slip or move around at all thanks to the shelf liner on the bottom.
The Abbey Bag would make a great gift for any sewist. But I'm keeping this one for me!
Tuesday, January 3, 2012
Bundle fun!
Fat Quarter Shop recently began selling fat quarter bundles that have been put together by famous quilt/sewing bloggers. Quokka Quilts thought it would be fun to pretend to be a famous blogger and create her own "Blogger's Choice" bundle and has put together an awesome contest for all of us aspiring bundle-makers. Create a bundle (including 12 prints and 3 solids) using fabrics available at Fat Quarter Shop. Winners will actually receive 1/2-yard cuts of all the fabrics in their bundle! Pretty darn cool! Not to mention it is a fun excuse to go browse about Fat Quarter Shop (one of my favorite online stores!).
Since I have little boys, my bundle is definitely inspired by them:
Fabrics included:
If you're thinking that you might want to join in on the fun, there's still time! The contest runs through January 15th.
Since I have little boys, my bundle is definitely inspired by them:
Fabrics included:
- Writer's Block Earth Symbols Yardage SKU# 11860-169
- Espresso Petite Dots Yardage SKU# 39065-222
- Sew Geared Up Golden BrownMetal Garage Flooring Yardage SKU# 0977-4
- Mechanical Genius Navy Hexagon Geo Yardage SKU# C8997-NAVY
- Robot Factory Brown Robot Connections Yardage SKU# 11533-16
- Hall of Fame Olive Game Plaid Yardage SKU# DC5365-OLIV-D
- Hall of Fame Mustard Game Turf Yardage SKU# DC5367-MUST-D
- Retro Basics Retro Slender Stripe Yardage SKU# CX4844-RETR-D
- Alexander Henry Brown Bumper 2 Bumper Yardage SKU# 7463-A
- Little One Organic Light Green Multi Star Dots Yardage SKU# 11480-130
- Hall of Fame Yellow Game Jersey Yardage SKU# DC5363-YELL-D
- Coming Home Pebble Sand Barn Siding Yardage SKU# 19501-19
- Michael Miller Sailor Cotton Couture Solid Yardage SKU# SC5333-SAIL-D
- Kona Cotton Olive Yardage SKU# K001-1263
- Kona Cotton Banana Yardage SKU# K001-1481
If you're thinking that you might want to join in on the fun, there's still time! The contest runs through January 15th.
Sunday, January 1, 2012
Happy 2012!
The start of a new year is always an exciting time for me. New year = fresh starts in my mind. Really though, 2011 was a pretty awesome year for me, and I have no complaints-- so really, I'm just kind of hoping for more of the same. Is that weird?
My goals for last year:
Only 5 quilts (and one of those was a little wallhanging), but lots of bags, pincushions, and even a fair amount of clothes.
My goals for 2012:
I'm looking forward to a happy and healthy 2012!
My goals for last year:
- Use more fabric than I buy.-- Ha!
Fabric In: 148.700
Fabric Used: 88.801
I feel like I did exercise a lot of self restraint though. So that's something, right? - Finish at least one UFO-- Only one UFO finished, but it was a biggie-- "Forest Canopy" for the win!
- Put together my Jane Stickle top.-- So close on this one... I've stalled out on adding the final outside border (the narrow 2.5" one that I'll cut the scallops from after quilting). But the center is otherwise done. Woo!
- Have fun with being creative and making stuff!-- This one was a total win! I have had lots of fun this year branching out from just quilting-- I did a lot more sewing and made lots of clothes, bags, and pincushions (my new addiction). I've also been pretty good about keeping up with our family scrapbook, which I'm feeling really proud about.
Only 5 quilts (and one of those was a little wallhanging), but lots of bags, pincushions, and even a fair amount of clothes.
My goals for 2012:
- Use more fabric than I buy.-- Someday, I'm going to actually meet this goal. Maybe this is the year? :)
- Get my Jane Stickle quilt basted and start quilting it!
- Complete the Amy Butler Style Stitches challenge.-- The actual challenge group is seemingly retired, but I still really want to make those last two bags in the book.
- Finish some UFOs-- Specifically, I'd really like to finish Hop to It, Playtime, and (highest priority!) my wedding quilt (started in 2002... as this year will be our 10th anniversary, it seems like it is time).
- Keep exercising!-- Last summer I started exercising regularly (primarily running) and it is not only helping me physically (I've lost nearly 30 pounds in the last 4 months), but it is also so beneficial to my mental well-being. I feel so much more hopeful, refreshed, and energetic after I run. More energy = more crafting! I gotta make sure I keep going!
I'm looking forward to a happy and healthy 2012!
Subscribe to:
Comments (Atom)


