Wednesday, August 31, 2011

Round Robin: Organized Chaos

For this round of Once 'Round the Country, the round robin quilt bee in which I am participating, I worked on Adrienne's quilt. I actually went into this one with a "vision," thinking I knew exactly what I wanted to do. (I bet you know what's coming...) Unfortunately, the fabric allotment was not enough for me to confidently execute my idea and still leave enough for the next round. So, I sucked it up, took a picture, and started working on a new (improved!) plan:

Organized Chaos plan
The colors were really distracting to my eye and made it hard for me to focus on design, so I switched my photo to greyscale to "see" it better.

At the beginning, Adrienne told us that her vision for this quilt was "Organized Chaos"-- she really wanted to focus primarily on the prints, using the solids as just accents. The subsequent borders by Anne and Kris did a beautiful job doing just that, so I really wanted to follow their lead by keeping to straight piecing, using as many of the included prints as possible while still having a sense of some sort of organization. I got the idea for flying geese from the center block. It didn't use flying geese, but the outside edges of the block had that kind of flavor. I ran with it.

Organized Chaos, outside border by Robin
My border ended up being less "organized" than Kris's (the next one in-- if you look closely, you can see how wonderfully deliberate her use of color is), but maybe a slightly more organized than Anne's (the gorgeous fractured border surrounding the center block). Like Anne, I used every print available. Like Kris, I used very regular shapes throughout. I also tried to echo the center block (and Kris's border) by repeating the solid elements.

Overthink much, Robin? :P

I felt so out of my element with this one, wrapping my brain around it was a serious challenge. It was fabulous.

Tuesday, August 30, 2011

Style Stitches Monthly Bag Challenge: Fringed Hobo Bag

Another month, another project from Amy Butler's fabulous book, Style Stitches!


For this month's Style Stitches Monthly Bag Challenge, I made the Fringed Hobo Bag.

Fringed Hobo Bag, front and reverse views
Going into it, this was the one project in the book I was seriously considering skipping. It just seemed a little too over-the-top. So, I never thought I'd say this, but it really turned out to be such a fun bag!

I decided on the small version because I liked the slightly longer strap that can be worn over the shoulder. The bag is listed as an "Advanced" project, and I definitely concur. Dealing with the curves, the trim, and the sheer bulk of all the interfacing and fleece involved all make for a bit of a challenge. So much interfacing. I think I probably spent more time fusing all of it on than I did actually sewing. And I nearly lost it when it came to the topstitching through it all at the end. Ugh. But once I switched to my 90/14 Topstitching needle, I got through it. Thank goodness I had one of those on hand (because the 80/12 quilting needle I usually have in my machine was an epic FAIL)!

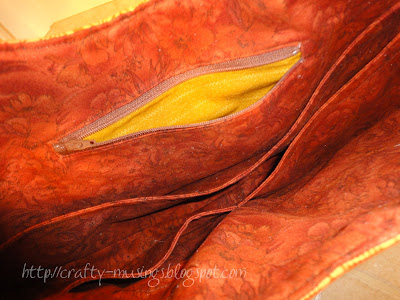
Fringed Hobo Bag, inside view of zipper
I decided to go ahead and add a zipper pocket to the inside. This was a little more challenging than normal because of the bulk of the fleece that had been fused to the lining panel. But I got it to work.

Fringed Hobo Bag, side view
Inspired by cottage revolution's version, I went out and found some wooden disc trim at Hancock Fabrics. It felt like a great match for my woodsy-themed fabric (a gorgeous Julie Paschkis print from In the Beginning fabrics).

me and my Fringed Hobo Bag
Here I am modeling it. You can see exactly just how "small" it is. Ha!

Overall, I'm really pleased with the bag. It is a gift for my sister-in-law. Hopefully, she'll enjoy it!

ETA: I nearly forgot! There was some trim drama on this one. The pattern for the small bag calls for 2-3/4 yards of trim. That was about 9" too short. I ran back to the store and was able (thankfully!) to get another 1-1/2 yards, and that fit exactly. So the small bag definitely requires at least 3 yards (I'd probably err on a little extra, like 3-1/8 yards).

Sunday, August 28, 2011

More pincushion-y goodness!

July's selection from the Shabby Fabrics Pincushion Club was from Bareroots. The pattern is #200, "Wrist Pin Cushions", a happy little trio of pincushions.

trio of wrist pincushions
They were a lot of fun to put together. The kits came with everything but the stuffing, making it super easy.

round pincushion on my wrist
And here's one on my wrist, so you can get an idea of the size.

So happy!

Monday, August 22, 2011

A new skirt...

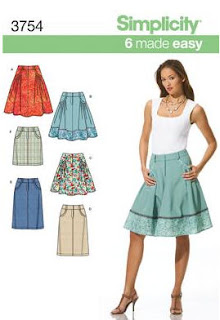
Simplicity 3754 pattern coverLast week I made a skirt. And it fits! And I feel good when I wear it! The pattern is Simplicity 3754. I made view E.

Simplicity 3754, view E, front view
I pretty much just followed the instructions to the letter. They were clear and easy to follow (I was a little surprised that even the zipper instructions made sense to me, and worked like a charm).

Simplicity 3754, view E, pocket facing close-up
I did make a couple of minimal changes, including shortening the skirt by 2 inches, doing a button instead of a hook closure, and using a different fabric for the pocket facings (shown in the picture above). For the facings, I wanted something a little lighter-weight than the stretch twill, and the leftover fabric from my shirt was perfect for the job.

Simplicity 3754, view E, back view
If I were to make this one again (and I think I will-- I really like the simple, straight-skirt style and the pockets), I would probably:
  • Omit the pocket binding. It is heavy and pulls some, and I think it would look cleaner if I instead turned the pocket facing and topstitched.
  • Add a couple more belt loops. I think having another on either side, placed between the side seam and the back carriers, would make belt-wearing a little more practical.


Simplicity 3754, view E, side view
I am already planning to make another version for fall from a black corduroy that I have sitting in my stash. This pattern is a keeper!

Friday, August 19, 2011

Style Stitches Monthly Bag Challenge 2011-August's Bag


I've picked out some fabrics for my August Style Stitches project, the Fringed Hobo Bag.


Initially, I was not very excited about this design. But now that I have my fabrics picked out, I'm starting to get psyched!

Hopefully, I can start work on it this weekend.

Sunday, August 14, 2011

Hop to It: "Spring Breezes"

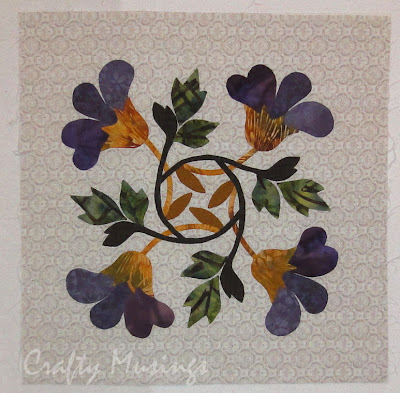
Since I'm not really going in any order, I skipped along to block 11 for this month. This might be my favorite Hop to It block thus far:

Hop to It, block 11
I just love the weaving vines and leaves, the flowing design, the lovely background, and the colors... oh, the colors! Somehow, I just lucked out on this one in picking fabrics. Happy!

All of the usual techniques prevailed in this one... bias bars for the stems, Perfect Circles for the berries, and needleturn with freezer paper on top for everything else. I had a few problems with placement of the dark green leaves (they should have been placed a little further down on their respective stems), but I managed to make it work without having to tear anything out. So I count that as a success.

I'm now caught back up to where I'm supposed to be block-wise on this project. Woo hoo!

Thursday, August 11, 2011

Fruity goodness

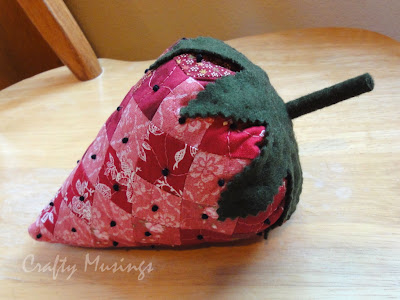
These fresh-picked little cuties are Miss Rosie's Quilt Co. "Fruit Salad Pincushions." The pattern was the June selection for the Shabby Fabrics Pincushion Club (kits appear to be available still).

Fruit Salad Pincushions-- watermelon and strawberry
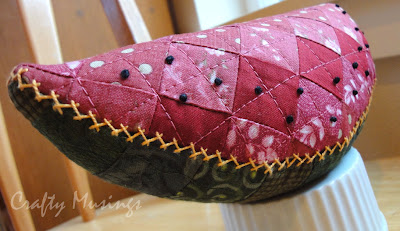
At first glance, they look sweet enough. But both of these pincushions were pretty darn involved. Creating the checkered look required making mini-bargello quilts for each-- including quilting!

watermelon, close-up of quilting on rind
Bargello is a style of quilt piecing in which fabric strips are first sewn into horizontal strata, and then are cut and arranged in vertical steps. It is a pretty labor intensive process. (At least for me it is... I am obsessed with making sure all my seams match.)

strawberry pincushion close-up
After those were complete, then I used the pattern pieces to cut out the required shapes, did all of the french knots (there were a lot of them-- especially on the strawberry), sewed them, stuffed them, and did the final finishing touches by hand (like the wool cap on the strawberry and the embroidery on the watermelon).

watermelon, close-up of embroidery
But, boy, aren't they happy?

another pic of the happy fruit pair
More pinchusions! Woo hoo!

Monday, August 8, 2011

Hop to It: Lily Dreams

Slowly but surely, I'm getting caught up on my Edyta Sitar Hop to It blocks. Here is block 8, "Lily Dreams":

Hop it It, Block 8: Lily Dreams
The big challenges in this one were getting the overlapping designs placed correctly as well as appliqueing the skinny stems that had leaves at the end (the dark stems). On those stems, I initially tried using the bias bars on the long part, leaving a larger piece of fabric for the leaves which I thought I could needleturn. But that approach just didn't work at all. It ended up being a wonky mess. So I just did plain ol' needleturn with freezer paper on top for the entirety of those pieces, stem to leaf. Frankly, I was a little surprised when it worked. But I'll take it!

Overall, another happy block. I'm really enjoying this project so far.

Friday, August 5, 2011

Frilly Ribbons pincushion

The May kit from the Shabby Fabrics Pincushion Club (they still have some kits available if you are interested) was the Frilly Ribbons basket pincushion from Crabapple Hill Studio.

Frilly Ribbons basket pincushion, front view
There was a lot of handwork in this one. In fact, the only time I used my machine was in basting the ribbons to the main basket piece. Everything else was by hand. The kit didn't actually come with quite enough beads, so I went out and purchased the little glass fluted flower head beads to use around the top edge of the basket. I think they are a nice addition with all of the pearly pink seed beads.

Frilly Ribbons basket pincushion, close-up
I think it looks so fancy! So much so, that I felt the need to procure some pretty pins to go with it. (Is it weird that I feel like my regular pins aren't pretty enough for my pincushion?) I found these beautiful pins on Etsy, from Whimsical Wool. It is true that they aren't exactly practical-- but aren't they perfect with this pincushion? Love.

Monday, August 1, 2011

Vacation shop hopping

When we went on our vacation to the peninsula a couple weeks ago, we stopped at a few quilt shops along the way. It was like a mini shop hop! We visited four different shops:
  • The Kingston Quilt Shop,in Kingston, WA, is a friendly store right next to the ferry terminal.
  • The Quilted Strait, in Port Gamble, WA, offered a beautiful array of contemporary designers and Japanese import fabrics.
  • Karen's Sewing Center, in Sequim, WA, is a Bernina dealer and has a nice selection of popular fabric lines. The owner was super friendly and welcoming, too!
  • Sleepy Valley Quilt Company, in Port Angeles, WA, was my favorite of the bunch. They offer a range of fabric styles, from reproduction to modern, as well as a lovely selection of stitcheries and wool.
It was a ton of fun seeing some new-to-me quilt shops, and of course I managed to come away with some fun new stuff:

vacation loot
Pretty fabric, a book, a pattern, and a wool pincushion kit (I'm addicted!). Yay!

And, lest you think it was all about the quilting, we also managed to take some fun hikes in the area, including a visit to Hurricane Ridge in the Olympic National Park. GORGEOUS!!! Holy cow. Truly, it was mind-blowing. A friendly couple even offered to take a picture of us:

the Zabacks on Hurricane Ridge
Big Bear loved the snow!

It was a fun getaway for everyone. I can't wait until we can do it again!