The October Style Stitches Monthly Bag Challenge was the Everything Wristlet. I actually finished it mid-October, but somehow managed to fail in blogging about it. So here goes...

I chose to make the small version and used some fabrics that have been in my stash for quite some time.

I love that taupe-y medallion print and wish I had taken time to center the design. But when I was cutting, I didn't even think of that. Doh!

This bag is in the "Experienced" (read: advanced) section of the book. And it really earns that moniker.

There were a number of challenges in making this bag, almost all of which had to do with the lining elements.

For one thing, there was some crazy thickness going on because the design called for sewing through multiple layers of Peltex. Fortunately, my machine worked it like a champ. But it caused for some stress.

And, as always seems the case for me and these bags, the zipper instructions were very challenging. The lining is made up of two parts: the card slot/center pocket and the main body. The main body starts as one long rectangular piece of fabric. The zipper is laid on top then the lining is folded over on top of itself and laid on top of the bottom half of the zipper to create the pocket. So when stitching the bottom half of the zipper, one has to be careful not to accidentally stitch the whole pocket closed. Because the pocket is so narrow, the only way to avoid stitching through it is to sew it in 3 steps (illustrated above): 1. from the outer edge to the head of the zipper; then take it out of the machine and open the zipper and reposition the foot on the edge of where the stitching started and 2. sew to the end of the zipper, at which point you have to remove it from the machine and then 3. sew from the other outside edge to the end of the zipper.
In fact, the whole time I was working on it, I was sure I must be doing it incorrectly, because none of this was detailed in the instructions at all. All it said was: "Note: Do not stitch through the back of the pocket." But it actually worked. I was shocked. Really. I probably wouldn't have even used her technique (being as I swore off A.B. zipper instructions), except that the lining is a single piece that is folded accordian-style to create the inside of the bag. It is actually a clever design, but the execution involved to make it happen is challenging.

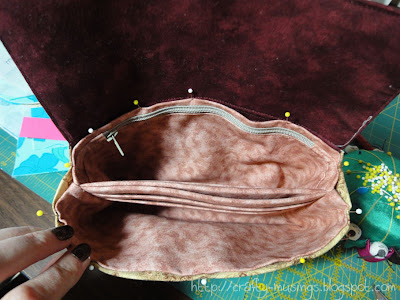
Inserting the lining was interesting as well (but it definitely went more smoothly than the zipper!). Essentially, you drop it inside of the bag body, fold the edges of each to the inside, and then edgestitch all around the perimeter. In theory this is simple. In practice it is challenging because you need to deal with crazy thickness on the sides, the barrier of the center pocket section, and with lining up the stitching with the outside flap seam (which you can't see at all). It took lots of pins, going very slowly, and then a little bit of handstitching to finish it all off-- but it worked.

It turned out to be a cute little bag. I like it, but I think I would like the larger version better. I'm not sure I'll ever go back and make another of this bag though, as it was a lot of effort for a style that is just okay for me. But you never know.
I didn't manage to finish the November bag, but it seems that JemJam, the challenge host, is taking a little break too. She says she'll jump back in again soon, but until she does, I probably won't start on the final two bags. I've got so much else going on with the upcoming holidays, I think it will be good to take a little break.


I am extremely impressed! The bag turned out great and the fabric choices are perfect.
ReplyDeleteAgain VERY nice! You worked through the challenges like a pro!! You are such a telented woman!!
ReplyDeleteSo pretty! I like that taupe medallion fabric! I think it goes great with the coordinates you choose!
ReplyDeleteVery pretty Robin! There sure is a lot of work to one little bag. Love the fabric combo.
ReplyDeleteLove the hair :)I have always wanted to do something like that with my hair but have never been brave enough.
ReplyDelete