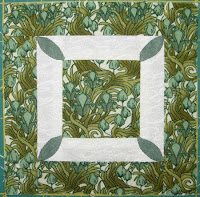
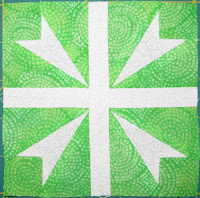
Block number/name: H-3 “Berry Baskets”
Date completed: November 23, 2009
Number of pieces: 28
Notes on block: Is it even possible? I am caught up with That Quilt! For today, at least.
I’m not sure what it was about this block, but it felt as if it took a long time to put it together. Maybe it was because I’m just not diggin’ the design. Or maybe it was because I had to unsew the center three times in trying to get the points to meet. Or it could be because I tried to make it more like the original and used a variation with additional bars in the flying geese at the top and bottom of the block. Possibly all of the above. But, it’s done!
Progress as of 11/24/2009:
Wednesday, November 25, 2009
Tuesday, November 24, 2009
Jane Stickle Quilt: J-9 & G-10
Block number/name: J-9 “Maury High School”
Date completed: November 22, 2009
Number of pieces: 13
Notes on block: Choosing the fabric for this block presented a dilemma. Do it all in one green or choose an accent color for the melons? Because the main fabric is so busy, I decided to go with an accent color. I’m happy with my choice except for the fact that now the melons are much more visible. Tiny melons, I shake my fist at you!!! Sigh. I take heart in the fact that they are at least a little better than my last attempt at tiny melons.
Block number/name: G-10 “Woven Meadow”
Date completed: November 22, 2009
Number of pieces: 39
Notes on block: Another two-block night! It always feels good when that happens.
There were many pieces, but this was a very straightforward block piecing-wise. I’m really happy with how this one turned out.
Date completed: November 22, 2009
Number of pieces: 13
Notes on block: Choosing the fabric for this block presented a dilemma. Do it all in one green or choose an accent color for the melons? Because the main fabric is so busy, I decided to go with an accent color. I’m happy with my choice except for the fact that now the melons are much more visible. Tiny melons, I shake my fist at you!!! Sigh. I take heart in the fact that they are at least a little better than my last attempt at tiny melons.
Block number/name: G-10 “Woven Meadow”
Date completed: November 22, 2009
Number of pieces: 39
Notes on block: Another two-block night! It always feels good when that happens.
There were many pieces, but this was a very straightforward block piecing-wise. I’m really happy with how this one turned out.
Monday, November 23, 2009
Greenpiece month 1: Applique blocks
Woo hoo! I managed to complete both of my Moda Greenpiece applique blocks before the month two blocks arrived.
Block 1:
The biggest challenge in this block was placement. The patterns include the shapes, but don't have any placement guides. So I'm kind of having to wing it. :)
Block 2:
I started with the watermelon. I put it together separately and then attached it to the background as one large piece. I decided to try and do the veins on the outer rind by reverse applique. Oh, my. That was hard. When I went to pick up my month 2 blocks, I took a look at the sample to see how it was done, and found that she had used embroidery for the veins. How smart! Too bad I didn't think of that. But, I don't think the reverse applique looks too bad.
The tiny stars and the bird were also very challenging for me. Lots of narrow points, skinny pieces, and tiny angles. Ooof. I wish the beak were cleaner and better. But I did it twice, and don't really want to risk it again (the fabric is rather frayed at this point). My bird is maybe just a little more menacing-looking than the original. He really wants that watermelon!
Sunday, November 22, 2009
Autumn House - Block 9
The last block in my Autumn House quilt is complete! It is called, "A Squirreling Vine."
This house's architect must have had a strange sense of humor. How else could one explain that one crooked window? (And how is it that I never notice these things until they are all done?) :)
To make it match the block 7, I went ahead and added a strip to the inside edge. Actually, the strip was initially on the outside (on both blocks), but after looking at the blocks all lined up, I decided it would look better if the strip was on the inside edge, toward the center of the quilt. So there was some unsewing in both blocks to make that happen. But I think it will look much better in the end.
Next step: putting all the blocks together. This may have to wait until after the holidays. At the same time though, I'm pretty anxious to get this top done. We'll see how it goes.
Thursday, November 19, 2009
Jane Stickle Quilt: L-6
Block number/name: L-6 “Maze of Madness”
Date completed: November 18, 2009
Number of pieces: 47
Notes on block: I LOVE this block. I think it is so pretty. Construction was very slow. Forty-seven pieces = a LOT of seams! I’m also really proud of this block. I think I did a good job maintaining straight seams throughout (the bowing in the picture is entirely due to my poor photography skills). When the pieces finish at ¼” wide, keeping them straight is so important, and it can really be a challenge. Only three seams had to be unsewn in the making of this block. Woo hoo!
Wednesday, November 18, 2009
Jane Stickle Quilt: E-13
Block number/name: E-13 “Moth in a Web”
Date completed: November 17, 2009
Number of pieces: 22
Notes on block: This was a fun block to make. And I love the look of it. I seem to be in a productive Jane mode over the last few days, and I am really enjoying the process. This is my 152nd block. Only 73 to go!
Date completed: November 17, 2009
Number of pieces: 22
Notes on block: This was a fun block to make. And I love the look of it. I seem to be in a productive Jane mode over the last few days, and I am really enjoying the process. This is my 152nd block. Only 73 to go!
Tuesday, November 17, 2009
Jane Stickle Quilt: RS-7
Block number/name: RS-7 “Fedelia’s Hearts”
Date completed: November 16, 2009
Number of pieces: 13
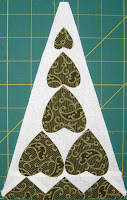
Notes on block: I’ve never been a big fan of hearts. They’re just not my thing. But, I actually do like this block. Maybe it’s the fabric I chose?
This block stitched up pretty quickly. For the upper section, I cut a rectangle and then used a vinyl overlay to help me with the placement of the hearts. After all of the appliqué was completed, I trimmed it down to size and attached it to the bottom section. It worked pretty well.
Monday, November 16, 2009
Jane Stickle Quilt: F-12
Block number/name: F-12 “Starburst”
Date completed: November 15, 2009
Number of pieces: 16
Notes on block: This is one of my favorite greens! When I first started work on my Jane blocks, back in 2004, my mother-in-law bravely entered into a quilt shop for the very first time to buy some green fabric as a Christmas gift. She ended up with a fat quarter bundle and put it in my stocking. This green is from that bundle.
Construction was pretty straightforward until the last four pieces. I decided to do needleturn appliqué for the inset star areas. There was so much bulk from all of my seams that it was very difficult to turn under the white fabric. But, I suspect it was still easier than an inset seam, and I’m happy with the result.
Sunday, November 15, 2009
Greenpiece goodness
Over the summer, I saw some pictures of the beautiful Moda Greenpiece quilt and decided that I wanted needed to make one.
So I signed up for a BOM program through Gathering Fabric, a local quilt shop. While most shops are doing wool applique (as in the original Moda quilt), this particular shop decided to treat the applique blocks as optional, and is not including fabric for it (though the background fabric is included). But it is providing the patterns and the embroidery files, leaving the choice up to each individual... wool applique, traditional applique, embroidery, or blank. The best part about this is that the price of the BOM reflects that. I also really like having choices. Since I know almost nothing about wool, I've decided to go the traditional needleturn applique route for mine.
A few weeks ago, I picked up my first set of pieced blocks, and also purchased some fat quarters for the applique blocks.
The fat quarters are all from Andover's Itsy Bits III line. The shop has a completed sample using these fabrics and it is really cute, so I thought I'd give them a try.
I haven't managed to complete any applique yet, but I do have my first pieced blocks complete.
I'm really happy with how they turned out. The instructions for the first block included a really spiffy, new-to-me method for completing flying geese. No triangles and no waste! It is pretty snazzy. (Patti R. Anderson has a basic tutorial that shows how it works.)
I really want to try and stay kind of on top of this project, so I'm hoping to get going on the first applique blocks here soon (especially since I'll be picking up the next set of blocks later this week!).
Thursday, November 12, 2009
Guild night
Last Thursday evening was the November meeting of my quilt guild. I thought I'd show you the block I made for this month's block lotto:
The fabric we were given was the purple/gold batik and the theme for the month was stars. I found this block on the McCall's Quilting site. They have a ton of free block instructions offered there. This one is called, "54-40 or Fight." Curious, I actually looked up the phrase and learned that the block name comes from a slogan popularized during a boundary dispute between the United States and the British Empire over control of the Oregon territory, located west of the Continental Divide, north of the 42nd parallel north, and south of the parallel 54°40' north. The Wikipedia article, "Oregon boundary dispute," suggests that the block was originated by women of the time who used quilts to express political views.
History is so fascinating!
Anyway, I didn't win any blocks this time, but it was fun seeing all of the different blocks people created.
Tuesday, November 10, 2009
Nursing cover
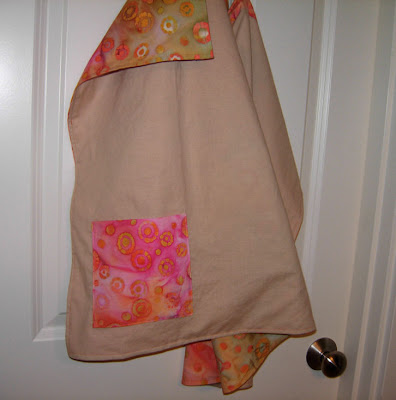
Back when I was breastfeeding the Boy, I learned about the Hooter Hider. It's a blanket-type thing that one can hang around one's neck for privacy while nursing. I thought it was the niftiest thing ever, particularly since I was very nervous and self-conscious while nursing in public. In fact, I generally didn't go out at all because I didn't want to be nursing in a public situation. When I saw the nursing cover-up, I thought to myself-- "I can make that!" And so I did. It wasn't a perfect design, but it really helped make me feel more comfortable about nursing.
After seeing the price tag of a Hooter Hider, a friend recently asked me if I could make a nursing cover for her. So I took my old design and refined it and came up with a new, and definitely improved, version.
My friend chose the fabrics. Isn't the batik pretty?
It is fully lined, and has a pocket on the inside (handy for a little wipe-up rag, or maybe a binkie).
She was thrilled with the finished product and excited to start using it (and she didn't waste any time... baby was being fed within five minutes of receipt!).
I'm really happy with how it came out too. So much so, that I definitely plan to make another one for me. Baby #2 is on its way!!!! I'm currently 16 weeks along, and everything is looking healthy and good. And hopefully, we'll be greeting a new baby sometime near the end of April.
Monday, November 9, 2009
Quilt retreat!
This last weekend, Evelyn and I (along with 60 other ladies) spent three days at the Falls Creek Conference Center for a quilt retreat hosted by Karen Snyder.
It was awesome!!! So awesome that I failed to take any time out to take pictures. But, I can tell you that the retreat center was beautiful (albeit a little stormy), the food was plentiful (and tasty), the ladies were all welcoming and friendly and fabulous, and having nearly 3 days to just sit and sew was amazing.
Evelyn finally reminded me that pictures were pretty nice for blogs, and helped me take a couple at the very end so that I can at least show you what I managed to accomplish.
I spent the majority of my time (all but about 3 hours!) working on my version of the "Prairie Pinwheels" quilt (from McCall's Quilting, August 2008). I managed to complete 33 blocks, which means I now have all of the 48 blocks required to make the quilt. Woo hoo! Evelyn took this picture of me standing in front my blocks. The design wall wasn't big enough to hang all of them, so there are also few sitting in the chair nearby. I hadn't planned on working on this quilt the entire time, but I just found myself wanting to get the blocks DONE. So I kept going until they were all completed. Hopefully, I'll be able to start putting them together soon.
Needing a little break from the pinwheel blocks, I took a time-out to participate in a retreat project that Karen put together. She requested that we each bring two half-yard pieces of ugly fabric. She took them all and then randomly drew names. We each received a bag pattern and got to go up and choose two pieces from the pile that we could use to make our "ugly bags".
This is my completed bag. It took me just a little more than an hour to put together, and was a nice respite from the grind of pinwheels. And the bag isn't bad at all!
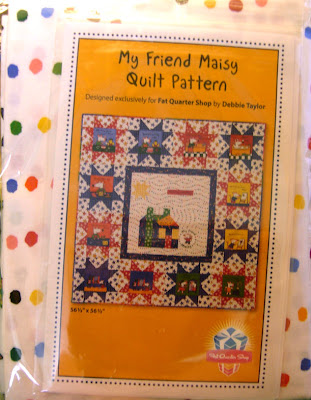
More pinwheels followed. Finally, on Sunday morning, the last pinwheels was complete. With only a couple of hours left before we planned to head home, I decided to get a start on the "My Friend Maisy" quilt.
It was a huge joy to be working on these after spending the entire weekend on pinwheel blocks. And they were so quick in comparison! This is going to be a very happy quilt.
On the way home from retreat, we made a stop at Sisters Fabric Shop in Chehalis. They had a lot of fabric packed into that little store! It was actually a little overwhelming. But, I managed to come away with a little something:
The brown is going to be for binding Felix's quilt (assuming I ever get it started!), the peachy floral is for my last Autumn House block (so I can make it match its mis-cut opposite block), and the green is for my Jane quilt (because I just couldn't resist!).
I also wanted to show you this:
The day before I left for the retreat, I took a little time and made a portable ironing station for myself, a la the fabulous twiddletails. I bought a TV tray at Target for about $9 and transformed it following Anina's instructions. It was a super-quick project (less than an hour!), and I was wildly grateful that I had it at retreat. I was able to just stay at my spot and do all the pressing I needed right there. I cannot even contemplate how much time it saved me to not have to get up and go to an ironing station every time I needed to press. And I think it will be just as helpful at home.
My first-ever retreat was amazing fun! Though I wasn't as productive as I had hoped (those pinwheels took a lot longer than I had hoped!), I feel like I really got a lot done. I got to hang out with my friend and meet some amazing ladies. I got to sew. And I can't wait until I can do it all again!
Friday, November 6, 2009
Frenetic packing
Tomorrow, Evelyn and I head out for our three day quilt retreat! Woo hoo! I've spent the last couple days frantically trying to put together everything I need/want to take with me. Making lists, checking things off, stacking stuff in a corner... and finally (I think!), all is ready to pack in the car tomorrow morning.
Here are the projects I've decided to bring along:
- Prairie Pinwheels-- What was to be a Christmas gift last year is coming out from the closet in hopes of becoming a gift this year. We'll see how it goes.
- Felix's Baby Quilt-- I can't believe he's already 6 weeks old! I gotta get this baby quilt going!
- Parallel Paths-- this is a Project Linus quilt that I've had cut for a couple of months, but haven't started.
- Jane Stickle Quilt-- I'm bringing along a bag of blocks. Who knows? Maybe some of them will have some sashing by the end of the weekend.
- Maisy Quilt-- I have yet to make a quilt for my son. (I know... bad, mama, bad!!!) He loves Maisy the Mouse. When I saw that Andover Fabrics had a new collection featuring Maisy, and that the Fat Quarter Shop actually had a kit featuring all of the fabrics, it just seemed like fate and I immediately ordered one. Tonight I cut it all out and I hope to get the top put together this weekend. This one is my priority project, I think.
Tuesday, November 3, 2009
Jane Stickle Quilt: D-12
Block number/name: D-12 “Crossed Swords”
Date completed: November 1, 2009
Number of pieces: 19
Notes on block: For some reason, I really thought this block would be more difficult than it was. (Hmm...I'm starting to feel like I say that a lot!) But it went together very easily (appliquéing the corners instead of setting them in probably helped too). I worked on this block while watching the Will Ferrell movie, Land of the Lost. It was fun, in a very silly, campy kind of way. But I’m glad I had this block to work on while watching it.
Monday, November 2, 2009
Jane Stickle Quilt: E-11
Block number/name: E-11 “Wagon Wheel”
Date completed: October 30, 2009
Number of pieces: 3
Notes on block: This was a fun block to do. I completed it using reverse appliqué throughout and finished it more quickly than I expected. It has such a neat look to it.
Next weekend I'm attending my first-ever quilt retreat! I’m wondering if I should bring along some handwork in addition to all of my machine projects. I mean, there could come a point where I need a machine break, right? If so, it would be a great opportunity to start piecing some of my blocks together.
Sunday, November 1, 2009
My Frog Prince
Halloween was a lot of fun this year!
The costume turned out really well. The pattern is Simplicity 3594, view B. I used flannel (nice and toasty warm) for the body, hat, and feet. The hat was lined with Kona cotton. The collar and crown were from a lamé-weight embroidered star fabric. The eyes were made from fleece.
My first instinct was to make a size 4, so of course I made a size 3 for the body (because I just didn't trust my first instinct). It ended up being a little tight, but it worked. I actually also shortened the leg length by about 1.5" (because I've had to do that in the past with patterns for him), but that ended up being unnecessary.
Unfortunately, the Boy was not so into the hat. In the brief moments that it was on his head, he would be in the process of attempting to take it off (as in the picture above). My theory as to why? Because the hat is the part I spent the most time making. LOL! The hat pattern came in sizes S, M, and L. I made a large and added a little width as I cut out the pattern (maybe about .5" or so). Though it fit his head width-wise, it ended up way too small length-wise. So I had to adjust for that (you can read about that mini-saga here). In the end, it fit him pretty well.
Frog feet were also part of the pattern and I made those too. However, the Boy hated those even more than the hat. They stayed on his feet for a grand total of about 20 seconds. I don't even have any pictures of him wearing them. But, here they are. Cute!
The Boy is beginning to understand the concepts of "candy" and "trick or treat" and knocking on doors. We were pretty low-key and just trick-or-treated in our little neighborhood. At the start, he used one finger to tap on the door. By the end, he was making a fist and actually knocking. But his favorite part of the adventure was taking candy and putting it in his bucket. Actually, I don't think he was nearly as excited about the candy as he was just for the process of putting it in his bucket.
And, just to make sure that everyone knew what the Boy was (since he didn't have a frog head), Papa went ahead and wore the hat. Yay, Papa!!!
Subscribe to:
Posts (Atom)