Saturday, November 29, 2008

Thankful

Happy Thanksgiving to you! I know I'm a little late, but it's been pretty hectic around here.

We had a fabulous and wonderful Thanksgiving holiday at our house. There were 9 of us this year, which worked out really nicely because we could all fit at the same table. My parents, my brother, and some friends joined us. There was much food. The menu included:

Deep fried turkey
Mashed potatoes
Giblet gravy
Traditional bread stuffing
Smoky bacon and biscuit dressing
Honey roasted root vegetables
Green bean casserole
Baked cranberries with rum
Buttermilk biscuits
Deviled eggs
Bourbon pecan tart
Pumpkin pie
Lemon shortbread
Homemade whipped cream

Mmmm.... it seemed like the favorite this year was the bacon and biscuit stuffing. Truly decadent. I wish I had some pictures to share, but I was kind of distracted what with all the cooking and feasting.

There is so much to be thankful for this year. I try to count my blessings every day, but it really is just extra special to have a day to really focus on all of the wonderful things in my life. Between that, and the fun feasting that always is a part of the day in my family, Thanksgiving is definitely my favorite holiday.

And I'm also very thankful for my friend, E, who brought a super special gift:

super nifty basket
With tasty treats!
super tasty treats inside the basket
How cool is it to have crafty friends??? The basket is just perfect.

Wednesday, November 26, 2008

So simple, yet...

LG's block exchange block
This block exchange block really should have taken 10 minutes. I mean, not only was all the fabric provided, but it was already cut into strips. The only problem: the strips I happened to pick up weren't quite the 3" width they were supposed to be. They were actually 2 7/8". I figured it wasn't a big deal, I'd account for it as I sewed my seams. The problem: I didn't do that. And then my block was more than 3/4" too small. Gah! And many stitches were unsewn. Ugh. But then the second time around, I carefully measured each strip before and after it was sewn. And after an hour and a half, I ended up with the correctly sized 13" block.

I should have taken a nap today.

Tuesday, November 25, 2008

Dear Baby Jane: L-4

Dear Jane block L-4Block number/name: L-4 “St. George’s Cross”

Date completed: November 24, 2008

Number of pieces: 21

Notes on block: I’ve been waiting for a block to use this pretty fabric in (from the “Posh” collection by Chez Moi for Moda). I just love it! I’m also very happy with how the block came together… my ¼” bars are actually ¼” inch wide. I’m feeling pretty proud at the moment. I actually started this block last night, but was just completely unmotivated and decided to read a book instead. I ended up doing the bulk of the work this evening while watching television with Keith. With frozen hands. Our house is so cold! No amount of snuggling under a blanket (which, while stitching, is kind of challenging) seems to help my chilled appendages.

Tuesday, November 18, 2008

Dear Baby Jane: D-7

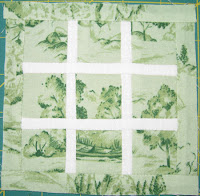
Dear Jane block D-7Block number/name: D-7 “Meeting Place”

Date completed: November 17, 2008

Number of pieces: 13

Notes on block: Inspired by Anina’s version of this block with its yellow scrolls, I decided to use this scrolly holly print. And it’s festive and happy too! This block is pretty simple, but it was a challenge for me. Just as I was about to sew the last sections together, I realized I had pieced one of my white fabrics wrong-side out. Doh! So I had to tear out that piece and restitch. I didn’t really want to take everything apart to do it though, so I ended up having to do an inset seam. At least I had my prior stitching lines to guide me. And then I cut one of the outer white bars 1/8” too narrow. Oops. You can see that the top bar in the picture is not as wide as it should be. And, of course, I realized it after everything was sewn together. I’ve decided that it should be fine. I mean, there’s still a good 1/8” seam allowance left. :)

Monday, November 17, 2008

Glad Tidings

Glad Tidings book coverA few years ago (2004 maybe?), while on the Bluebonnet Patchwork Trail Shop Hop in Central Texas, I saw a sample. It was on display at a wonderful San Antonio quilt shop called Las Colchas. It was an Advent quilt from the Nancy Halvorsen book Glad Tidings Advent. I instantly fell in love with the quilt. I have no idea why. I’m not particularly religious. I’ve never been into the primitive/folksy look. But there was something about the design that just sang to me. I actually waited a little while before buying the book, just in case it was a momentary thing. But I couldn’t get that quilt out of my mind. So I did buy the book, as well as a special button set.

As I was straightening up my quilty room in September, I found the book and decided that this year would be the year. I worked on it for a bit, took a break, worked a little more, another break, and finally completed it this last week.

Glad Tidings quilt front
I love it.
I pretty much followed the given instructions. My only big regret is that I went ahead and did the suggested “Quick Quilting” finish of placing the top and back right sides together, sewing around, turning, and stitching closed, and then quilting. As a result, I’ve got some rippling going on. I think I would have been better off to do a traditional finish, quilting first and then doing a binding. Other than that, I think it came together pretty well.

Glad Tidings quilt back
Another change I made was in the hanging tabs. Instead of sewing both ends in, I only attached one and then finished the other. I then went and made buttonholes on the finished ends so that they can button around onto the back of the quilt. The hanger I wanted to display it on is closed—so there is no way to slide hanging loops or a sleeve onto it. Now I can button around the hanging bar. The hanger was a Christmas gift from our friends Ruth and Patrick. How perfect is it with this quilt? Thanks again, Ruth and Patrick!

Glad Tidings cow ornament front
The little ornaments were very simple to make. Just fabric fused onto wool felt with some embroidered and button embellishments. I used perle cotton for the hanging loops (I couldn’t find any black crochet thread, as was suggested in the book). The book instructs you to hot glue the hanging loops to the ornament. I did this, but am not thrilled with the result. It’s a little messy looking. It’s on the back so it’s not like anyone is going to see it. But if I were to do it again, I think I would maybe cut the felt a little differently, leaving enough room for an eyelet at the top to thread the loop through.

Glad Tidings cow ornament back
The book has some other cute projects using the same elements that appear in the Advent quilt, including some mini quilts and a little pillow. But really, I kind of see it as a one-trick-pony kind of project book. It is also focused on speed with regards to the techniques—the fastest ways to get to a completed project. It’s definitely not about best practices. I think the end products evidence this. But with some creativity and forethought as supplements, this is a fun little book with very cute patterns.

Glad Tidings label
Despite its faults, I love this quilt. I look forward to making it a part of our family holiday traditions, and using it to help us better experience the spirit of the season and remember the story of Christmas.

Glad Tidings angel detail

Saturday, November 15, 2008

Dear Baby Jane: BR-8

Dear Jane block BR-8Block number/name: BR-8 “Thunderhead”

Date completed: November 14, 2008

Number of pieces: 30

Notes on block: It was very surprising to me that this triangle turned out as well as it did! Everything went together pretty smoothly—even the funky inset seams on those inner V-shapes. It’s another one of those weird renderings. The original block has a square-in-a-square going on in the center, thus avoiding any inset seams, but then Brenda Papadakis’s version does not. But I went with it anyway, I think in part because it has fewer seams this way. And I’m felling lazy.

Friday, November 14, 2008

Dear Baby Jane: I-3

Dear Jane block I-3Block number/name: I-3 “Family Album”

Date completed: November 14, 2008

Number of pieces: 21

Notes on block: I picked up this fabric a couple of years ago for use in a baby quilt with a vegetable garden theme. When I initially saw it, my impression was of cabbages. I knew it wasn’t a cabbage print, but I figured cut up into little pieces, the effect would be there. It wasn’t until I got home and opened the fabric up that I saw that “Yellowstone” appeared throughout the design. So, this one didn’t get used in the veggie quilt. But it seemed just right for a happy lakeside window view.

This block was a little intimidating because of the 1/4” bars throughout. I worked really carefully to keep my seams straight and to size. I suppose it would make my life a little easier to mark all my seam lines on long narrow pieces like this. But it just feels like cheating somehow (I don’t know how I get these ideas into my head… probably the same way that I decided I needed to be handpiecing all of these blocks). So I use my eyes and check every so often with the ruler.

Wednesday, November 12, 2008

Dear Baby Jane: C-4... again

Dear Jane block C-4 version 2.0Block number/name: C-4 “Tic Tac Toe” (version 2.0)

Date completed: November 11, 2008

Number of pieces: 37

Notes on block: So. I've completed a do-over. And you know what? I like the first version better. Sure, the seams are straighter and more consistent on this one. And this one is actually 5” square. And it uses just 2 colors, as in the original quilt. But I really love the effect of the 3 colors in my previous version. And I kind of like that it is all catawampus. I also “previewed” each of the blocks in the quilt, and I rather prefer the look of the first one.

So there you have it. Only my second do-over in the quilt so far, and I’m not even going to use it. Of course, I can still change my mind…

Saturday, November 8, 2008

Dear Baby Jane: C-4

Dear Jane block C-4Block number/name: C-4 “Tic Tac Toe”

Date completed: November 8, 2008

Number of pieces: 37

Notes on block: I think I need to rename this one, “Tic Tac Toe... Doh!” That’s what I get for not paying attention. All I could focus on were the colors I chose (I thought this one might look pretty nifty with 3 colors). By the time I got to the outer white pieces, I wasn’t even paying attention. I guess I figured that they wouldn’t fit if they were wrong. Little did I realize that all those outer angles were equal. As a result, my center is 90° off-kilter.

On the one hand, this block took a long time to put together and it does look kind of cool. On the other hand, it is very different from the original and it’s a smidgen small. This might require a do-over. This is kind of funny to me, because the only other block I’ve done a do-over for thus far is its neighbor, C-3. But I think I'll wait and see how I feel about it in a couple of days.

Friday, November 7, 2008

Quilt Festival: Shopping

It would be very difficult to come out of the International Quilt Festival without buying at least something. For me, I don't think it is even in the realm of possibility. The shopping options are just beyond belief... hundreds of different booths offer everything a quilter could desire. Check out Anina's photos... they'll kind of give you an idea of the scale involved.

In any case, of course I came back with some quilty booty:

Quilt Fest booty
The photo may not show it, but I exercised a lot of self restraint. Really!

I bought many patterns, mostly for baby/child quilts. They were way too cute to pass up and all were from designers/companies that were new to me. From Lee Brown I bought the cute applique kitty pattern (no Web site, but they're a British pattern company that offers many amazing and wonderful designs). Mary's Patterns had a very cute dinosaur quilt pattern I just had to have. Thimble Art offers really nifty dimensional quilt patterns that you really need to see in person to appreciate (I bought their dinosaur and jungle animal patterns). From Little Country Quilts I picked up a baby bib pattern with lots of cute applique options as well as a book, Quilts, Bibs, Blankies...Oh My!) with lots of wonderful nursery projects.

Really, only a little bit of fabric made it into the mix... unless you count my BIG splurge: a kit for the Playtime Quilt from American Jane Patterns. I saw this quilt online a few months ago, and have been pining for it ever since. When I saw it all packaged up and good to go in a spiffy kit, there was no hesitation: I immediately whipped out the charge card. My plan is to work on it over the course of a year like a block-of-the-month. I'm going to start in January (assuming I can wait that long!). And then there is the other kit I bought. But we won't talk about that one, because it is a secret surprise for someone special (shhhh!).

Also in the mix is a set of Micron Pigma Pens (which I have not been able to find anywhere locally) and a little fabric kit to make a Cynthia England pattern that I bought a few years ago (I am hoping the fabric kit will help motivate me to actually make it). Not pictured are the two thimbles and the wool batting I purchased. There you have it. Full disclosure!

Thursday, November 6, 2008

Guild night!

A new month, another guild meeting! Tonight I'll be bringing along my latest block exchange contribution, a couple of blocks to enter into this month's block lotto, and a quilt for show and tell.

For this month's block lotto, we were given an 8"x10" piece of a cute snowman print flannel. I don't feel like I was especially creative this time around, but I think my blocks are pretty:

Snowman block 1
I made the one above using amandajean's instructions from Week 5 of her Star Quilt Along.

Snowman block 2
This block is a traditional one called "Corn & Beans." I found it in the book Quilts from The Quiltmaker's Gift by Joanne Larsen Line and Nancy Loving Tubesing. What I love about the book is that it takes traditional blocks and puts them together with very modern aesthetic—bright colors, exciting prints, batiks, and more. For every quilt in the book, multiple size options are offered, along with detailed, illustrated instructions (including suggested backing layouts—very handy). The more I look at this book, the more I want to make every quilt in it! And, if you haven't seen the picture book, The Quiltmaker's Gift, you should check it out too. The illustrations are just gorgeous.

I think I must somehow have some good quilting karma built up, because after winning in June's block lotto, I won again in September:

September block lotto win
How lovely are these? Mmmm... they all just scream out "Fall!" to me. I'm thinking that I might make them into placemats and/or a tablerunner. I think they would be just perfect for Thanksgiving dinner. I love how even though they are all different, they have the unifying theme that really ties them together.

Last, but not least, here is the latest block for the block exchange:

Block exchange SY's block
This month I got to pick my own fabrics to use. The only only request was that we choose muted colors. I gave myself fits with the house fabric I chose... I just felt this need to make sure all the stripes matched. I'm a glutton for punishment sometimes. Also, as it was suggested that we could do some embellishment, it seemed only appropriate to decorate the house with a little Halloween spirit. It was October after all. I fussy cut and then appliqued the pumpkins and attempted a little stitchery in the form of the spider. Hopefully she'll like it!

Wednesday, November 5, 2008

Dear Baby Jane: C-5

Dear Jane block C-5Block number/name: C-5 “Eye of the Cyclone”

Date completed: November 4, 2008

Number of pieces: 20

Notes on block: This is a pretty block. I really love the look of the curves, and the name is so very appropriate. It has a lot of movement to it. My rendition turned out pretty well (thanks in large part to Anina’s fabulous instructions), but I wish I had thought ahead and pressed my seams open in the white sections. It would have made reverse appliquéing the white outer pieces much easier. As it is, the points are on the bulky side and not as pretty as they could be. And I reversed the colors on the pinwheel. But I don’t think that matters too much.

Wow! What an election. Though I did have more than my fill of politics over the last couple of months, for the first time ever I was actually excited to vote. Don’t get me wrong, I exercise my right to vote at every opportunity. But generally, I’ve always felt that in presidential races, my vote didn’t count (what with the electoral college actually making the “real” votes). But this year, I watched debates, listened to speeches, and really took some time to learn more about the candidates, the issues, and the election process. As a result, I felt like a more informed voter, and I really felt like my vote counted. I just think that’s pretty cool. And it’s even more awesome to see other Americans feeling the same way. Go, go democracy!

Monday, November 3, 2008

Dragon Boy and other things

Wow! Quilt Festival was amazing! This was not my first time, but every time I go it is inspiring and wonderful. It was made extra special this year because I got to visit with my friend Mikki and make some new friends. As always, the judged show offered tons of inspiration and incredible eye candy. I also enjoyed some of the special exhibits, particularly the Daughters of the American Revolution quilts (some dated back to the 18th century!). And, of course, the shopping was spectacular and I spent way more than I should have.

Unfortunately, I don't have any pictures to share from Festival because I left my camera at home. Since I was missing Halloween at home, I felt like I'd much rather have pictures of the Boy than a bunch of quilts.

Speaking of the Boy, here he is in his dragon costume:

dragonboy
I made it using Kwik Sew pattern 3099. The pattern includes a dinosaur, a bear, a bunny, and a lion (all of which are very cute). I used the dragon view and combined it with the belly from the other views. The black is just polar fleece and the lavender parts are made from crushed panne velvet. Because I decided to use the panne for the belly and scales (instead of the fleece the pattern suggested), I gave it some stability and stiffness with fusible fleece. I also added seam allowances around all of the scales, cut two of everything, and then sewed right sides together and turned so that all of the edges would be finished. Ridges were quilted onto the belly to make it look more dragon-belly-like. The tail was partially stuffed with poly-fil to give it a little body. The only other modification I made was to shorten the arms about an inch or so.

dragonboy profile

I was feeling all proud because I finished it two weeks early (so very unlike me!). But I couldn't figure out why it was still looking so dinosaur-like. I woke up one morning with an epiphany. What is the difference between a dinosaur and a dragon? Wings!

dragon wings
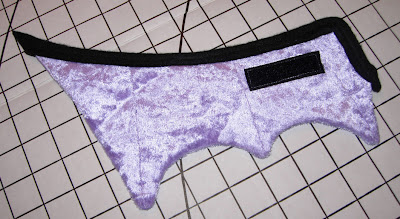
I drew a shape, traced it onto tissue paper and used it as the pattern. Again, I used fusible fleece on one side, but on the other I used super-stiff fusible Peltex. I sewed right sides together on three sides and turned it right side out. Then I used strips of the black fleece and sewed it on like a binding to cover the raw edges. Then I sewed velcro strips onto the costume and the wings so that they would be removable (as I didn't think they'd work so hot in the car seat).

dragon wing back side
If I had it to do over, the only thing I'd change would be to sew the velcro on before I sewed the front and back of the wings together. That way there wouldn't be stitching showing on the outside of the wing. Other than that, I'm really happy with how the costume came together. I think he's the cutest dragon-boy ever!