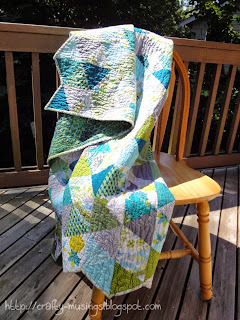
Thanks to motivation from The Sassy Quilter's Triangle Quilt Along, I have managed to finish my triangle top just in time to enter into her last-chance link-up! Woo!
The design is simple enough-- lots and lots of 4.5" equilateral triangles. They were super-easy to cut out using my Hex N More ruler. A bit of starch before cutting and careful handling made them pretty easy to work with as well. The print fabrics are all from Patty Young's Sanctuary collection from Michael Miller Fabrics that came out a few years ago. The solids are Kona cottons in Glacier, Medium Gray, Spring Green, and Bahama Blue.
For this one, I went wavy lines all over. I knew I wanted something with some curve to it, and that would give it some texture. I looked about for inspiration and found a couple of triangle quilts (here and here) quilted with wavy lines and really liked the effect, so I went for it. Aurifil Mako 50/2 in Light Juniper (2845), a pretty sea green-colored thread, was used for all of the quilting.
Continuing on my perpetual quest to use my stash, I pieced together the back with fabrics I had on hand. I can't even remember how long ago I bought that pretty blue/green print...
The quilting really shines on the solid sections of the back.
I decided to leave the jagged triangle edges along the sides mostly to have the experience of binding them. I used a a couple of tutorials from Jaybird Quilts to guide me through the binding process: "Quilt Binding Basics, Part 2" for cutting the bias binding; then "How to Bind 120° Angles Tutorial" as a guide for dealing with the funky edges.
As I didn't have quite enough striped fabric to get around the whole quilt, I used a bit of Kona Green Tea to supplement. I wasn't sure about the stripes at first, but I loved how well the colors went with the fabrics in the top so used it anyway. It actually doesn't look too bad!
My mother-in-law's favorite colors are teal and turquoise, so I've decided that this quilt will be for her. She is a tea drinker and I found a beautiful tea cup on Etsy that matches the quilt beautifully that I will give to her at the same time. The cup is what inspired me to name this one the "Serenitea Quilt."
I think this will make a happy Christmas gift-- now the trick is managing to wait until then to give it to her!
Wednesday, July 30, 2014
Wednesday, July 23, 2014
Finally!!!
A quilt for Little Bear!!!
The design is from Abbey Lane Quilts and is called "Meter Maid." The pattern was straightforward and easy to follow. I also appreciated that it accounts for directional prints in the cutting directions (a big plus since I was using some directional prints!).
The bulk of the fabric was from a fat quarter set I purchased at Quilt Festival last fall from Hearts to Holly Quilt Shop. I added a couple more from my stash, and chose Kona cream for the solid frames.
Since the frames were solid, I really wanted to do something interesting quilting-wise as I knew it would show up really well. I decided to do circles (traced from a spool of thread) in the narrow parts of the frame and outside border, and the fun loopy design in the wider frame parts and border. I used Aurifil Mako 50/2 in Pale Flesh (2315) for all of that. Then I quilted the prints with a simple meander using Aurifil Make 50/2 in Dove (2600).
I love that the quilting is so visible on the back!
I also love that I was able to use up the last bits of fabric from the front in the back. They add some nice color, too.
And the label... I decided to name this one, "Vehicles Vroom!!!"
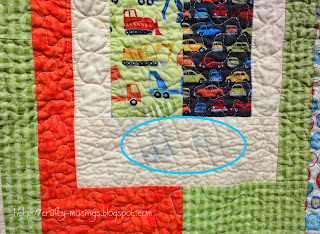
As I was taking pictures, I noticed this:
Doh! I think that happened in the wash. I prewashed all of my fabrics, so didn't think to put a color catcher in with it when I gave it a wash after completion. At first I thought it might be the wash-out blue marker I used-- except that I didn't mark that part at all (I only marked the circles), and that is the only spot in the quilt where the stain appears. I'll definitely be more careful in the future and use a color catcher. Fortunately, Little Bear doesn't care about the stain. :)
It only took four years. Ha! But, he finally has his own quilt made especially for him. Yay!!!
Sunday, July 20, 2014
Fancy tote bag
A friend of ours recently turned four-- the perfect excuse for me to make something fun and frilly!
She had recently seen a tote bag at a local farmer's market and fallen in love with it. Her mama was not in love with the price and so they did not pick it up that day. I said, "Hey! I can make something like that!"
Using purple fabrics from my stash (because that is her favorite color), and a couple yards of purchased trim, I designed and put this together. It is very similar to a bag I made for myself a few years ago-- just a wee bit smaller (and much fancier looking!).
This girl is all about the bling, so I found some super-sparkly pink trim that I layered atop some ribbon for the mid-section of the bag. Then I used one of my machine's fancy stitches to attach the beaded trim along the top.
Even the lining is purple. And, of course, I had to put a little pocket in there.
Best of all-- our friend LOVED it! Yay!!!
Tuesday, July 8, 2014
Digging out the next UFO
I finished up the top and backing for my triangle quilt and it is ready for basting. I've also got a plan for quilting it up. So I'm feeling ready to tackle something "new."
A few(!) years ago, I joined an online 9-patch swap. As a result, I have this pile of 60 9-patches. I've been thinking about how to go about using them for awhile now and have narrowed it down to two options.
Option 1:
My first thought was to do something pretty straightforward and simple. Classic! I'm definitely thinking navy/dark blue sashing and borders. It would be about 60" square. I might even have enough in my stash to make this one happen.
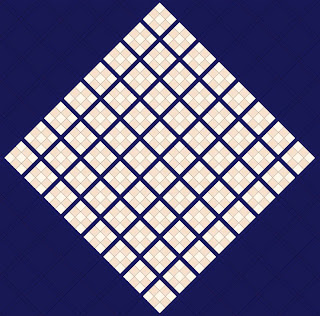
Option 2:
This, however, is the option I'm leaning toward: an on-point square of sashed 9-patches with setting triangles. It is more interesting to me visually, and would give me some fun quilting space, and be a little bigger, finishing about 80" square. The downside is that I would definitely have to buy some fabric.
Either way, I need a few more 9-patches to make it work, so I dug through my little 2.5" scrap box.
If nothing else, I think I'll be putting together a few of those this week as I ponder the options.
Monday, July 7, 2014
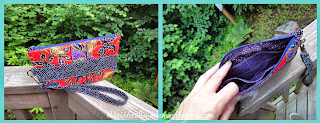
A couple more clutches...
At the beginning of this year, I signed up for one of those "Pay-It-Forward" gigs on Facebook wherein I committed to send out a friendly surprise sometime within the calendar year to peeps who agreed to do the same for others. Two people agreed. As I had so much fun making the Noodlehead Gathered Clutch for my son's teacher, I went ahead and made a couple more for my pay-it-forward friends.
I purchased the swivel clasp hardware from Etsy seller, BeingBags. I gotta say-- the prices are reasonable, the shipping was fast (and free!), and the hardware is solid. I definitely recommend this shop!
Bonus: All the fabrics are from my stash. Yay!
Also, I cannot recommend the Noodlehead Gathered Clutch pattern enough! The clutch is a great design, the instructions are easy to follow, it is quick to put together, and it offers a fun way to use up scraps or small cuts of fabric.
I plan to mail these out this week-- hopefully my friends will enjoy them!
Friday, July 4, 2014
Right now...
There's a number of things I want to blog about, but I am feeling overwhelmed at where to start. Since I have to start somewhere, here is what I've been doing this week:
Here are a few quilts that need binding, including my Raspberry Rabbits BOM, a quilt for Little Bear, and my Framed Coins (which I finished quilting on Sunday, 6/29). Okay. Technically, I've not actually been doing any binding this week, but this pile has been weighing heavily in my mind. I really need to just. do. it.
Anyway, after all of the intense quilting my Framed Coins, I needed something quick and easy-- a palette cleanser:
I threw this together on Monday, from cutting to basting. It is the "Playpen" design from the Me & My Sister Designs book, Crazy for Baby. Now it is ready for quilting.
After getting the baby quilt put together, I was ready to jump into something new:
A triangle quilt! The Sassy Quilter's Triangle Quilt Along caught my attention back in April, but I just wasn't ready to join in at that point. But triangles have remained on my mind, so I've finally started in on one. I used Julie Herman's Hex N More ruler to cut 4.5" equilateral triangles and Electric Quilt to help me figure out how many I needed. The print fabrics are all from Patty Young's Sanctuary collection from Michael Miller Fabrics that came out a few years ago. The solids are Kona cottons in Glacier, Medium Gray, Spring Green, and Bahama Blue. I've pieced all the rows and am now working on joining those rows together.
Now I am off to squeeze some limes. We're making margaritas. Woo! Happy Independence Day!
Subscribe to:
Comments (Atom)


