Having successfully completed a couple of projects recently, and also feeling wildly inspired by the diversity and creativity currently on display in Blogger's Quilt Festival, I'm feeling the itch to start something new. And the itch is strong. So yesterday I spent more than a little time in my crafty den perusing fabrics and patterns.
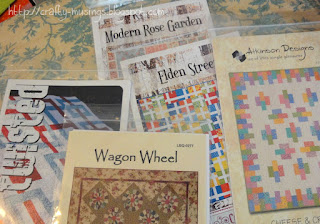
These are the patterns that kind of jumped out at me initially... I guess I'm leaning toward something scrappy and stash-busting? Hmmm...
But then I saw this pattern and thought of all those green fabrics I have from my Jane Stickle quilt. Oh, look... I managed to even put together a nice fabric grouping there too! How cool would this be in greens? You don't need to answer. I KNOW it would be awesome.
But then I remember the projects in process...
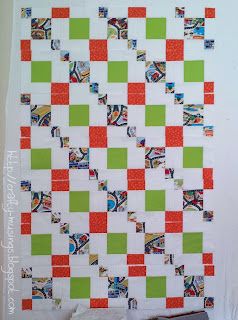
...like the the final clue of the Spring Mystery Quilt (pictured above) that I haven't yet completed; the Fall Mystery Quilt that I've finally got basted that needs to be quilted; the final two Harrington & Hannah blocks I have yet to prep; the Jane Stickle that awaits more hand quilting; the fabric I cut for a new dress; the next baby quilt in the queue to be planned; the boxes of projects; the pile of flimsies... you get the idea.
My husband saw me pulling out fabrics and such last night and asked what I was up to. I told him I was thinking about starting something new. He raised his eyebrows at me and suggested that I might be better off working on one of my existing projects.
UFO guilt. It is strong. It is mighty. It is... practical? reasonable? And I really ought to just finish what I started, right?
Sigh...
So I dream of quilts-to-be. As to what I will decide... we'll see.
Thursday, May 23, 2013
Saturday, May 18, 2013
Blogger's Quilt Festival, Spring 2013: Haiku Quilt
For this edition of the Blogger's Quilt Festival, I am entering my latest finish into the Bed Quilts category:
The quilt is a gift for a recently wed couple, Kevin and Colby. We went to visit them today and were finally able to give them their wedding gift. Yay!
The design is inspired by the quilts in the Judy Sisneros book, 9-Patch Pizzazz. I used her methodology to create my version. The largest blocks are 24" square. The nine-patches are 6" square. The finished quilt is about 96" square.
I had a lot of fun quilting this one too! I quilted it all with my Bernina 440QE. In the center, I imagined a breezy wind blowing and quilted a horizontal wavy design using a creamy variegated Superior Threads King Tut thread, #920, "Sands of Time." For the inner border, I used a dark brown Aurifil Mako 50/2, #1140, and quilted linked chain squares, a design I found in Angela Walters's fabulous book, Free-Moton Quilting. Finally, for the outer border, I stitched Elizabeth Hartman's dogwood quitling pattern in a 2" grid using Aurifil Mako 50/2 #2326, a taupe-y gold color.
I love how all of the various quilting designs work together in this quilt. And I am flippin' proud of the work I've done! My one regret is that I used too much pressure as I marked my gridlines in the outer border (I used a Sewline pencil), and some of the lines remain-- I just could not get them out (scrubbing; fabric eraser; multiple washes). On the bright side, they aren't really visible unless you know to look for them as they kind of blend in with all of the quilting lines. Also, after being washed for the third time, they are finally disappearing. So over time, I think they will all be gone. Eventually.
I went into this quilt not really knowing exactly how much I'd need of each fabric. So I just bought a couple of yards of each. I was able to use all of the leftovers in the back (plus a couple of others).
I've taken to calling this the "Haiku Quilt." I'm not normally very creative when it comes to naming, but in this instance, I felt inspired. I wrote a haiku which serves as the name of the quilt and that is written on the label:
Petals and leaves atremble,
Cranes fly joyously.
And I have to give many thanks to my quilt photo shoot helper:
Every time we walk by that park (which is daily), he asks when can we go and do another quilt picture? Apparently, I need to get quilting!
The stats:
Quilt Measurements: 96" x 96"I hope you are getting the chance to check out lots of other quilts in the Spring 2013 Blogger's Quilt Festival. It never fails to inspire me, and I find myself looking forward to the event each spring and fall when I can gaze at all of the shared happy eye candy and fabulous creativity.
Special Techniques used: none
Quilted by: Robin Zaback (me!)
Thanks so much for stopping by!
Wednesday, May 15, 2013
Tiramisu: A Sweet Success!
One of the best gifts I received this Mother's Day was the gift of time. My husband entertained the boys so I could have some daylight sewing hours (a rare treat!). I used the time to sew up my Cake Patterns Tiramisu dress.
I LOVE this dress. LOVE!!!!
I used a really lovely teal blue Sophia double knit from fabric.com (which is still available! I may need to buy some more colors...).
It is drapey and has a beautiful weight to it, and is very soft. It also seems to have excellent recovery. And it twirls! (Well, as well as it can with me in 5" heels... but you get the idea.)
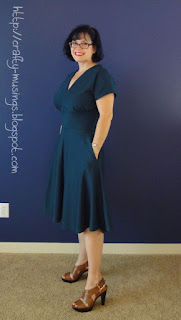
The instructions were straightforward-- clear and concise with some nice illustrations. Even more awesome though was the online support through Cake Patterns' Web site. Stephanie (the designer) hosted a Tiramisu sew-along when the pattern was released and the posts for that were so helpful! It takes you from cutting through construction to finishing with helpful photographs, tips, and videos. I especially appreciated Day 5 and all of the information offered about checking fit. It was a HUGE help and very effective. To wit:
No gaping!!! I had done a 1" FBA following Cake Patterns' instructions. But to get it to fit well, I ended up cutting about 1" from the bottom of the bodice, moving the center notch points out by 1" on either side, and then doing 7/8" side seams through the midriff band. (ETA: I started with the size 35D bodice and a 32.5 skirt.)
In the sew-along, Stephanie suggested that decorative stitching can add a bit of fun to understitching. I gave it a try and love this little detail. Only I know it is there, but it makes me happy.
And check out those pockets! I was afraid the pockets would drag or just make my hips look ginormous. But they are awesome.
I also braved the dreaded coverstitch machine and used it to finish the hem.
I love my Tiramisu. I love how it fits, how it feels, and how I feel in it: fabulous!!!
Friday, May 10, 2013
Feeling dressy...
Last night, I finally took some time to cut out a couple dress patterns I've been wanting to make.
First up is the Cake Patterns Tiramisu knit dress:

I traced this pattern back in February, but needed to step away from it for a bit (my angst at putting together the .pdf pattern was just too great!). I'm using a beautiful teal double knit I purchased from fabric.com last year. I'm excited to finally have it all cut out now and to give it a go!
Also on the docket is Vogue 1224:
For this one, I am using a beautiful border print jersey I purchased from Gorgeous Fabrics last summer (sadly no longer available).
They both seem to be relatively simple designs, so I am hopeful that I'll have a new dress (or two!) soon.
First up is the Cake Patterns Tiramisu knit dress:

I traced this pattern back in February, but needed to step away from it for a bit (my angst at putting together the .pdf pattern was just too great!). I'm using a beautiful teal double knit I purchased from fabric.com last year. I'm excited to finally have it all cut out now and to give it a go!
Also on the docket is Vogue 1224:
For this one, I am using a beautiful border print jersey I purchased from Gorgeous Fabrics last summer (sadly no longer available).
They both seem to be relatively simple designs, so I am hopeful that I'll have a new dress (or two!) soon.
Wednesday, May 8, 2013
The Lilium Laptop Bag
I recently had the opportunity to test a pattern for designer Sara Lawson of Sew Sweetness-- the Lilium Laptop Bag.
For my version, I went with a selection of happy teal-colored fabrics:
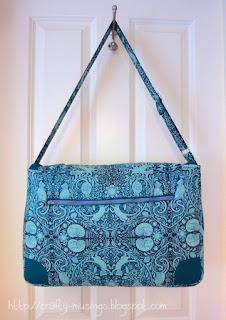
The exterior is a super cute kitty print by Julie Paschkis for In the Beginning Fabrics. The pattern called for a yard of fabric and that is what I had. What I didn't consider though until I started cutting was the scale and directionality of the fabric design. I tried to take advantage of the print as best I could with what I had, but I really could have used another 1/4 yard or so to allow me to do more with the design. The accent fabric is Kona cotton in Glacier.
Gah! I cut off my kitties heads with the back zip pocket! :P
But I'm pretty pleased with how I managed to center the design on the strap:
Also-- best slider strap instructions I've read. So easy!
The bag was not all smooth sailing for me, however. I faced a couple of challenges along the way. One was the interlining I chose to use. Sara suggests a product called Annie's Soft and Stable for her bags. I couldn't find it locally, so, based on a note in the pattern and the recommendation of the very knowledgeable associate I spoke with at Pacific Fabrics, I went with automobile headliner fabric. It is 1/4" foam that has a felt backing on one side. I was unhappy with it for two main reasons:
One other challenge was due completely to my own ineptness:
I somehow completely messed up the cutting of the lining flap. Believe me, it wasn't the instructions or the pattern piece-- those were very clear. But I still somehow managed to just mess it up. I don't even know how I did it. But I didn't have enough fabric to re-cut, so I ended up having to make it work by piecing it together. Doh! But The pattern in the fabric hides the seams pretty well, and it all worked out in the end. Phew!
For the lining, I ended up using three different fabrics as I didn't have quite enough of any one (or two). I love the zipped divider pocket, and Sara's instructions were awesome!
The large bag really is huge. It can easily accommodate our ginormous laptop. And, to give you a sense of the scale, this is me carrying it:
It really is a great design. Sara put a lot of thought into the instructions-- they are very clear and not overly wordy. She also includes lots of pictures to illustrate the steps. Her attention to detail is awesome. Seriously, if you are on the lookout for a good laptop bag-- this is a winner!
The Lilium Laptop Bag pattern is available now through the Sew Sweetness Pattern Shop.
For my version, I went with a selection of happy teal-colored fabrics:
The exterior is a super cute kitty print by Julie Paschkis for In the Beginning Fabrics. The pattern called for a yard of fabric and that is what I had. What I didn't consider though until I started cutting was the scale and directionality of the fabric design. I tried to take advantage of the print as best I could with what I had, but I really could have used another 1/4 yard or so to allow me to do more with the design. The accent fabric is Kona cotton in Glacier.
Gah! I cut off my kitties heads with the back zip pocket! :P
But I'm pretty pleased with how I managed to center the design on the strap:
Also-- best slider strap instructions I've read. So easy!
The bag was not all smooth sailing for me, however. I faced a couple of challenges along the way. One was the interlining I chose to use. Sara suggests a product called Annie's Soft and Stable for her bags. I couldn't find it locally, so, based on a note in the pattern and the recommendation of the very knowledgeable associate I spoke with at Pacific Fabrics, I went with automobile headliner fabric. It is 1/4" foam that has a felt backing on one side. I was unhappy with it for two main reasons:
- It was challenging to sew as the foam just did not want to feed through the machine. There was a LOT of friction between the foam and the throat plate, and even using a walking foot I found myself having to pull the pieces through from the back to get it going. It resulted in uneven stitches, frustration, and a sore wrist.
- I'm just not happy with the finished structure of the bag. It just seems a little too floppy for me. I want it to have a little more body. I think the Annie's would have been both easier to work with and would have resulted in a more sturdy-feeling bag.
One other challenge was due completely to my own ineptness:
I somehow completely messed up the cutting of the lining flap. Believe me, it wasn't the instructions or the pattern piece-- those were very clear. But I still somehow managed to just mess it up. I don't even know how I did it. But I didn't have enough fabric to re-cut, so I ended up having to make it work by piecing it together. Doh! But The pattern in the fabric hides the seams pretty well, and it all worked out in the end. Phew!
For the lining, I ended up using three different fabrics as I didn't have quite enough of any one (or two). I love the zipped divider pocket, and Sara's instructions were awesome!
The large bag really is huge. It can easily accommodate our ginormous laptop. And, to give you a sense of the scale, this is me carrying it:
It really is a great design. Sara put a lot of thought into the instructions-- they are very clear and not overly wordy. She also includes lots of pictures to illustrate the steps. Her attention to detail is awesome. Seriously, if you are on the lookout for a good laptop bag-- this is a winner!
The Lilium Laptop Bag pattern is available now through the Sew Sweetness Pattern Shop.
Subscribe to:
Comments (Atom)


