Monday, January 27, 2014

Simplicity 1783 - Part 2

Simplicity 1783, pattern cover

Big Bear's birthday party was Saturday, and it seemed like all of the kids had a really fun time. Woo! I hope to share more on that soon, but I need a bit more time to decompress. In the meantime, let me share part two of Simplicity 1783. In Part 1, I shared View B, the top. This time around I made View D, the skirt.

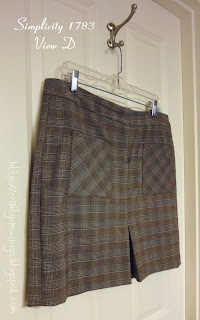
Simplicity 1783, view D, hanging at an angle

What drew me to this one was the front kickpleat and the fact that it called for only 1 yard for fabric. The fabric is a poly-blend plaid I found on clearance at JoAnn's back in 2008 (yay for finding using stash (but it is true that I forgot I had this, it was buried so deep)!).

Simplicity 1783, view D, front view

It turned out really well!

Simplicity 1783, view D, hanging from the front so you can see the pocket wonkiness

Just don't look too closely at the pockets. Ugh. I decided that I wanted to try and add some interest to the pockets by having the plaid on the diagonal. I knew this would mean I'd be working with all bias edges, and if I had followed the instructions in the pattern as written, it would have resulted in all kinds of wonky. So I decided to first underline the pockets with a quilting cotton (highly stable) and then follow the instructions as written. Unfortunately, there was a fair amount of bulk and I had a hard time trying to keep everything pretty and even. What is worse is that the first time I attached them to the skirt, I didn't even line them up-- which, with the plaid, was VERY evident. And then, after attaching them the second time, I realized that they are actually different sizes. Doh! I don't know why it didn't occur to me to actually compare the finished pockets before I attached them to the skirt. Fortunately, I don't feel like it is very noticeable when I'm wearing the skirt. Certainly, not noticeable enough to make me do them a third time.

Simplicity 1783, view D, detail view of front fly

I gotta say too that I am pleased as punch with how the fly turned out. Woo! I've never done a fly in this manner before, and it was definitely more involved than the ones I've done in the past, but I really appreciate the finished look. Very snazzy.

Simplicity 1783, view D, back view

I made a size 16. The only changes were to use 1/2" side seams and to use hem tape at the bottom hem.

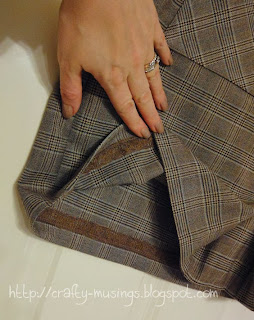
Simplicity 1783, view D, detail view of hem, showing the pretty hem tape

The hem tape allowed me to do a 5/8" hem instead of a 1-1/4" one, resulting in a really nice, wearable length for me. I'm not sure I would have felt as comfortable even 1/2" higher. This is already what I consider very short for me. I am 5'4", so if you are any taller, you may want to add some length.

Simplicity 1783, view D, another front view

While the top in this pattern may not have been my cup of tea, the skirt is definitely a winner!

Friday, January 24, 2014

Party prep time!

My week has been consumed by party prep for Big Bear's birthday party. Tomorrow is the big day. He's turning 7!

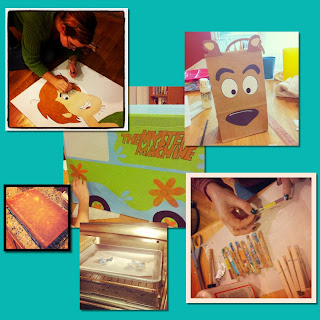
a collage featuring some of the crafty party preparations

I'm definitely getting my craft on with this theme!

Wednesday, January 15, 2014

Simplicity 1783 - Part 1

Simplicity 1783, pattern cover from www.simplicity.com
I've been continuing to follow my garment-sewing mojo and last week I made a couple of pieces from Simplicity 1783. This post will focus on View B-- the short-sleeved top.

S1783 view B, front view on hanger
What drew me to the design were the lines-- the pleats and darts looked lovely in the line drawings and the top seemed to have a nice shape to it.

S1783 view B, back view on hanger
The pattern is designed for a woven fabric and includes a side zipper. But since I decided to use a lovely crepe jersey knit that I had in my stash, I omitted the zipper. Though I'm not sure I would even have needed it in a woven as the top is not really fitted and can easily go over my head with no stretching. I cut out a straight size 16 with no alterations.

S1783 view B, my fabulous first-ever thread loop
I also liked the feminine button-loop closure on the back. And it was a new technique for me-- so that was fun too! I used Vogue Sewing (a wonderful reference book!) to guide me in making the thread loop and it worked like a charm. Yay!

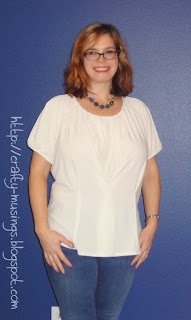
S1783 view B, front view
Unfortunately, what looks good in the line drawings and on the hanger does not necessarily work for every shape. It is just okay for me. It is not horrible or anything, but I think the pleats just don't work quite right with the boobage. I actually ended up tacking down the center pleat at the 'V' as it is pretty open on me and I can just envision stuff dropping right down into the pit. My husband noticed that aspect right away and told me he thought it would work well as a crumb catcher. :P

S1783 view B, back view
As the jersey not opaque, I decided to use French seams. It is very prettily finished on the inside and the seams look very nice from the outside as well. But it made for some obnoxious bulk when I attempted my narrow hem at the bottom not to mention the bulk of the pleats as well. I really wish my hem were smoother and more even.

S1783 view B, front view 2
On the bright side, I tried a couple of new techniques (French seams, thread loop closure) and was really pleased with how well they worked out. So I definitely learned a bit. And the top is wearable (I'm wearing it right now, in fact... we'll see at the end of the day how full my pleat is. Ha!). I just don't love it.

Wednesday, January 8, 2014

Simplicity 5914 - again!

This is actually the fourth time I've made Simplicity 5914, and the second time I've made View A, the long, flared version (I've previously blogged about View B). Clearly, I like this pattern.

For this go 'round, I used a lovely tweed-look RPL from Gorgeous Fabrics (still available here!). It has a wonderfully nubby texture to it, and I think it drapes beautifully in this skirt.

I sewed the size 16, shortened it by 1.5" and used 1/2" side seams and an invisible zipper. I feel like it fits me really well. Yay!

My first completed project of 2014!

Wednesday, January 1, 2014

Looking Forward: 2014

On the one hand, I really enjoy blogging. It is my crafty journal, with pictures, notes, stories... a record of the things I make. It is a wonderful thing to have that and to be able to share it with others.

On the other hand, blogging kind of stresses me out. It takes time. LOTS of time. And some days, the prospect of sitting down to try and accomplish a blog post just seems hard. Last night, as I was laboring over my coat post (which took me a couple of hours to put together), my husband suggested to me that maybe I should make it easier on myself by blogging projects in pieces rather than all at once at the end.

I like the sound of that! I have kind of been doing that some using Instagram-- micro-blogging, quick pics of what I'm working on with a little update. I want to do more of that. I want to do more of that using my actual blog-- smaller posts, vignettes of what I'm doing, small discussions/musings on whatever questions or challenges are developing as I work on something. So that is something I hope to work on for 2014. Smaller, more consistent, posting more regularly. I think it is a good goal.

Speaking of goals. Check out my 2013 completed projects collage:

2013 Crafty Musings collage

Woo! Look at all of that! It is fun putting the collage together. Seeing it all together like that really makes me feel like I've been productive in the last year. Kind of cool! And some of those were big projects, too!

Here were my goals for 2013:
  1. Use more fabric than I buy.-- Check! And an improvement over last year, too:
    Fabric In: 61.600 yards
    Fabric Used: 79.195 yards
  2. Finish at least 2 UFOs.-- I finished a couple of lingering UFOs, and even dug out a couple of languishing projects and made progress. (Many thanks to Carrie P. over at A Passion for Applique for her yearlong "Nothing but UFOs" initiative-- it was inspiring!)

  3. Sew more clothes for me!-- I only made three items for myself, but they were all awesome, and one of them was a coat (which I was shocked to see that I mentioned specifically in my goals last year!).

  4. More handwork.-- Sigh... I guess I can't meet every goal. I am still missing handwork. But I did do some toward the end of the year as I have been working on Wild Olive's Autumn Stitching Club.

  5. Lose that last 15 pounds.-- Almost. And I am okay with that! I managed to stay active and drop 10 pounds this year.

My goals for 2014:
  1. Use more fabric than I buy.-- I intend to keep working on shrinking the stash.

  2. Finish at least 2 UFOs.-- This is the year I am going to finish my Bargello Reflections quilt. For reals. And hopefully some other stuff too.

  3. Finish at least 1 kit quilt-- In the past few years, I've acquired a number of quilt kits. I want to start making those kits become real quilts.

  4. Blog once a week.-- See above. This feels like a reasonable expectation I can set for myself. (Says she who blogged one time last month... ha!)

  5. Lose that last 5 pounds.-- ... or maybe even a little more. I am finding it harder to keep a regular exercise schedule lately. I want to re-focus and really push myself to be intentionally active at least 4 days a week as well as be more whole foods focused (and eat a lot less Doritos).

I'm feeling like 2014 is going to be a fun year!