This year, just after Thanksgiving, I found myself inspired by a few lovely versions of McCall's 6442 that I found on Pattern Review (including this, this, and this). I started out by making a muslin of the bodice.
The muslin helped me to decide on a full bust adjustment of 1" (which included adding a horizontal dart from the side seam), shortening the sleeves by 1-1/2", and going up one size (to an 18). Then I went to cut out my actual fabric. That was a time-consuming process. Because I wanted to be sure it was a warm coat, I decided on adding an underlining of flannel to my wool outer fabric. I did some research and found a Threads article by sewing guru Sandra Betzina, "Understanding Underlining," that offered great guidance on how to go about doing that. Part of the process involved hand basting all of the wool and flannel pieces together. By the time I was done with that, I needed a break and just stepped away from the project (and all other crafty pursuits) for a month.
Last weekend, I finally got to work on the actual putting-together of the coat. Over the course of three days, I finished it. Yay!!! My husband helped me take some pictures today:
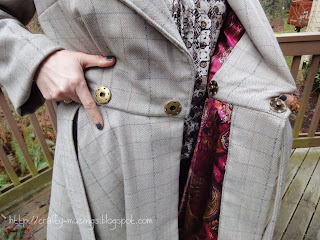
I made view C with the notched collar and then added the belt from view B.
The outer fabric is wool purchased from Hancock Fabrics in 2008. I just used a plain off-white 100% cotton flannel for the underlining. The resulting coat really is nice and cozy!
The pattern does not include belt loops. I really wish I had thought to include some. They would make putting the belt on a bit simpler.
The lining is a poly charmeuse I found at JoAnn's. I wanted something fun and colorful.
I ended up making a few other changes as I went:
- Added topstitching to the collar and the bodice front facing.
- Shortened the sleeves by an additional 2-1/8" from the outer fabric, and 1-5/8" from the lining.
- I didn't like the way the pattern suggested to finish the sleeves, so I finished it the same way as the pattern instructs to do the skirt hem.
- At step 45 in the instructions (wherein you baste the skirt lining to the outer at the top), I trimmed the lining by about 1/2" and then aligned the edges and basted (I didn't want my lining, which is slinkier, to be drooping down below the hemline).
- Added two 30 mm snaps.
- Interfaced and topstitched the belt.
This coat was NOT a fast project. In addition to the work I added for myself with the underlining, there was a lot of hand sewing involved with the lining (the sleeves to the armholes, the bodice to the skirt, the skirt facing to the lining). I know there are ways to do linings that don't involve nearly so much handwork, but I was tired of researching and just wanted to get in there and get this coat made; so I went with what the pattern instructed. The pattern instructions are straightforward and the techniques involved are not difficult, but I still don't know that I would consider the pattern to be "Easy" as advertised on the pattern cover. Overall, this coat is a winner. It was a great learning project and my sewing skills have improved as well. And it feels good to finally have a snazzy, fancy coat to wear when I'm feeling the need to dress up.
Huzzah!!! A new coat!!!
Happy new year!!!


