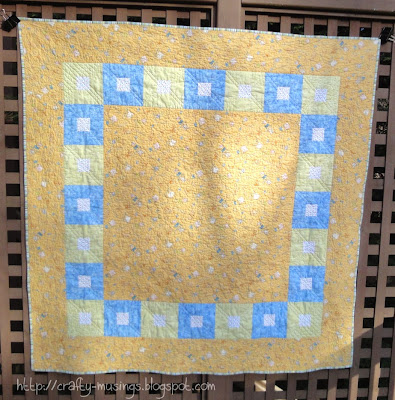
Technically, I made this last year. But I wasn't able to finish it with a label until just this week as I have been waiting for baby to arrive. So I'm counting it as my first quilt finish of the year. Woo!
It is a simple, very cute pattern called "Play Pen" from the book, Crazy for Baby by Me & My Sister Designs.
This is the second quilt I've made from this book, and I should have another to share soon (that baby is due next week!). Having made three projects from it so far, I'm calling this book a winner! Fast, simple projects, great instructions... what's not to love?
I also appreciate that the projects are a bit larger than the typical baby quilt. This one finished at 54" square, a nice size for playing on as well as for bundling-up with and snuggles.
I used Aurifil Mako 50/2 thread for the quilting. The yellow areas are all done with #2130 (Medium Butter) and the rest with #2600 (Dove). Inspiration for the double-loop quilting in the yellow areas came from Natalia Bonner's book, Beginner's Guide to Free-Motion Quilting.
The super cute ducky print has been in my closet for many years (P&B Textiles, c2000). It felt good to finally have a special project for it! All of the rest of the fabrics came from the stash as well, including the happy striped binding and the pieced back.
I had to put a ducky on the label.
Hopefully, baby Graydon will enjoy his new quilt!
Showing posts with label baby. Show all posts
Showing posts with label baby. Show all posts
Friday, January 30, 2015
Tuesday, December 30, 2014
Getting ready for a new year
Yesterday, I started on something new. I am thinking of it as a kick-starting project to lead me into the new year. I've got it all cut and have started sewing up half-square triangles like a madwoman!
Pretty pinks, yellows, and oranges in a Me & My Sister Designs pattern from their book, Crazy for Baby.
It should be a happy little quilt!
Pretty pinks, yellows, and oranges in a Me & My Sister Designs pattern from their book, Crazy for Baby.
It should be a happy little quilt!
Thursday, February 28, 2013
Something small
I'm not sure how I managed to blank on this, but on Saturday morning I awoke realizing that I had a baby shower to go to that afternoon. Fortunately, I had all the supplies I needed and was able to put together a tag blankie in short order.
I didn't have enough of any one color of minkee so it ended up a little scrappy, but I think it works. If nothing else, I don't think baby will mind. :)
The mojo is not exactly back, but pure necessity got me going at the machine. That's something, right?
I didn't have enough of any one color of minkee so it ended up a little scrappy, but I think it works. If nothing else, I don't think baby will mind. :)
The mojo is not exactly back, but pure necessity got me going at the machine. That's something, right?
Friday, June 10, 2011
Baby shower!
Last night I attended a quadruple baby shower for four pregnant mamas in Big Bear's preschool class. Our hostess provided a big basket for each expectant mama and the guests filled them up with gifts. I decided to make little tag blankets for the new babies:

Super quick and easy, and nice little stashbusters.

They gave me a fun excuse to go out and buy lots of ribbons!

Each blanket is about 18" square-- just right for a little hands.
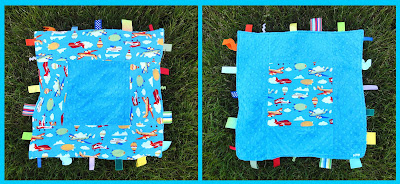
Three of the mamas are expecting boys, and one is a surprise (fun!).

It was a lot of fun getting to watch the mamas unwrap the blankets and see their big smiles. Hopefully, the babies will like their new blankets too!

Super quick and easy, and nice little stashbusters.

They gave me a fun excuse to go out and buy lots of ribbons!

Each blanket is about 18" square-- just right for a little hands.

Three of the mamas are expecting boys, and one is a surprise (fun!).

It was a lot of fun getting to watch the mamas unwrap the blankets and see their big smiles. Hopefully, the babies will like their new blankets too!
Thursday, October 28, 2010
Gnome baby!
Unlike his big brother, Little Bear had no opinion about what he wanted to be for Halloween (he is only 6 months old, after all). So I decided that he would make an excellent little gnome.

I couldn't find a gnome pattern, so I winged it. I started with a pair of overalls made using a pattern in the Kwik Sew book, Sewing for Baby. It's a great book full of baby basics. The pictures are dated, but the patterns are timeless and the directions are easy to use and follow.

I used the overall pattern in size 6-12 months, and shortened them by about 3" (though I probably could have left them a little longer). They were really easy to put together and fit really well. How fun is that plaid corduroy print?
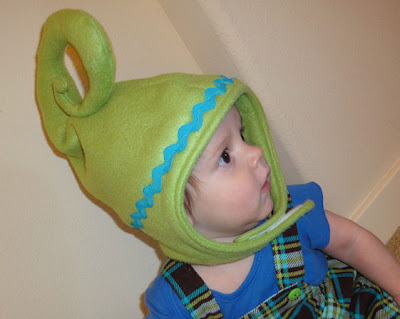
The hat was inspired by some gorgeous hats I saw on Etsy by Swirly Hats. I used McCall's 5253 for the base of the hat, and then drafted my own top. I stuffed the swirl to help it keep its shape. The hat is a little big, but it still looks pretty darn cute.

For the little shoes, I modified the fabulous Cloth Shoe Pattern from Stardust Shoes. It took me a few tries to figure out how to make them work and to get the shape right, but it was worth the trouble. I used a faux suede-backed sherpa for the sole, and a fuzzy fleece for the upper-- so they should also keep his feet nice and warm for trick-or-treating. I'm a little in love with the gnome shoes.
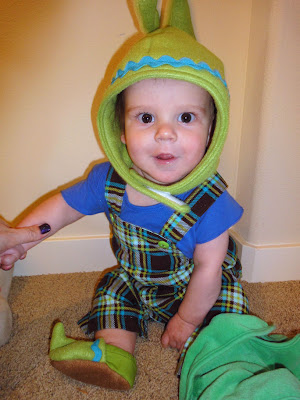
Happy gnome baby!

I couldn't find a gnome pattern, so I winged it. I started with a pair of overalls made using a pattern in the Kwik Sew book, Sewing for Baby. It's a great book full of baby basics. The pictures are dated, but the patterns are timeless and the directions are easy to use and follow.

I used the overall pattern in size 6-12 months, and shortened them by about 3" (though I probably could have left them a little longer). They were really easy to put together and fit really well. How fun is that plaid corduroy print?

The hat was inspired by some gorgeous hats I saw on Etsy by Swirly Hats. I used McCall's 5253 for the base of the hat, and then drafted my own top. I stuffed the swirl to help it keep its shape. The hat is a little big, but it still looks pretty darn cute.

For the little shoes, I modified the fabulous Cloth Shoe Pattern from Stardust Shoes. It took me a few tries to figure out how to make them work and to get the shape right, but it was worth the trouble. I used a faux suede-backed sherpa for the sole, and a fuzzy fleece for the upper-- so they should also keep his feet nice and warm for trick-or-treating. I'm a little in love with the gnome shoes.

Happy gnome baby!
Friday, September 24, 2010
Jane Stickle Quilt: BR-7
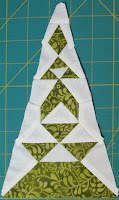 Block number/name: BR-7 “Cheryl’s Clown”
Date completed: September 22, 2010
Number of pieces: 25
Notes on block: It is fall premiere week on television. So last night we sat down and watched some shows, which meant I had to have something to stitch while we watched. This block was kind of a funky one. I pieced all of it but for the top right and left edges of the center triangle—those I appliquéd onto the chevron-shaped green section in the center. Frankly, I’m surprised it actually turned out as well as it did, and nice and flat to boot. I’m thinking more TV means more stitching tonight!
I just realize it has been awhile since I've mentioned my Little Bear. He is doing awesomely well! He's growing like a weed, has started to sleep on a schedule (though he is still waking up more than I'd like at night), and is a super happy little boy. Behold the cuteness:

I can hardly believe that he is nearly 5 months old now. It is going by too fast. Seriously, way too fast.
Labels:
applique,
baby,
family,
Jane Stickle Quilt,
quilting
Thursday, September 16, 2010
Another mini-project
Recently the Sewing Republic site featured a pattern from Juliette Lanvers of Chickpea Sewing Studio for making a diaper clutch. It's essentially a folding changing pad with a pocket to hold wipes/diaper. So handy! And I definitely needed a nice, compact changing pad.

I bought the fabric last month when we went on vacation, and finally got the chance to put it together just the other day (while Big Bear was at preschool and Little Bear took a nap).

Mmmm.... super-soft minkee for the inside!
It went together really quickly and I'm totally thrilled with how it turned out (though maybe I could have been a little more patient as I machine stitched the binding down... it's a little messy-- but it does the job). I also finally used one of my customizable buttons that have been languishing in my stash. Cute! It is not a huge pad (it finished around 10" x 22"), but I think it will work fine on-the-go.

And it fits perfectly inside my diaper bag.
I'm loving these quick projects! They make me feel so accomplished.

I bought the fabric last month when we went on vacation, and finally got the chance to put it together just the other day (while Big Bear was at preschool and Little Bear took a nap).

Mmmm.... super-soft minkee for the inside!
It went together really quickly and I'm totally thrilled with how it turned out (though maybe I could have been a little more patient as I machine stitched the binding down... it's a little messy-- but it does the job). I also finally used one of my customizable buttons that have been languishing in my stash. Cute! It is not a huge pad (it finished around 10" x 22"), but I think it will work fine on-the-go.

And it fits perfectly inside my diaper bag.
I'm loving these quick projects! They make me feel so accomplished.
Wednesday, July 14, 2010
Summer heat and a hat
With all of the hot weather we've been having, not a lot of crafting is going on (as I'm finding it hard to get motivated to stitch while dripping sweat). But along with the sunshine came the need for a hat for LB. So I got to work.
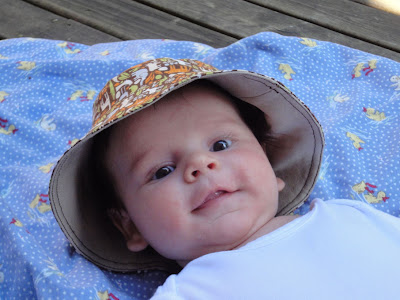
Here he is modeling his new hat. I made it using Betz White's Reversible Bucket Hat pattern which is a simple, fun design that is really quick and easy to put together (just be sure to use lots of pins). I used the Alexander Henry mini zoo print for one side and a solid khaki twill on the reverse. This is an XS and it is still a little large for LB, but I figure he'll grow into it. So far it has been working pretty well as generally when we're outside, he's in the baby carrier (I love my Ergo!), and he's positioned such that the carrier helps keep the hat in place. I may still add some straps to help keep it on his head though (for those windy days).

Here he is again, just because. I call this his Indiana Jones look.
I'm looking forward to making a couple more hats soon, one for BB (which is all cut and ready to sew) and one for me!

Here he is modeling his new hat. I made it using Betz White's Reversible Bucket Hat pattern which is a simple, fun design that is really quick and easy to put together (just be sure to use lots of pins). I used the Alexander Henry mini zoo print for one side and a solid khaki twill on the reverse. This is an XS and it is still a little large for LB, but I figure he'll grow into it. So far it has been working pretty well as generally when we're outside, he's in the baby carrier (I love my Ergo!), and he's positioned such that the carrier helps keep the hat in place. I may still add some straps to help keep it on his head though (for those windy days).

Here he is again, just because. I call this his Indiana Jones look.
I'm looking forward to making a couple more hats soon, one for BB (which is all cut and ready to sew) and one for me!
Friday, June 11, 2010
Jane Stickle Quilt: BR-9
 Block number/name: BR-9 “Sue’s Garden”
Date completed: June 6, 2010
Number of pieces: 18
Notes on block: This block was pretty intimidating, but Anina’s approach worked like a charm. I just extended the tops of all of the “curved” section pieces by 1” to make sure I had enough room to appliqué the arches. And because they were all extended by exactly the same amount, I had no problems with matching while hand stitching the seams.
We seem to be falling into a routine of sorts in the evening lately. About three nights a week, Keith takes charge of the baby, holding him and giving him cuddles so I can stitch (or go to bunko, or quilt guild, or other). Then on the other evenings, I focus on the baby and Keith plays Monster Hunter (his video game of choice lately). Some evenings, we share the baby duties and watch some television together (like Glee!!! I so need to see the season finale again!). It feels like we’re balancing things pretty nicely right now.
Gratuitous picture of my baby boy:

Looking at him just makes me smile. :)
Friday, May 28, 2010
Handmade goodness
My baby boy has been the recipient of some beautiful handmade gifts. They're so lovely and special, I just have to share...
From the talented and generous Carrie P.:

How cute are those??? We aren't quite ready for the bibs yet, but those burp cloths have already seen a lot of action.
From one of the amazing moms at my older son's preschool:

What a blanket! It is truly just beautiful. It is a great size, and I love the little ties she included-- it rolls up quite nicely for easy transport.
And from my best friend:
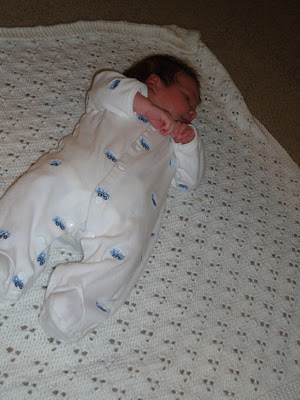
She knitted this gorgeous blanket. When I opened it up, I was truly speechless.

And there he is, up close and personal. Such a cutie! (Ahem. No bias here, of course!)
It just makes me feel so proud and happy and special that these talented people took time out to make something for my son. I'm truly blessed to have such amazing friends.
Handmade gifts are the best!
From the talented and generous Carrie P.:

How cute are those??? We aren't quite ready for the bibs yet, but those burp cloths have already seen a lot of action.
From one of the amazing moms at my older son's preschool:

What a blanket! It is truly just beautiful. It is a great size, and I love the little ties she included-- it rolls up quite nicely for easy transport.
And from my best friend:

She knitted this gorgeous blanket. When I opened it up, I was truly speechless.

And there he is, up close and personal. Such a cutie! (Ahem. No bias here, of course!)
It just makes me feel so proud and happy and special that these talented people took time out to make something for my son. I'm truly blessed to have such amazing friends.
Handmade gifts are the best!
Wednesday, April 28, 2010
It's a BOY!
Early Monday morning (1:53 a.m. to be exact), we finally got to meet our new little one! He's a healthy, happy little boy with lots of spiky dark brown hair. He was 8 pounds, 1 ounce in weight, and 21 1/4" in height.


Big brother is thrilled to have his new little brother home now too!
After a super smooth and quick delivery, we're now safe and sound at home and are hard at work taking care of each other and finding our new groove. I rather expect this blog is going to be a little quiet for awhile. But I fully intend on coming back soon! :)
Sunday, February 21, 2010
A new diaper bag!
Last week I finished up my diaper bag! I have to say, I'm really glad I stuck it out because it turned out really well. It's a very nice looking bag, if I do say so myself.

The pattern is one I found on etsy.com from Jenna Lou Designs called the "Mabel Messenger." I love the shape, size, and look of this design. I also love the adjustable strap.

Construction was a little bit of a challenge for me, but I think it worked out in the end. Really, the trouble was all my own doing. Worried that using all quilting-weight cotton would result in a too-flimsy bag, I went ahead and added a canvas interlining. As it turns out, the canvas was not necessary with all of the interfacing and the heavy-duty Peltex that was called for in the pattern, and it created a LOT of bulk that I (and my machine) had a hard time dealing with. If I make the bag again (I may... because I do really like it!) I would definitely just follow the instructions and see how that goes.

The pattern included just one inside pocket. I chose to add a few more-- 4 on the inside, and one on the outside. They worked out really well, and are a great addition to this design to make it a little more functional as a diaper bag.

Here it is, all loaded up. Stuffed inside: 1 cloth diaper, 1 diaper cover, 1 wet bag, 1 receiving blanket (makeshift changing pad), 1 water bottle, 1 tube of diaper paste, 1 container of Purell, 1 package of wet wipes, 1 extra pair of pants, 1 pack of kleenex, keys, and wallet.

And it was still nice and trim looking even when the flap was closed. Considering that all of this was bulky toddler-sized stuff, I think it will work even better for an infant. (I keep crossing my fingers that my boy will be potty trained soon...)

I apologize for the blurry picture. I'm not so hot at self-portraits. But hopefully you can get a better idea of the size/scale this way (and see my big belly, too!).
I gave it a test drive the other day when the boy and I took a visit to the zoo. It worked pretty well! I loved that it wasn't hugemongous like my Nappy Bag. It was able to hold it all and still look really good. At the same time though, I may need to invest in a bigger bag for any outings more than a couple hours long (or if I have to carry diapering stuff for two). So I'm still on the lookout for some pattern options. Maybe this one, or this? The thing is, I'm running out of time... only 9 weeks to go!

The pattern is one I found on etsy.com from Jenna Lou Designs called the "Mabel Messenger." I love the shape, size, and look of this design. I also love the adjustable strap.

Construction was a little bit of a challenge for me, but I think it worked out in the end. Really, the trouble was all my own doing. Worried that using all quilting-weight cotton would result in a too-flimsy bag, I went ahead and added a canvas interlining. As it turns out, the canvas was not necessary with all of the interfacing and the heavy-duty Peltex that was called for in the pattern, and it created a LOT of bulk that I (and my machine) had a hard time dealing with. If I make the bag again (I may... because I do really like it!) I would definitely just follow the instructions and see how that goes.

The pattern included just one inside pocket. I chose to add a few more-- 4 on the inside, and one on the outside. They worked out really well, and are a great addition to this design to make it a little more functional as a diaper bag.

Here it is, all loaded up. Stuffed inside: 1 cloth diaper, 1 diaper cover, 1 wet bag, 1 receiving blanket (makeshift changing pad), 1 water bottle, 1 tube of diaper paste, 1 container of Purell, 1 package of wet wipes, 1 extra pair of pants, 1 pack of kleenex, keys, and wallet.

And it was still nice and trim looking even when the flap was closed. Considering that all of this was bulky toddler-sized stuff, I think it will work even better for an infant. (I keep crossing my fingers that my boy will be potty trained soon...)

I apologize for the blurry picture. I'm not so hot at self-portraits. But hopefully you can get a better idea of the size/scale this way (and see my big belly, too!).
I gave it a test drive the other day when the boy and I took a visit to the zoo. It worked pretty well! I loved that it wasn't hugemongous like my Nappy Bag. It was able to hold it all and still look really good. At the same time though, I may need to invest in a bigger bag for any outings more than a couple hours long (or if I have to carry diapering stuff for two). So I'm still on the lookout for some pattern options. Maybe this one, or this? The thing is, I'm running out of time... only 9 weeks to go!
Sunday, July 13, 2008
Another baby quilt
My friend just learned that her family may be adopting a little baby girl who is due to be born any day now! This does not leave much opportunity for dilly-dallying about design and fabrics. Time for some decisive quilting action! (And another excuse for a girly quilt!)
Inspired by AJ and her beautiful designs, I whipped out my Electric Quilt program. Lacking any original thoughts of my own though, I adapted a design I found in the June 2008 issue of McCall's Quilting called "Summer Ice":

I had three fabrics in my stash that I knew I wanted to use, all from the Mackenzie collection by Anna Griffin. I really wanted to get a good idea of how they might look in the design, so I made my first attempts at importing fabrics into the program. It's not perfect, but you can definitely get a good feeling about the overall look of the quilt. But I still need to come up with a name for it. On the other hand, that is probably the least of my worries at this point.
Yesterday I went fabric shopping and picked up the other fabrics needed (the pink, green, and blue) and then did my pre-washing. Now I'm ready to cut!
Inspired by AJ and her beautiful designs, I whipped out my Electric Quilt program. Lacking any original thoughts of my own though, I adapted a design I found in the June 2008 issue of McCall's Quilting called "Summer Ice":

I had three fabrics in my stash that I knew I wanted to use, all from the Mackenzie collection by Anna Griffin. I really wanted to get a good idea of how they might look in the design, so I made my first attempts at importing fabrics into the program. It's not perfect, but you can definitely get a good feeling about the overall look of the quilt. But I still need to come up with a name for it. On the other hand, that is probably the least of my worries at this point.
Yesterday I went fabric shopping and picked up the other fabrics needed (the pink, green, and blue) and then did my pre-washing. Now I'm ready to cut!
Friday, February 8, 2008
Yummy Cupcake!
This week the boy and I received an invitation to the birthday party of one of the babies in our playgroup. She's going to be turning ONE (yay, Katie!) and the theme of her party: cupcakes! Her mom is all excited because she found a cupcake-shaped cake pan— and now she can make a cake-sized cupcake. It's funny how sometimes it's those strange little things that can make us happy.
Anyway, inspired by the theme of the party, I decided to make a cupcake pillow for Katie. I thought about making a sort of tuffet-like pillow (as in actually 3-D cupcake-shaped), but th en realized that would require a little too much mathematical effort for me (and probably more fabric than I wanted to use). So, I went with just a flat pillow in a cupcake shape. I knew I wanted to use fleece (so soft, so washable, and no fraying!). I didn't exactly have a plan, but on Tuesday, I went to Hancock Fabrics. I found a pink remnant for the frosting, a colorful pastel stripe to cut up for different colored sprinkles, and then a yellow ribbed fleece that was absolutely perfect for the cupcake base. Then I went home and actually designed the pillow. Gah! One day, I'll get my order of operations correct.
Tonight, I got to work and made my pattern. I decided it would be fun to have Katie's name on the pillow, and embroidered it in the frosting area. I did a practice one using tear-away stabilizer on the bottom and wash away on top (because of the heavy nap of the fleece, I didn't want my threads sinking down). On try two, I used a cut-away and was a little happier with the result. The third try, I used the same color in the bobbin as in the top. That did the trick. Except I kept having a problem with some of the upper threads getting a little loopy on top (only in a couple of places though). I never managed to figure that one out, but there were only a couple, so I was just able to pull the extra to the back side. I'm wondering if maybe I enlarged the lettering to the point where the satin stitch was just too wide... maybe should have adjusted to a step stitch? Anyway, it looks alright and I'm pretty happy with it. Finally, I got down to actually putting it all together.
Here are the front and back views:
Overall, I'm really happy with it. So cute! I hope Katie likes it... and I can't wait for the party to give it to her. :)
Anyway, inspired by the theme of the party, I decided to make a cupcake pillow for Katie. I thought about making a sort of tuffet-like pillow (as in actually 3-D cupcake-shaped), but th
 en realized that would require a little too much mathematical effort for me (and probably more fabric than I wanted to use). So, I went with just a flat pillow in a cupcake shape. I knew I wanted to use fleece (so soft, so washable, and no fraying!). I didn't exactly have a plan, but on Tuesday, I went to Hancock Fabrics. I found a pink remnant for the frosting, a colorful pastel stripe to cut up for different colored sprinkles, and then a yellow ribbed fleece that was absolutely perfect for the cupcake base. Then I went home and actually designed the pillow. Gah! One day, I'll get my order of operations correct.
Tonight, I got to work and made my pattern. I decided it would be fun to have Katie's name on the pillow, and embroidered it in the frosting area. I did a practice one using tear-away stabilizer on the bottom and wash away on top (because of the heavy nap of the fleece, I didn't want my threads sinking down). On try two, I used a cut-away and was a little happier with the result. The third try, I used the same color in the bobbin as in the top. That did the trick. Except I kept having a problem with some of the upper threads getting a little loopy on top (only in a couple of places though). I never managed to figure that one out, but there were only a couple, so I was just able to pull the extra to the back side. I'm wondering if maybe I enlarged the lettering to the point where the satin stitch was just too wide... maybe should have adjusted to a step stitch? Anyway, it looks alright and I'm pretty happy with it. Finally, I got down to actually putting it all together.
Here are the front and back views:
 |  |
Overall, I'm really happy with it. So cute! I hope Katie likes it... and I can't wait for the party to give it to her. :)
Sunday, February 3, 2008
Excess foam
 After I completed the windowseat cushion, I found myself with a number of leftover chunks of foam. None of the pieces were particularly large. Just small blocks.
Hmmmm.... blocks, eh?
 So I made myself a bunch of colorful blocks! I shopped my stash. I used cotton primarily, but I was also able to integrate some different textures on a few of them (minkee, flannel, fleece, and organza). They were really simple to make too. Yay!
I think they're really fun looking, and that the boy will enjoy them (or, if nothing else, he will enjoy throwing them). I was even thinking it might be fun to go out and buy foam so that I can make a few baby gifts. There are just so many options. Alphabet, animals, colors, numbers... and one could integrate embroidery designs too. Fun stuff. :)
Subscribe to:
Posts (Atom)

