Crafting has (once again) fallen by the wayside over the last few months (years). But I have been trying to make time to do more. Because when I do, I feel happy. Yay, happiness!
My PTA work finally quieted down enough for my creative juices to flow a bit right at Thanksgiving. My husband's cousin had a baby in June 2018 and I got a wild bee in my bonnet to make the little dude a quilt. Because every baby needs a quilt! But it had to be simple and something I could finish quickly as we were going to meet baby in person for the first time at the family Christmas party on December 8th. My other goal was to try and use my stash and avoid purchasing any additional fabric.
Success!!! I even finished with a whole day to spare. ;)
The design is "Hyde Park" from the book Super Simple Fat Quarter Quilts by Lynda Milligan and Nancy Smith (see amazon.com listing). The instructions were straightforward and clear and the top came together very quickly. I didn't have enough full fat quarters, so I went a bit scrappier. I purchased this cute sheep fabric in 2013 (a Hamil Textiles fabric, designed by World of Susybee). It was great to finally be able to put it to good use!
I quilted it with swirls through the center and then did a fancier border treatment-- I try to embrace opportunities like this practice and build my quilting skills. Babies don't judge. ;)
Here I've added in some lines to show the design a bit more clearly. I love how it turned out! My one regret though is that, because of the scrappy nature of the fabrics, the quilting doesn't show up very strongly. However, had the design turned out not-so-great, this would have worked to my advantage. So, not a huge regret.
The back isn't ideal-- but it was available in my stash and I had enough of it that it only took one seam (important as time was of the essence!). The binding was finished by machine (I used Red Pepper Quilt's binding tutorial).
Little sheep on the label! Yay!
The 56x67" size is perfect for playing on and as he gets older, it will be excellent for snuggling.
It was a joy to meet our new baby cousin and to be able to give him this quilt.
Showing posts with label quilting. Show all posts
Showing posts with label quilting. Show all posts
Thursday, January 3, 2019
Thursday, July 19, 2018
Hearts Full
My heart is definitely full! I have just completed my two-year term as PTA president at my boys' elementary school and I am finally finding myself with the energy and wherewithal to craft again! Huzzah! I mean, I've done stuff here and there-- very occasionally-- and I've kept track of those on Instagram (my account name is furicious). Blogging however has just not been a thing. But, now that I'm finding myself in my craft room a bit more regularly, I'm feeling the urge to journal again. So here I am!
First up: a quilt! I started this quilt in the summer of 2016, when I learned that one of my friends was pregnant. The design is from a Moda Bake Shop tutorial, "Layers of Love," by Sterling LaBosky. I used a Kate Spain "Aria" layer cake and a couple of Kona solids.
By January 2017, I was quilting it. But then life got in the way and it sat unfinished until last month when I finally picked it up again and finished it off. Baby is nearly two. Doh!
Fortunately, mama was very understanding and graciously accepted my belated baby gift. As it turns out,baby toddler girl is a big fan of snuggling under blankets. So, yay!
I quilted it with Aurifil Mako 50/2 thread in 2710 (Light Robin's Egg blue) using an all-over design.
Hearts seemed appropriate. Since it is hard to see, I've highlighted the design I used in the photo below.
I was worried, especially since it was already half-quilted, that I would struggle to get going again. Thankfully, I quickly found my rhythm quickly and all went well. Phew!
I finished the quilt with a machine stitched binding, a personalized label, and a trip through the washer to get it all crinkled and snuggleable.
Hopefully, Lady M will enjoy her new quilt!
First up: a quilt! I started this quilt in the summer of 2016, when I learned that one of my friends was pregnant. The design is from a Moda Bake Shop tutorial, "Layers of Love," by Sterling LaBosky. I used a Kate Spain "Aria" layer cake and a couple of Kona solids.
By January 2017, I was quilting it. But then life got in the way and it sat unfinished until last month when I finally picked it up again and finished it off. Baby is nearly two. Doh!
Fortunately, mama was very understanding and graciously accepted my belated baby gift. As it turns out,
I quilted it with Aurifil Mako 50/2 thread in 2710 (Light Robin's Egg blue) using an all-over design.
Hearts seemed appropriate. Since it is hard to see, I've highlighted the design I used in the photo below.
I was worried, especially since it was already half-quilted, that I would struggle to get going again. Thankfully, I quickly found my rhythm quickly and all went well. Phew!
I finished the quilt with a machine stitched binding, a personalized label, and a trip through the washer to get it all crinkled and snuggleable.
Hopefully, Lady M will enjoy her new quilt!
Thursday, June 30, 2016
Twinsies: Stars on a Cloudy Day
Here is the second of a pair of quilts I recently gave to a friend who had twin boys:
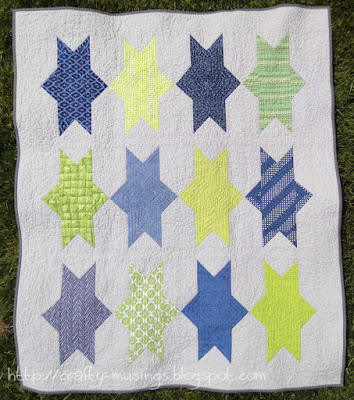
Like the other quilt I made, this design is from the It's Sew Emma Patterns book, Fat Quarter Style, and is called "Sparklettes." Since I put the stars on a grey background, I named my rendition, "Stars on a Cloudy Day."
Again, I used fabrics from my stash and used Seahawks-inspired colors. This is the Crib size (finishing at about 40.5" x 47.75").
The quilting was all done using Aurifil Mako 50/2 in Dove (#2600-- a soft grey). I'm not thrilled with how the stars turned out-- but they are at least all relatively consistent, so I like to think that all the funkiness looks intentional.
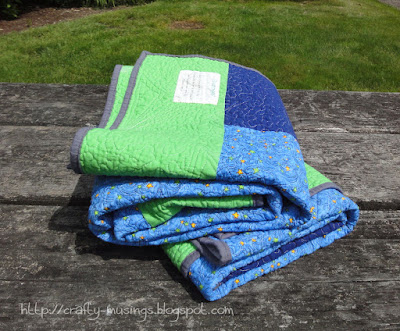
Gotta love a scrappy back! I've had that sky blue star print in my stash for at least 15 years now. It is so good to finally put it to use!
And the label.
I really wanted each quilt to be unique but still similar and I am really happy with how they pair together.
My friend was so happy to receive them. I think these quilts will get much love from her boys.
Wednesday, June 29, 2016
Twinsies: Firecrackers
I recently completed a pair of quilts for a friend who had twin boys last fall and I finally managed to gift them this month! In this post, I'll share the first of the two, which I call "Firecrackers."
The design is from the book, Fat Quarter Style, by the fabulous folks at It's Sew Emma Patterns. It is called "Plume"-- but I went with "Firecrackers" because after I quilted them, the grey parts made me think of little explosions. The pattern is great-- very clear and accurate instructions throughout. I love that the book gives size options, too! This is, appropriately enough, the Crib size (finishing at about 40.5" x 50.5").
The fabrics were all from my stash. Since I didn't know if mama had picked out any colors or anything, I went with a Seahawks palette. I felt confident that would be a safe bet.
The quilting was all done using Aurifil Mako 50/2 in Dove (#2600-- a soft grey). Again, I found myself inspired by Angela Walters' Craftsy class, "Dot-to-Dot Quilting," and I employed her techniques to quilt the grey areas. That Angela Walters is so dang awesome! I find myself continually inspired by her work and teachings.
Scrappy back for the win!
And a label.
Next post, I'll share quilt number two!
Tuesday, May 24, 2016
A wallhanging for springtime
It took a couple of years, but I have finally completed my Edyta Sitar wallhanging, from her book, Seasonal Silhouettes.
This is the April design. Hand applique, with a bit of embroidery (the centers of the purple flowers) and one bead (for the robin's eye). My only other change to the pattern was to piece the background. The completed wallhanging is about 18" x 22".
I really need to find myself another applique project. I do love applique.
I machine quilted it using Aurifil thread in a couple different colors... I can't remember which ones though. Doh! (The perils of waiting so long to blog about a project!)
I finished quilting and binding it last fall. The label reflects that date. I put it on before I realized I forgot the hanging tabs. Oops!
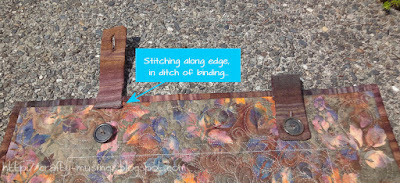
So, it sat around for a few months until I got motivated last week and added the hanging tabs and buttons. I took a strip of fabric, folded it lengthwise (right sides together) and stitched around one short edge and the long edge. Then I turned it right-side-out, added a buttonhole on the finished end, and then stitched it to the back of the quilt, trying to keep my stitching right in the ditch of the binding.
Since I couldn't actually use it until I got the hanging tabs on there, I am calling this one a 2016 finish.
"Spring Showers" now resides in my hallway. At least, it does for now... I still have visions of having a lovely collection of seasonal wallhangings to switch out. :)
Tuesday, May 10, 2016
Fall 2013 Mystery Quilt
Basted and ready to go, this one sat for nearly a year before I finally figured out how I wanted to quilt it. But, I finally got it quilted and bound in December:
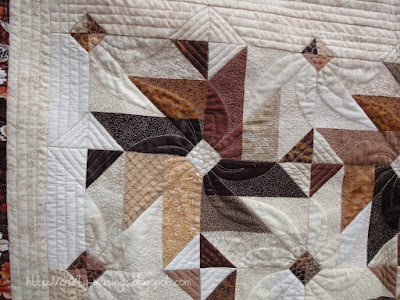
It is the Heather Spence Designs Fall 2013 Mystery Quilt.
The fabrics all came from stash. (Yay for stashbusting projects!) It actually was a lot of fun putting this one together.
On this one I decided I wanted the center to have the feeling of waterlilies or lily pads or somesuch to help tie it and the border together design-wise. I ended up going with this super, labor-intensive approach of using the pinwheels as the basis of a flower, and then, to emphasize it, I did microstippling in the areas between. It creates a sort of trapunto-esque effect.
So. Much. Quilting. I think I listened to two books on CD. So 20 hours or so? Yikes!
Aurifil 50/2 in Light Sand/Beige (2000) throughout the center was perfect-- the 2-ply thread works so nicely for tight quilting.
Then, in the border, I just did some watery wavy lines. I used a slightly heavier-weight thread, Mettler (40/3) in a dark brown.
I do love me a pieced back!
So I haven't put a label on it.... yet. I'm kind of on the fence with this one. I really love the quilting and the overall look of the quilt. But I don't need it and it doesn't really fit with our decor at all. So I am thinking I want to donate it, but am having a hard time letting it go.
I need to give it a wash still. Maybe then I'll decide. :)
Monday, May 9, 2016
Reversible Embroidered Quilt
This quilt was started with a class I took back in 2008 through a (now closed) local Bernina dealer. The class and project were meant to highlight machine embroidery as a quilting option as well as to teach a quilt-as-you-go method of construction.
I actually completed the quilt itself back in 2008. I just didn't get the binding on it until December 2015. :P
To be honest, I'm not a huge fan of this quilt. But I learned a good number of things through the making, including that I'm really just not a fan of quilt-as-you-go. I also like more quilting in my quilt. I learned that machine binding can be an awesome thing (and nowadays, I machine bind many of my quilts... though I don't use the exact technique that was taught in this class). Also-- machine embroidery, while lovely, is really boring to do.
I plan to donate this one, so no label.
While it is maybe not my cup o' tea, the colors are happy and overall, I think it is a pretty quilt.
I am happy that the quilt is finally finished!
Saturday, May 7, 2016
"Watch the Clocks"
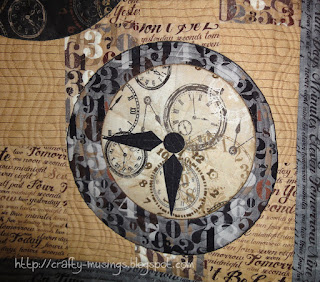
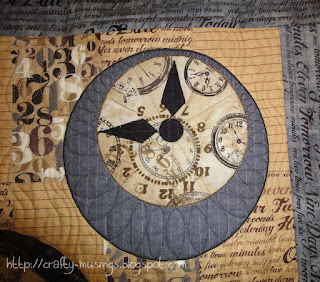
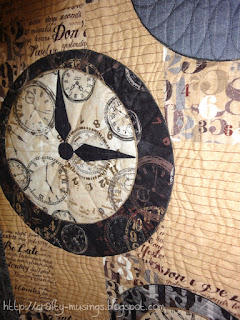
The top for this quilt was completed in 2014. I finally got it quilted last fall. Then it took two months to get the binding and buttons sewn. But-- it was technically completed just before the new year:
The quilt is from a kit my husband gifted me in 2013 from the Fat Quarter Shop. Though the fabric is no more, the design is still available as a free project from Windham Quilts and is called "Tick Tock." I call my rendition, "Watch the Clocks."
Pardon my dark and dreary pictures. My front hallway in the darkness of winter is not very photo-friendly.
Since it involved only simple piecing and fusible applique, this was a super quick and fun quilt to put together. In fact, I constructed nearly all of the top one morning during a quit-the-day-away event I attended.
It took awhile before I decided how to go about quilting it. I kind of wanted to create a feeling of gears running behind the clock faces. I think the wavy-line-circle design running across the background captures that pretty well.
Since the hanger I intended to use is closed, I needed to devise a plan to be able to take the quilt on and off of it. I decided on simple buttonhole tabs sewn in with the binding and placed the buttons on the back. It works quite well.
And the label.
We have a beautiful grandfather clock in our hallway, just across from where the quilt hangs. It is a happy pairing!
Subscribe to:
Posts (Atom)


