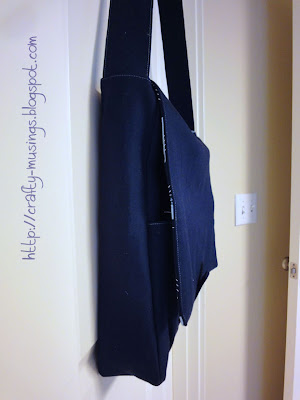
A few years ago, I made an Amy Butler High Street Messenger bag for my sister-in-law for Christmas (it was pre-blogging, but I posted a review of it on PatternReview.com). Since that time, my husband has not-so-subtly hinted that he would love to have a bag like that for himself. I finally managed to get it done and gave it to him for Christmas.
The exterior is a navy blue twill. The lining is a quilting weight cotton with a fun circuit board print. The pattern calls for home dec weight fabric for both the exterior and the lining. Since I chose a quilting cotton for the lining, I went ahead and used Pellon SF101 interfacing on every lining piece to provide a little more heft. I also (as per the instructions) used a canvas interlining for the entire exterior. I opted for the velcro closure since my husband is likely to haul about some electronic devices.
In an attempt to break up all of the plain navy, I did all of the topstitching in a light blue-grey thread. I kind of wish I had opted for a heavier duty thread so it would be even more pronounced, but my machine is sometimes persnickety about heavier threads and I just didn't want to fight. One thing to note about the design of this this bag is that the strap is NOT adjustable. Which isn't necessarily bad, but when trying to make it with no way to fit to the person for whom it is intended... it is kind of a crap shoot. In this case, I left it at the full cut length of the pattern, and it works perfectly on my husband. If it were for me, I would have needed to shorten it by a few inches.
This bag is a great size (15" tall, 12.5" wide, 3.5" deep) and includes 3 large zipper pockets. One on the exterior back, one on the inside flap, and one in the interior hanging tool pocket. I'm not sure why I always decide to follow Amy Butler zipper instructions, considering all of the negative experiences I've had with them, but I did it here too. As it turns out, the zipper instructions for this bag are relatively easy to follow. However, I am not a fan of the finished look.
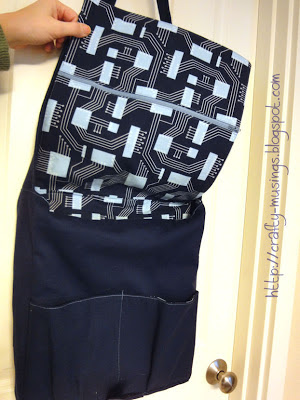
In the method used, the ends of the zipper tape (both above and below the zipper stops) are left visible, and there is a tiny opening left (really, really tiny-- nothing would ever be likely to escape it is so small, but knowing it is there kind of just bothers me). Pictured above is the inside flap zipper so you hopefully can see what I'm trying to describe. Should I make this bag again, I will definitely start with a longer-than-12" zip, trim to size, and use end tabs to make sure the zipper tape is covered and no holes remain. I feel kind of silly though because in my pattern review when I made this for the first time, I noted that I used longer zippers to avoid this very issue. Duh. Clearly, I should have read my own review before making it again!
I just love this lining print! With the flap open, you can get a good look at the nice open pockets on the front. I think they look snazzy, and seem like a nice easy spot to stash small things when you don't want to have to dig in the depths of the bag.
One interesting feature of this bag is the hanging tool pouch. It hangs down on the inside of the bag from the top of the front inside edge. It has a nice zipper pocket and a nice sized open pocket (perfect for a smart phone or even a portable gaming device) and some pen slots. The fact that it can be lifted out allows for easier access to the zipper pouch-- very practical!
A couple of notes about the pattern:
The instructions are very detailed. But they are a little frustrating as they refer to pieces by number in the cutting instructions, but then by name everywhere else-- which wouldn't be so bad except that all of the names sound very similar, and there are lots of pieces to keep track of. Painter's tape or sticky notes are definitely helpful for keeping track of what's what. Also of note: all of the pieces are square/rectangular. I found it easiest to measure the pattern and then rotary cut everything, rather than tracing and laying them out as per the instructions.
He was thrilled when he received the bag. And it suits him really well, both in style and fit. Yay!!!
Subscribe to:
Post Comments (Atom)


Timely post since I just got the fabric for my niece's bag. :-) I'll definitely opt for longer zippers and will likely ping you over the course of the project hysterically requesting advice! Keith's rockin' it!!
ReplyDeleteat least the zippers are inside. It turned out great and I do like the inside fabric too. Reminds of computers.
ReplyDeleteYour Manly Bag turned out great! I am getting ready to make this bag for myself. But I wanted to make the strap adjustable. Thanks for sharing.
ReplyDelete