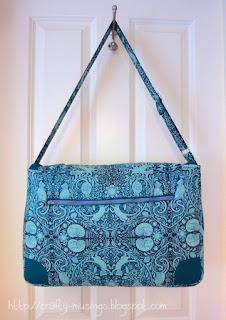
For my version, I went with a selection of happy teal-colored fabrics:
The exterior is a super cute kitty print by Julie Paschkis for In the Beginning Fabrics. The pattern called for a yard of fabric and that is what I had. What I didn't consider though until I started cutting was the scale and directionality of the fabric design. I tried to take advantage of the print as best I could with what I had, but I really could have used another 1/4 yard or so to allow me to do more with the design. The accent fabric is Kona cotton in Glacier.
Gah! I cut off my kitties heads with the back zip pocket! :P
But I'm pretty pleased with how I managed to center the design on the strap:
Also-- best slider strap instructions I've read. So easy!
The bag was not all smooth sailing for me, however. I faced a couple of challenges along the way. One was the interlining I chose to use. Sara suggests a product called Annie's Soft and Stable for her bags. I couldn't find it locally, so, based on a note in the pattern and the recommendation of the very knowledgeable associate I spoke with at Pacific Fabrics, I went with automobile headliner fabric. It is 1/4" foam that has a felt backing on one side. I was unhappy with it for two main reasons:
- It was challenging to sew as the foam just did not want to feed through the machine. There was a LOT of friction between the foam and the throat plate, and even using a walking foot I found myself having to pull the pieces through from the back to get it going. It resulted in uneven stitches, frustration, and a sore wrist.
- I'm just not happy with the finished structure of the bag. It just seems a little too floppy for me. I want it to have a little more body. I think the Annie's would have been both easier to work with and would have resulted in a more sturdy-feeling bag.
One other challenge was due completely to my own ineptness:
I somehow completely messed up the cutting of the lining flap. Believe me, it wasn't the instructions or the pattern piece-- those were very clear. But I still somehow managed to just mess it up. I don't even know how I did it. But I didn't have enough fabric to re-cut, so I ended up having to make it work by piecing it together. Doh! But The pattern in the fabric hides the seams pretty well, and it all worked out in the end. Phew!
For the lining, I ended up using three different fabrics as I didn't have quite enough of any one (or two). I love the zipped divider pocket, and Sara's instructions were awesome!
The large bag really is huge. It can easily accommodate our ginormous laptop. And, to give you a sense of the scale, this is me carrying it:
It really is a great design. Sara put a lot of thought into the instructions-- they are very clear and not overly wordy. She also includes lots of pictures to illustrate the steps. Her attention to detail is awesome. Seriously, if you are on the lookout for a good laptop bag-- this is a winner!
The Lilium Laptop Bag pattern is available now through the Sew Sweetness Pattern Shop.


Is it okay that I'm most impressed with the skinny-minny model???? :-) SO proud of you, girl!! The bag's beautiful too though! :-) Since in true slacker-fashion, I haven't worked on my niece's Butler High Street Messenger, would you recommend this one over that one??
ReplyDeleteExcellent job. You are a great tester. I am sure all your tips will be of help to those who order the bag.
ReplyDelete