Ugh. More sickness! I swear, I'm cursed. And this time, the boy has got it too. :( Sufficit to say, I've not been very productive on the quilty front. But with the guild meeting coming up on Thursday, I had to get my groove on.
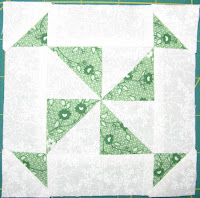
Here is this month's block exchange block:
The fabric choices were left up to us. The instructions said that she preferred "a vintage look with reds, greens, browns, and beiges or off-whites." I had a lot of fun picking out fabrics for this block. I think they work together pretty well.
The only downside to this block is that I actually had to do some calculating. There were no cutting directions. The only instruction was that the four-patches and the half-square triangles should be 4.5" and then be put together to create an 8.5" block. Math with a head cold? Not my cup of tea, to be sure! But (despite the horribly askew picture) my block did end up the right size in the end.
Meanwhile, I also managed to get the binding on the "Little Sheep Quilt." It just needs a label and then will be ready to send off to the new baby! I haven't made the label yet, but the fact that the binding was done made me feel like I could go ahead and start on the next project:
These fabrics are going to be made into a "Stacked Coins Baby Quilt." (And oh, my gosh-- let me tell you, the Moda Bake Shop rocks! So many cool ideas there!) But instead of using a couple of charm packs, I went ahead and dug through my stash and created my own little stack o' 5" squares. I'll be using Kona cotton Snow for the sashing and borders.
Hopefully, I'll be able to start sewing on it soon. (The baby girl is due in a couple of weeks!)
Tuesday, March 31, 2009
Sunday, March 29, 2009
Playtime: the elephant block
This afternoon, I managed to complete the next block in my Playtime quilt, the elephant:
Once again, because I was wanting to do hand applique, I had to reverse all of the line drawings in the pattern (since it was designed for fusible applique) and then figure out the placement order. As in previous blocks, I also used a vinyl overlay to help me with positioning of all the pieces. I did all of the applique by needleturn with freezer paper on top. A little bit of embroidery finished off the block. The block is 14.5" x 12.5".
This was also another block where I needed to supplement the kit fabrics. The fabrics it included for this block were kind of funky:
The more I thought about it, the more I didn't like the idea of a brown elephant. So I visited the local quilt shop and found some greys that I liked a lot better.
The elephant is actually not complete yet. He still needs some wheels on his wagon as well as a pull-cord. But the pattern says those parts will be completed in months 4 and 5.
Here's my virtual progress on the quilt thus far:
Hopefully, I'll get the whole top section all put together for real next month!
Saturday, March 28, 2009
Shop hop adventure
Over the last three days, I hopped to 16 different quilt shops in the second annual Northwestern Washington Tri-County Quilt Shop Tour. Each shop on the tour had a different block pattern that they shared with customers on the tour. And each shop designed a quilt using the 16 different blocks. It is pretty amazing how different quilts using the same 16 blocks can look. Seeing all of those amazing designs was a big part of the shop hop fun for me.
In my little slideshow above (which hopefully works... I've not tried this before), you can see all of the awesome variations. It's really neat how the style of finished quilts reflected the personality of each shop. I think my favorite quilts were Fourth Corner Quilts (done in bright, happy Amy Butler prints), Calico Country (the patriotic theme was great and I love how they broke up one of the blocks and used it as cornerstones in the border), Folktales (the wool applique in the center was fantastic!), Keepsake Cottage (what's not to love about using red rick-rac in the sashing? Fabulous!), Fabric-Etc. (such a unique layout and the little quilter's village was so cute!), and the Quiltmaker's Shoppe (the scalloped borders and the quilting were amazing). Most of the shops offered patterns and/or kits so that you could re-create their quilt. (So if you see one you love, you should definitely call them and ask about it!)
Because I managed to visit all of the different shops, I actually have the patterns for all of the blocks. Yay! I'm planning on putting them to use this week as I make some blocks to enter into my guild's April block lotto.
And of course, there was some shopping. The budget was tighter this year, so I had to watch my spending. But I did get some fabulous fabrics (mostly for use in my Jane Stickle and Playtime quilts), a couple of patterns (future Christmas gifts, if I can get my act in gear!), and some silk thread (because I keep hearing tell of it's awesome applique powers).
The boy and I traveled together on Thursday and Friday. He was a real trooper, but by the last shop on Friday, he was done. I mean, really, really done. I don't foresee any more shop hopping in our future... at least, not without a shop hop buddy who could help entertain and keep an eye on him. But overall, we had a great time. He was well-behaved (if a little energetic!) and happy. On Thursday, we even took a fun park break between stops.
Today, the boy stayed at home with papa, and I headed out on my own. It was a nice change of pace just being able to take my time at each shop and really look. And, as always, it was so fun getting out and visiting so many quilt shops. Each shop is so unique and it never ceases to amaze and inspire me.
Friday, March 27, 2009
Shop hopping!
The boy and I have been busy the last couple of days. We've been on the road visiting quilt shops in northwestern Washington on the second annual tri-county shop hop. We've been to eight shops so far, and I'm hoping to visit the rest tomorrow.
I'll be back with a report soon!
Wednesday, March 25, 2009
Quilting along: progress!
Inspired by the prodigious Zonnah, I've been plugging away at the Oh, Fransson! Quilt Along. On Monday night I managed to complete the last of the blocks.
I also was able to successfully cut out all of the sashing/borders I need for the top of the quilt (after some somewhat stressful calculations). I was a little short for my cutting plan, but I had just enough fabric to piece the rest of what I needed.
Last night, after spending much time working on setting up a layout that I liked, I proceeded to put the top together.
Now all that's left is to add the outer sashing, and I'll have a completed top!
Hopefully, I'll be able to get the rest of the sashing on in the next couple of days. But then this quilt will have to be set aside for a bit so I can do some catching up on my other projects. Fortunately, the recipient of this quilt is not due to appear until summer. So I've got a little time before I need to finish it up.
Tuesday, March 24, 2009
Jane Stickle Quilt: H-12
Block number/name: H-12 “Hannah Lou’s Hearts”
Date completed: March 24, 2009
Number of pieces: 9
Notes on block: Chances are, I would have never noticed how Jane completed her block if Anina hadn’t made mention of it. And then I would have missed out on a cool opportunity to fussy cut! (Not to mention make things more difficult for myself…but let’s not go there.) Once I knew that the original used teardrops, I had to try it that way. Fortunately, my appliqué skills were up to the challenge (thank goodness for freezer paper and toothpicks!). I’m pretty tickled at how well it came out.
The fabric is from In the Beginning’s Floragraphix II line. So very pretty. I'm so glad I found a good block for showcasing it.
Monday, March 23, 2009
Quilting along: sashing shortage
I felt so certain that I had 2 yards of this fabulous Alexander Henry print (Traffic Jam). But in reality, I actually only have 1.5 yards (some of which I've already cut for other projects). The Quilt Along fabric requirements suggest 1.75 yards. Ooops!
Well, not one to be swayed from my vision by something as small as lack of fabric, I've come up with a plan. I had already resigned myself to having to piece my sashing and borders since I have a directional print. So, now I'll just have a little more piecing to do.
Here's my plan:
The red "X" is the chunk that has already been cut out. The 3 long strips will be for piecing the outside vertical borders. The 12 strips will be for piecing the horizontal sashing and borders. Then the shorter strips will be for the vertical sashing. All together, I'll have just enough for the top. Unfortunately, I won't have any to use on the back of the quilt. But I can live with that.
I think this will work. I really, really HOPE this will work. Wish me luck!
Sunday, March 22, 2009
St. Patrick's Day family feasting
I may not be Irish (well... maybe an 1/8th?), but I can definitely appreciate an opportunity for feasting when I see one! Last night my parents, my in-laws, and my husband's grandmothers all joined us for a Saint Patrick's Day dinner. It was a lot of fun!
The menu:
Corn and Wild Rice Cakes with Creme Fraiche and Smoked Salmon (Beach Plum Inn)
Mummy's Brown Soda Bread (Cooking Light)
Chopped Salad with Lemon and Dill (Ellie Krieger)
New England Boiled Dinner (Cooking Light)
Caramelized Onions and Apples (Mark Bittman)
Strawberry Shortcake Jelly Roll (Cooking Light)
And my dad brought a bottle of Chaucer's Cellars Honey Mead. Mmmm... very tasty with the strawberries!
If you look closely, you can see the boiled veggies piled in a green bowl. I painted that! I started the bowl back in January, and (finally) got back to the ceramics place last weekend and finished it. They had it fired and ready to go just in time for me to use for the dinner.
I'm really pleased with how it turned out. And it was perfect for a Saint Patrick's Day feast.
Friday, March 20, 2009
Progress report
I've been busy lately! There are a number of different projects I'm currently working on, and I figured I might do a status round-up here. (I'm hoping this will help me focus a bit!)
Oh, Fransson! Quilt Along-- I've made some progress on this one. I've completed block sets A, B, and D, and have started work on set C (that mess above is what I've managed thus far on the C blocks). Hopefully, I'll be able to work on catching-up over the weekend.
Here you can see my A, B, and D block sets.
Grandma's Country Album-- It's been awhile since I've made any progress on this quilt. But I actually completed another block last night! I started it just before Valentine's Day (it just seemed appropriate). This isn't a great picture... it is a dark block, but the colors aren't that dark. I feel good about many of my points in this one (with much gratitute to the fabulous Carrie P. and her pointy-point tutorial!), but I really need to work on my circles. Circles are hard. I've been poking about, looking for techniques, and I'm thinking I need to try and get a set of the Karen Kay Buckley Perfect Circles. It sounds like those are pretty handy. I only have three blocks left to complete for this quilt, and one of them has a lot of little berries.
Autumn House-- I just got block 3 in the mail. Woot! I'm hoping to start prepping it next week. But it might have to wait a bit.
No new pictures for these, but they're in process as well:
Simple Modern Baby Quilt-- (aka, the little sheep quilt) I need to baste the layers and attach the binding.
Jane Stickle-- Last night I started working on block H-12.
Playtime-- The next block in the queue is the toy elephant. I'm hoping to get started on that this weekend.
Guild stuff-- Before the next meeting (on April 3rd), I have a block exchange block to complete, three pillowcases to make (for Conkerr Cancer), and a block lotto block or two.
Another Baby Quilt-- I've chosen a pattern and fabrics for this, but am not going to start on it until I finish the little sheep quilt. (Repeat to self: must finish at least one project before starting another...)
Thursday, March 19, 2009
Jane Stickle Quilt: G-5
Block number/name: G-5 “Poof”
Date completed: March 17, 2009
Number of pieces: 8
Notes on block: I used Anina’s technique for this block, piecing the background in its entirety and then doing the appliqué on top of it (except I handpieced rather than paper-pieced). I wasn’t thrilled with how this block was turning out until I covered up my mismatched center with the appliqué. Now it makes me smile. And what a perfect block it was for Saint Patrick’s Day.
Wednesday, March 18, 2009
Sometimes...
...it pays to be crafty.
Found out last night about a last-minute birthday gathering this morning for one of our toddler friends. Thank goodness for the fabulous Child's Coloring Wallet by Jennifer Casa. I LOVE this pattern.
Completed in about an hour. Yay!
Tuesday, March 17, 2009
Baaa!
I've been plugging along on my Simple Modern Baby Quilt from Elizabeth Hartman of Oh, Fransson! After a trip to the quilt shop for more thread, I completed the quilting and also did a little applique.
The pattern includes applique designs for a giraffe, a kitten, a bird, and a dog. But none of those really fit the farm theme this quilt's got going on. So, I drew a little sheep. I used fleece for the head and legs, and a creamy minkee dot for the other parts. I was a little worried about appliqueing the minkee, so I did practice a bit before jumping into the "real" thing. Stitching it ended up being no problem at all. Then I finished it with a little bit of embroidery.
ETA: Happy Saint Patrick's Day! :)
Sunday, March 15, 2009
Dagnabbit!
Saturday, March 14, 2009
Jane Stickle Quilt: TR-8
Block number/name: TR-8 "Brigadoon"
Date completed: March 13, 2009
Number of pieces: 8
Notes on block: When I saw this on the That Quilt blog, I was a little worried. Anina completed her block using primarily reverse applique-- and doing that with all those narrow areas between the pieces kind of scared me since I'm not so good at dealing with bulky areas. Despite assurances that it wasn't hard, I decided to try and find an alternative approach.
First I spent a little time attempting to draft a pieced version of the block, but I quickly lost patience. So I settled on this approach: reverse applique for the center diamonds, then regular applique for the two side ones and the rounded section at the bottom. I also pieced the very tippy-top section. Overall, I think it worked out pretty well. Yay!
Thursday, March 12, 2009
Playtime: the ball block
The next block in the Playtime quilt is the ball. There are a number of ways one can approach making this block. I thought I'd share how I decided to go about it.
Since the pattern was designed for fusible applique, I needed to set it up to do hand applique (because I like hand applique). I used a lightbox and traced to reverse the pattern and then numbered it in the order that I wanted to stitch stuff down. Next I traced all the pieces onto freezer paper and prepped my fabric. I then traced a vinyl overlay to help me with placement of my pieces.
Here you can see that I traced the overall shape of the ball (the white line) onto the main ball fabric. I used this line to have a guide both for piece placement and for the overlay. I placed the vinyl and positioned my first piece. Then I removed the vinyl and basted it in place (I'm in the process of basting it the above photo).
I put the vinyl back on top to check my work (to make sure nothing moved during basting).
Here I'm positioning the next piece (the green one at the top). You can see that I've already appliqued the edge of the blue piece.
I continued in the same manner (position, baste, stitch) until all the pieces were done. It's hard to tell in my poorly lighted picture, but everything is lining up pretty nicely.
After all that, I was pretty intimidated at the thought of just cutting out and appliqueing the shape onto the background fabric (because it's a circle, because there are lots of seams). So I decided to try something different, inspired by a technique for circles that I saw on The Happy Zombie's blog.
I traced the circle onto freezer paper and ironed it to the right side of my piece (I removed all the basting stitches and freezer paper from the previous applique work). Then I used my sewing machine and basted around the freezer paper shape so that I would have a reference line on the wrong side of the fabric.
I removed the freezer paper and then pinned the piece onto a plain piece of solid fabric (I just used Kona cotton) wrong sides together. (You can see my basting stitches in pink.)
Then I stitched with a normal stitch length just inside of the basted line, all the way around the shape. I backstitched when I got all the way around to secure my stitching.
Then I cut out the shape, eyeballing the seam allowance (about 1/4").
I cut a slit in the solid fabric, being very careful to not cut the applique. And then I turned it all right side out, using my handy-dandy that purple thang to help push all the seams out and get the shape right.
After a press, I had a little ball shape ready to stitch onto the background fabric. Except that I forgot to do the appliqued stars. Doh! Fortunately, I didn't have any problems doing it after the fact. But it was definitely inconvenient.
The finished block:
You can't really tell in this picture, but because of the circle technique I used, the shape actually is kind of dimensional and puffs up from the background. The finished block looks pretty cool, I think.
Wednesday, March 11, 2009
Jane Stickle Quilt: E-3
Block number/name: E-3 “Paddle Wheels”
Date completed: March 10, 2009
Number of pieces: 20
Notes on block: Simple and happy. I can imagine a whole quilt of these blocks. It would be so cute… maybe in ‘30s prints, like I used in my block. So cute!
As I stitched this one together, Keith and I watched the movie, W. I was surprised that it actually painted a rather sympathetic portrait of George W. Bush. Overall though, it was just kind of odd. It’s an Oliver Stone film, so I’m certain there was an agenda. It’s just not clear to me exactly what that was.
Tuesday, March 10, 2009
Quilting along
I've got my fabrics for the Oh, Fransson! Quilt-Along washed, ironed, and ready to cut:
I'm going to be using the solids for the blocks, and the Alexander Henry car print for the sashing. I love all the colors. It is a little weird using solids, but it's something I've been wanting to try, so I'm also excited about it.
Hopefully, I'll get a chance to start cutting today!
I'm going to be using the solids for the blocks, and the Alexander Henry car print for the sashing. I love all the colors. It is a little weird using solids, but it's something I've been wanting to try, so I'm also excited about it.
Hopefully, I'll get a chance to start cutting today!
Monday, March 9, 2009
Autumn House - Block 2
Hooray! Last night I finished block 2 of the Bunny Hill Autumn House BOM.
I only received the block on February 20, but it feels as if it took a long time to finish. Must be all those leaves. I wish they were more uniform, but in nature, leaves are sometimes a little different too. So I guess it's okay. Most of the block I completed by needleturn using freezer paper on top. On the big, long straight-edged pieces (house, side, roof), I used freezer paper on top but pressed the seams under before stitching (in hopes of keeping the sides relatively straight). This worked pretty well, so I think I'll be using this technique again.
When I was in the 7th grade, I wrote a book report on an Agatha Christie mystery, Crooked House. That bit of randomness came to mind as I was pressing this block. Really, the house isn't that crooked... just a little askew, maybe. I think it has to do with the foundation and settling. It's an old house, you know.
Sunday, March 8, 2009
Challenge quilt reveal!
I'm not sure if it's allergies, or a cold. Regardless, I've been kind of out of it the last few days. And now I feel as if I'm falling behind. Eep!
On Thursday, I went to the monthly guild meeting where we had the big challenge quilt reveal. It was fun seeing what people got and how they finished them, particularly the UFO I turned in!
Before:
After:
The woman who completed my UFO used the pattern I included as her guide for finishing it. She completed all the applique in the center, and then added the outer blue border. She used her own backing fabric and then turned it to the front to create the bound edge, which was kind of cool to see (I've not seen very many quilts finished this way). I also liked the quilting. She stippled most of the background and then did some fun free-motion flowers in the baskets, and a vine in the border. I talked to her after the meeting, and found out she was actually very new to machine quilting, so this quilt was really challenging for her. I'm just so happy that my old, forgotten UFO has a new, happy, and finished life!
I also met the woman whose UFO I completed. In fact, I was actually standing right in front of her, commenting to my friend, "I just don't know what she was thinking with those chenille bits..." When the woman sitting in front of us interrupted and said, "Well, it was my project, so let me tell you!"
Apparently, she signed up for a class on making the popular Yellow Brick Road quilt. When she went to the first class, the instructor gave everyone a bag of these chenille pieces and told them to use them with coordinating cottons to make their quilts. She was about as thrilled with the chenille as I was, and she didn't even bother going back for the second class. And so, those chenille bits ended up as her UFO. It was a pretty funny story the way she told it.
There was voting on the quilts in three categories, including Ugly Duckling (best transformation), Best Adaptation (taking what was completed and then doing something different), and also Best Overall. Of course, we don't get to find out the winners until the next meeting. Should be exciting!
Wednesday, March 4, 2009
Next up: baby quilt
Some friends of ours have a new baby. Time for a quilt!
I'm thinking about these fabrics:
Not the baby norm, I guess, but I really like how they're looking together. I may still change my mind.
The pattern? I'm planning on using Simple Modern Baby Quilts from Oh, Fransson.
Oh! And have you seen that Oh, Fransson is hosting a Quilt Along?
I'm so in.
I'm thinking about these fabrics:
Not the baby norm, I guess, but I really like how they're looking together. I may still change my mind.
The pattern? I'm planning on using Simple Modern Baby Quilts from Oh, Fransson.
Oh! And have you seen that Oh, Fransson is hosting a Quilt Along?
I'm so in.
Tuesday, March 3, 2009
Jane Stickle Quilt: H-10
Block number/name: H-10 “Ben’s Bowtie”
Date completed: March 3, 2009
Number of pieces: 26
Notes on block: Last night, my husband and I did our first workout from Jillian Michael’s 30-day Shred. Afterward, my arms were feeling so flubbery that I wasn’t sure I should even be attempting to stitch! But I toughed it out and managed to complete most of the block. It made for some good post-workout relaxation. I finished it up today. Fortunately, my arms aren’t sore now. Just my legs… my legs are hurting. Eeeow! I guess it’s nice to know I still have some muscle down there.
It has been awhile since I've posted a progress report for my Jane Stickle quilt. Here's how it's looking thus far:
97 blocks done, 128 to go.
Monday, March 2, 2009
March block exchange
Since the guild meeting is this week, I figured I ought to get on with making this month's block exchange block. (If you're interested, you can read about how the block exchange works.)
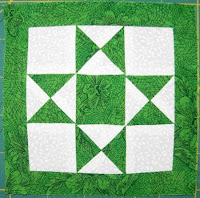
This month was kind of cool. In the instructions, the owner said that she wanted to make an Amish-inspired sampler quilt. She included black background fabric and requested we use solid colors of our choosing for our blocks. She actually included patterns for a whole bunch of different blocks, and even said that we could go out and find our own if we were so inclined. All of the block patterns were printed from McCall's Quilting's online selection of free block patterns, including the one I made (pictured above), Crossing Ohio.
This block was a lot of fun to make, and I think it turned out pretty nifty. Hopefully, the recipient will like it too!
Sunday, March 1, 2009
Jane Stickle Quilt: H-7
Block number/name: H-7 “Bennington Star”
Date completed: March 1, 2009
Number of pieces: 25
Notes on block: This was a nice, straightforward block. I really love this bright green, too. It makes me think of new growth. I’m so ready for Spring to arrive!
Most of this I put together last night as Keith and I watched Journey to the Center of the Earth (the recent one, with Brendon Fraser… very campy and fun). I finished up the block this morning. Lately, the Boy has had some independent streaks where he just wants to play on his own for a bit. On the one hand, this means I can get some chores done or even do a little stitching (like today). On the other hand, he’s my little boy—and he’s growing up so fast!