The last day of school for Big Bear was on Thursday. I made a couple of gifts for his teacher.
First was a collaborative gift I put together from the class (heavily inspired by Pinterest, of course!).
Each student painted a 4" square of watercolor paper and signed the back of the square. I then used a Cricut machine to cut out the butterfly shapes from the painted squares as well as from colored tissue paper. I glued tissue paper butterflies to the back of each cutout both to cover the writing on the back as well as to give some more color. I then pasted the tissue paper cutouts onto the background (a 12" x 12" heavyweight scrapbook paper) to act as sort of "shadows" for the dimensional butterflies. The background paper turned out not to be heavy enough and was bowing/curling from the glue even before I added the dimensional butterflies. So I backed the whole thing with some thick paperboard cut to size which flattened everything back out. Then I scored each of the painted butterfly shapes on either side of the middle, carefully folded up the wings and antennae and used hot glue to position each atop a "shadow."
The quote was one I found online that I printed onto vellum and glued to the background. It was perfect as they spent the last 2 months studying butterflies as a part of their second grace curriculum.
I didn't have time or space (12" x 12" was a tight fit for all those butterflies!) to have the kiddos sign the actual piece. So before cutting, I photographed the names on the back of the squares. Then I used Paint Shop Pro to resize the names so they were proportionally the same size. I printed them out and then traced them onto the corner of the background.
I found a relatively inexpensive 12" x 12" shadowbox frame at Michaels to finish it off.
As papercrafting is not my thing, I'm pretty pleased with how this project turned out. And Big Bear's teacher was happily surprised and touched by the gift. Yay!
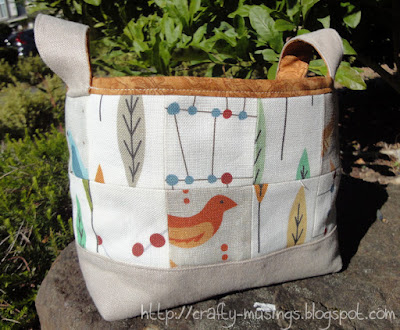
In addition to the class gift, I also decided to put together a little gift basket to the teacher from our family. I used Pink Penguin's happy little patchwork basket tutorial, but enlarged it a bit so that it finished at 5" x 7".
I used some linen for the body of the basket and a cute linen/cotton charm pack (purchased from Michelle Engel Bencsko's Cicada Studio way back in 2008) for the patchwork. I interfaced the linen before sewing to give it some stability and used fusible fleece for the inner lining. The lining fabric is quilting cotton from my stash.
The basket didn't go together entirely as expected. The thickness of the charm square fabric did not lend itself to finishing in the manner as called for in the pattern. So I improvised, resulting in the narrow border of lining along the top of the basket. It worked out okay, but it is not as tidy as I would have liked.
I didn't get a picture of it all filled with goodies, but they included a Starbucks tumbler (one of the fancy duo-chromatic ones that just lately came out), a Starbucks gift card, a gourmet chocolate bar, and a gift card to her favorite restaurant, along with a heartfelt thank you card.
Hopefully, she enjoys it!


I think you outdid yourself, Robin! Great gifts!
ReplyDeleteThanks, Andrea! Paper is way out of my comfort zone-- but it was fun to put together. And I just love making gift baskets-- quick and fun! :)
DeleteI know the teacher will treasure the gift you made. You did a great job. I have made many of those little baskets. Quick and easy.
ReplyDeleteBaskets are the best! They are quick and can be personalized so easily-- and it is so fun to fill them up. :)
DeleteWhat size did u use for the butterflies and what cartridge did you use? Love this idea and want to do something Similar
ReplyDeleteIt was the school's cutter and die, so I don't have any numbers or anything-- the butterflies were about 2.25" across.
Delete