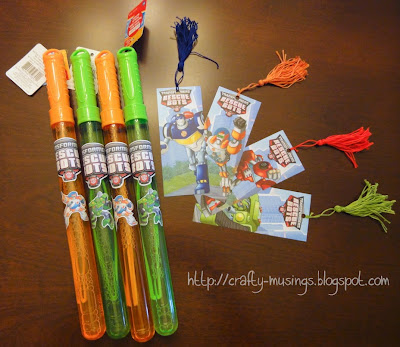
On Sunday, Little Bear turned 5 years old! To celebrate, he wanted to have a Transformers Rescue Bots party. So I got to craftin'!
First on the list was a "Pin the Autobot Symbol on Boulder" game.
I used a projector to trace the image of Boulder the Rescue Bot and then painted him with acrylics. Then I printed and cut out Autobot symbols for the kids to stick on him (the goal was his chest).
I also put together some simple party favors, including bubble wands decorated with Rescue Bot stickers I made using Avery Shipping Label stickers. Since the wands were orange and green, I went with Blades and Boulder characters to match. I also purchased a .pdf of some Rescue Bot bookmarks from So Happy Shop on Etsy and printed them out on cardstock. I finished them with some homemade tassels using a tutorial, "How to Make Your Own Tassels," from Sew4Home.
There was also an array of treats, including a cake. Rather than a fancy Rescue Bot-themed design, I was surprised when Little Bear decided he wanted a chocolate cake with chocolate icing and sprinkles.
I used Smittin Kitchen's "i want chocolate cake" cake. It turned out beautifully. This is the first time in recent memory that we actually finished off an entire cake! Sooooo good!
Bonus: I had a sous chef to help me with the baking!
Last, but definitely not least, Little Bear finally got his very own personalized name pillow.
Happy birthday, Little Bear! I love you!!!!
Wednesday, April 29, 2015
Thursday, April 23, 2015
More sparkle!!! M6752
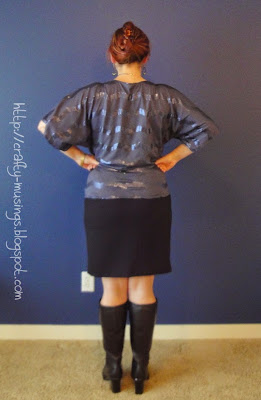
Apparently, I was totally feelin' the sparkle for my recent trip to Las Vegas, because in addition to the sequin top and sparkle dress, I made this:
The top is McCall's 6752, view A. I love the style and shape of the top and dig the zipper detail. The kimono sleeves seemed like a great fit for the fabric as well (less stripe matching!). The fabric is a 100% polyester jersey knit from Fabric.com.
I cut a size 16. My only alteration was to lengthen the bodice 1.5".
The instructions were very straightforward. I did add a couple steps (as I have been wont to do lately with knits):
I attempted to match the stripes on either side of the zipper. It kind of worked. I particularly love the zipper detail. It is something just a little different and it gives the top a bit of edge. I dig it! I can totally see myself making this top again at some point.
The skirt I've paired the top with here is Kwik Sew 3765, which I made back in 2012. Love this skirt!
Chevron sparkle, FTW!!!
The top is McCall's 6752, view A. I love the style and shape of the top and dig the zipper detail. The kimono sleeves seemed like a great fit for the fabric as well (less stripe matching!). The fabric is a 100% polyester jersey knit from Fabric.com.
I cut a size 16. My only alteration was to lengthen the bodice 1.5".
The instructions were very straightforward. I did add a couple steps (as I have been wont to do lately with knits):
- Used knit stay tap along the back neck edge.
- Stabilized the shoulders with nylon stay tape.
I attempted to match the stripes on either side of the zipper. It kind of worked. I particularly love the zipper detail. It is something just a little different and it gives the top a bit of edge. I dig it! I can totally see myself making this top again at some point.
The skirt I've paired the top with here is Kwik Sew 3765, which I made back in 2012. Love this skirt!
Chevron sparkle, FTW!!!
Monday, April 13, 2015
V8961 - Vegas dress!
On my Vegas trip, my friends and I did the "Sin City Club Crawl" party bus. Quite the experience! This is what I wore (including the shoes, which I was kind of regretting by the end of the night... considering it was a party bus, there was a lot of walking involved!):
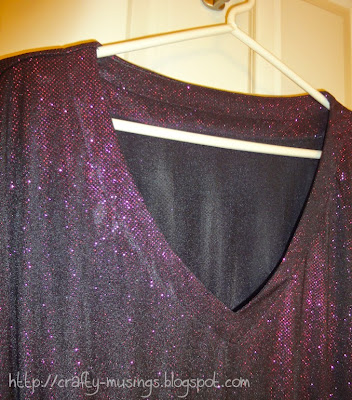
This is Vogue 8961, View B. I cut a size 16. The fabric is "Metallic Glitter Stretch Slinky Knit Black/Violet Pink" (ha! that's a mouthful!) from Fabric.com. This fabric just kind of begged for a disco-mama kind of dress, and this pattern's silhouette really seemed to fit the bill.
Alterations included lengthening the bodice by 1.5" and shortening the skirt by 1". Because of the thinness of the fabric, I went ahead and lined the skirt as well.
Construction-wise, I pretty much just followed the directions (which were very straightforward and easy to follow), but added in a couple of additional steps. I stabilized the shoulder seams with some nylon stay tape, and added knit stay tape around the neckline ("Extremely Fine Fusible" from SewKeysE). Because the fabric was knit (the pattern is actually designed for a woven), I used a knit stitch throughout and I finished the skirt hems with my coverstitch machine.
In addition, I went ahead and topstitched the neck facings, because I just envisioned lots of floppiness otherwise.
I like the gathered sleeve detail on this dress, and am happy with how clean it looks on the inside as well.
This dress was easy to put together, very comfy to wear and it totally met my disco-mama vision. I call it a WIN!
Finally, here's a flash picture, so you can get an idea of the sparkleliciousness:
Woo! Sparkle!
Friday, April 10, 2015
Kwik Sew 3740: My sequin salvage project
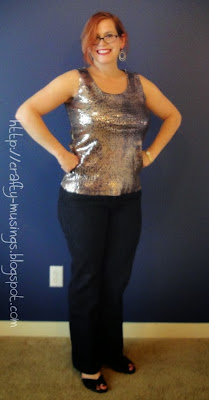
So after the debacle that was my sequin dress, I managed to salvage some of the fabric by taking it all apart and then using the pieces to cut out Kwik Sew 3740, View B, a tank top.
This one worked out MUCH better, thank goodness!
The fabulous kitty print sequin mesh fabric is from Gorgeous Fabrics. For the lining, I used a 70 Denier Poly/Lycra jersey knit in "Kona Coffee," also from Gorgeous Fabrics. I think they paired pretty well.
I cut a size large and lengthened it by 2", adding at the Shorten/Lengthen mark. While I didn't do anything else with regards to alterations for fit, one major change I did make was to fully line the top. I used the instructions from Vogue 1351 as a guide for lining, including the handstitching at the shoulders to finish the lining and then understitching the neck and arm edges (as shown in the detail pic above).
After the dress, and seeing this top, I am beginning to think I need to try adding a swayback adjustment to my repertoire. I think most of my me-made clothes have the excess fabric at the lower back-- but the sequins exaggerate the issue to the point where I am definitely going to research it for projects in the future. Because why have pooling fabric if I don't have to?
A couple of other construction changes were to stabilize the shoulders with nylon stay tape, and then the neck edge with fusible knit stay tape (I used the "Extremely Fine Fusible" from SewkeysE-- it is pretty snazzy stuff!).
In order to keep the finish on the outside as clean as possible, I used a double-sided fusible tape to secure the hem. I used my cover-stitch machine to hem the lining.
A few things I learned about sequins in this process:
SPARKLE!
This one worked out MUCH better, thank goodness!
The fabulous kitty print sequin mesh fabric is from Gorgeous Fabrics. For the lining, I used a 70 Denier Poly/Lycra jersey knit in "Kona Coffee," also from Gorgeous Fabrics. I think they paired pretty well.
I cut a size large and lengthened it by 2", adding at the Shorten/Lengthen mark. While I didn't do anything else with regards to alterations for fit, one major change I did make was to fully line the top. I used the instructions from Vogue 1351 as a guide for lining, including the handstitching at the shoulders to finish the lining and then understitching the neck and arm edges (as shown in the detail pic above).
After the dress, and seeing this top, I am beginning to think I need to try adding a swayback adjustment to my repertoire. I think most of my me-made clothes have the excess fabric at the lower back-- but the sequins exaggerate the issue to the point where I am definitely going to research it for projects in the future. Because why have pooling fabric if I don't have to?
A couple of other construction changes were to stabilize the shoulders with nylon stay tape, and then the neck edge with fusible knit stay tape (I used the "Extremely Fine Fusible" from SewkeysE-- it is pretty snazzy stuff!).
In order to keep the finish on the outside as clean as possible, I used a double-sided fusible tape to secure the hem. I used my cover-stitch machine to hem the lining.
A few things I learned about sequins in this process:
- They don't drape so hot.
- They are on the delicate side and if you rub against them too hard (or are not careful enough putting on your coat), they can come off.
- Also, they are not exactly comfy to wear... the edges of the garment definitely chafe.
SPARKLE!
Friday, April 3, 2015
March got away from me!
Yikes! March was crazy sauce. Where did it even go??? While I apparently failed to blog, I did manage to do some making-- including some fun clothes for my end-of-month trip to Las Vegas (which was Awesome!!! with a capital 'A'). Once I get them laundered (they have some Vegas stench going on at this point), I'll take pictures to share.
In the meantime, I finally had the opportunity to gift the baby quilt I finished at the beginning of the year!
This is another happy design from the book Crazy for Baby by Me & My Sister Designs. Can you believe this is my third quilt from this book? (See: quilt one, quilt two) Clearly, I am a fan.
The pattern is called, "Crazy for Baby," but I am calling this one "Kitten Play"-- because, KITTIES! The kitty print is "Paris Paws" from Alexander Henry. So cute.
Through the center, my quilting was inspired by Natalia Bonner's book, Beginner's Guide to Free-Motion Quilting, and her "Loops and Poppies" design. Then I tried to balance the curvy quilting with straight-line action in the pieced border sections. I did a little poppy-loop chain through the kitty border. I think it all worked together really well. Auriful Mako 50/2 thread was used for all of the quilting (I'm pretty sure I used #2423, "Baby Pink" throughout).
I'm running out of big pieces in the stash, so it's all about the pieced back lately. The beautiful solid in there is Flamingo Pink from Northcott (note to self: get more!).
I especially like the label on this one. Cuteness!
And baby Rina and mama love their new quilt!
Subscribe to:
Posts (Atom)


