Monday, October 31, 2011

The Little Merboy

A very rare species, indeed...

Merboy, front view
Recently, Big Bear read the story of the Little Mermaid and watched the Disney movie and declared that was what he wanted to be for Halloween. Then one of his preschool buddies pointed out that mermaids are girls. Uh-oh. Big Bear was not happy to hear this. But he thought about it for a bit and decided he could be a mer-boy instead. Phew! Crisis averted... (well, other than the fact that then I actually had to figure out how to make a merboy costume...).

Merboy, back view
For the bottom half, I used McCall's 4964, a pattern for fleece pants that included side seams. I then drafted a fin shape to insert into the side seam. I used fleece for the pants and overlaid each piece with the fancy fish-scale looking fabric. The fins were made of felt overlaid with the same scale material. I was worried about the weight of the fins, so I added in the gathered tulle on the backside of each to help support them so they wouldn't just flip backward.

Merboy, side view
The shirt is from Burda 9537, a basic t-shirt design. I changed it up a little by adding a center back seam and seams along the top of each sleeve so that I could insert some fins. Again, I used the scale fabric overlaid onto felt and used gathered tulle to help support either side of each fin (and to help tie in with the look of the tail fin). I cut the shirt extra long in the torso and sleeves to allow me to cut a jagged edge (in lieu of hems).

Merboy cuteness
And then we finished it all up with some fun merboy face stripes, a little bit of blue hairspray, and some shell necklaces.

Now Merboy is ready for some Halloween fun!

Happy Halloween!!!

Sunday, October 30, 2011

Fierce!

Oh, my...
Beware: Tiger!
Have you ever seen such cuteness ferocity???

tiger on the prowl
Watch out! He's on the prowl...

tiger on the hunt
For cookies!!! (Tigers love cookies, you know.)

tiger costume, front view
The costume is from Kwik Sew 3099. I made a size small (12 months), and it fits pretty well on Little Bear (he's 21 pounds and about 31 inches tall... I probably could have shortened it a little, but it is fine when he is wearing shoes). The body is fleece and then I used "bunny fur" for the belly and ear contrasts. The paws are just white fleece with some black faux suede that I found in my stash. This is actually the second time I've used this pattern, so it went pretty smoothly (other than sewing the hood on inside-out... thank goodness for seam rippers!).

I'm so thrilled with how it turned out. Super cute, nice and toasty warm (perfect for chilly night of trick-or-treatin'), and he actually seems to enjoy wearing it. Yay!

Saturday, October 29, 2011

A little nail art

I've got a little something different to share today. For the last couple of years, I've been getting into nail polish. Love it. There's something about looking down and seeing happy color on my nails that just makes me feel good. Usually, I just pick a color and paint my nails and that's that. But last night, while the husband was out with his friends and the boys were in bed asleep, I decided to get a little crafty with my nails and attempted my first-ever water-marbled manicure.

my first water marble manicure
Using My Simple Little Pleasures's fabulous video tutorials as a guide, I managed to successfully do all 10 of my nails. I started with a base coat of Nubar Faded Putty and then did the marbling with Nubar Edgy Umber, Zoya Dove, and O.P.I. Mermaid Tears. It wasn't hard, but it was definitely time consuming.

It was a lot of fun to try something new!

Friday, October 28, 2011

Bloggers' Quilt Festival, Fall 2011: A Quilt for Finn

I'm excited to have something new to share for this fall's Bloggers' Quilt Festival! I call this quilt "Gone Fishin'":

Gone Fishin' front view
The design is adapted from "Sea Views" by Kate Conklin Designs. The print fabrics are all from the "Storyboek" collection by Jay-Cyn Designs for Birch Fabrics, and then I also chose a few coordinating Kona solids.

Gone Fishin' embroidered block
I really love the design with all of it's wonderful, flowy curves. But I really wanted to take advantage of the larger panel prints of the fabric. So I mixed in some of those as "plain" blocks. And then I embroidered the recipient's name in one of them.

Gone Fishin' quilting detail
As much as I love the design, the pattern was a little bit challenging. Cutting it all was easy-peasy. But sewing all those curves back together again resulted in some serious wonkiness. To get them to work, I ended up having to trim my blocks smaller than her suggested sizes. And almost none of them laid flat (despite repeated attacks with the full-on steam iron). But all ended up working in the end once everything was quilted. Yay!

Gone Fishin' back view
The pieced back is fun too, I think.

Gone Fishin' label
And the finishing touch. I love making labels for my quilts. Not only can I easily personalize them for the recipient, but I can include some care instructions and information about the making of the quilt. I think of it as more than just a label-- it's also a sort of memory.

Gone Fishin' draped on a chair
This quilt is for a baby boy named Finn. Hopefully he'll have lots of fun snuggling in it!

Tuesday, October 18, 2011

Style Stitches Monthly Bag Challenge: Blossom Bag

The Blossom Bag was the September project for Jem Jam's Style Stitches Monthly Bag Challenge.

Style Stiches Monthly Bag Challenge button
This is a bag I've been looking forward to making. My mother-in-law (who gave me my copy of Style Stitches last year for Christmas) pointed to this bag as being her favorite in the book. So I knew right then that I needed to make it for her! I even picked out fabric for it a few months ago (extra notable because this is also the first project in the book that I've gone out and bought fabric for-- everything else I've made using my stash).

However, despite all of my enthusiasm, September was just not much of a crafty month for me (as my dearth of blog posts attests). But last week, I was finally ready! The preparations were mighty-- I think I spent nearly two hours just cutting out all of the pieces. Then I spent nearly two hours applying all of the interfacing. Then I spent about five hours putting it all together.

front view of my Blossom Bag
I chose to do the handbag style, with the shorter handle length. I also chose to use a regular quilting-weight cotton instead of the recommended decorator-weight. Following Natalie's advice, I decided to go ahead and double interface all of my exterior and lining fabrics in order to simulate the heft of a dec-weight. It was a lot of interfacing. But it really seems to have worked.

purse feet on the bottom of my Blossom Bag
Natalie also said that though she loved her bag, she was finding that it was already showing signs of wear on some spots, probably due to the lighter-weight fabric. With this in mind, I went ahead and added some purse feet to at least help with that on the bottom. Also based on her recommendation, I plan to Scotch-guard the bag.

back view of my Blossom Bag
And here's the back of the bag. I love the handle details in this bag. They weren't too complicated to make, but measuring to ensure even placement is definitely something I would recommend taking the time to do.

side view of my Blossom Bag
This is a view of the side. It was a little tricky sewing the side in, due to the thickness and inflexibility of the Peltex. But lots of pins and just taking it slow got me through it just fine.

inside view of my Blossom Bag
In putting the bag together, I ran into two main challenges. The first one: the zipper pouch. If ever a section needed an illustration, it was this one. I swear those instructions were on crack. She approached this zipper differently than every other one she has presented in the book thus far. But, similar to the other methods she has offered up thus far, this one is convoluted and far more difficult than it needs to be. Frankly, even after having done it, I am still wondering if I actually did it correctly. But it does work. If you decide to make this bag, I would highly recommend using a different zipper approach (this one, from Bree of My Crafty Crap, looks pretty promising-- I definitely plan to try it!). I think I'm officially declaring myself DONE with Amy Butler zipper instructions.

close-up of bar tacks on side panels
The other major challenge? The last step wherein one is supposed to bartack through the side panels in order to hold the dividers in place. So THICK! Ugh. My machine managed it, but I had to take off the foot and go super slow to make it happen (many thanks to Tori at James Family Blog for sharing that fabulous tip!). Thank goodness-- because hand stitching that would have been painful (literally, I think).

me and my completed Blossom Bag
And here I am with the bag. Should I decide to make one for me at some point, I'll definitely do the longer straps. I'm a shoulder-bag kind of girl.
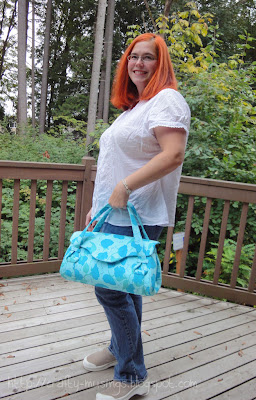
me standing and holding my bag
This view gives a little better perspective on the actual size of the bag. It really is a great size.

If you want to make one of your own, or even just get a taste of what an Amy Butler pattern is like, Sew, Mama, Sew! has a FREE Blossom Bag pattern download.

Monday, October 17, 2011

Lucky September!

September really was a lucky month for me. I won two different giveaways-- woo hoo!

First, I was one of the winners for August's Style Stitches Monthly Bag Challenge (my entry was this Fringed Hobo Bag). I received a gift certificate to the Fat Quarter Shop. And then I immediately used it to buy this:

Fat Quarter Shop Apple Dumplings Quilt Kit
Happy and fall and Aneela Hoey... I don't do kits very often, but this one just spoke to me. Of course, now I need to actually make it. More hours in the day, please!

My second win was from Laundry Basket Quilts in their giveaway for the Moda County Fair blog hop:

Laundry Basket Quilts giveaway treats... so awesome!
Wow!!! Winning this one was such a treat because I am a big fan of Edyta Sitar and her designs (I'm currently having a ton of fun working on her Hop to It design). Such a wonderful array of treats, including her beautiful new book, Reasons for Quilts, which is full of inspiration and eye candy. I need to start finishing some things, because I really want to jump in and make that Wagon Wheel quilt (she even sent the templates to go with it!).

Many, many thanks to Jemellia and the Fat Quarter Shop for hosting and sponsoring the Style Stitches challenges, and to Laundry Basket Quilts for the wonderful treats!

Sunday, October 16, 2011

Safari Happy!

I made something! Lately, crafting really has been my oasis. Recovering from our busy daytime routine results in me focusing my precious evening-times on crafting. So I've actually made a few things, even if I haven't found the energy to blog about it. Here's hoping that this post will help me turn a new leaf and start getting into a blogging routine again.

Anyway, I've been making stuff-- even quilts! This one is for Leander, the new baby brother of one of our preschool friends.

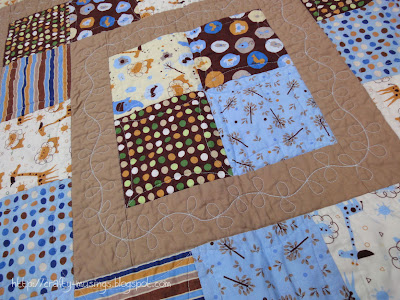
Safari Happy, front view
I used the "Storytime Squares Quilt" tutorial from made by Rae. It was super simple and very quick to put together!

Safari Happy, quilting detail
The print fabrics were leftover from a quilt I made a couple of years ago. The solids were in my stash. No new fabric was purchased in the making of this quilt. YAY!

Safari Happy, back
Being as it is a small quilt, I went ahead and practiced my quilting by doing some leafy vines and some simple curves in the blocks. I think it turned out pretty nice (though it is maybe a bit much design-wise considering the simplicity of the pattern).

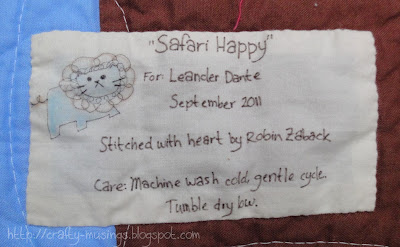
Safari Happy quilt label
The baby's name is Leander, which is Greek for "Man of Lions." It inspired my fabric choices, and my label.

Big Bear the quilt holder
And look! I even had a special helper during my photo shoot. Big Bear loves getting involved whenever I get out the camera.

I hope baby Leander enjoys his new blankie!

Thursday, October 6, 2011

Block exchange catch-up

Oh, my... again, blogging fell by the wayside. However, I think I'm finally starting to adapt to our new schedule. (Yay! ) Hopefully, this will allow for more crafting energy and blogging time. My to-do list is growing-- so I really need to start making time to visit the quilt mines!

But, I'll start with something small: my guild block exchange! I haven't shared for awhile, so I have four months worth of blocks to show you.

For July:

Julie's block
This is Julie's block. Halloween!!! It's definitely gonna be a fun quilt.

For August:

Pat's block
Pat's blocks were super-easy to put together, and have a great look. She requested that we sign our blocks.

For September:

Sue's block
This is Sue's block. Simple and happy. I love the bright colors in the Laurel Burch fabrics she chose.

For October:

Tammi's block
This is Tammi's block. The block design is called "Card Trick"-- I've never made one before. It is pretty darn cool, I think! It probably helps that I love her fabrics.

Here's to a productive October!