Friday, October 30, 2009

Apple spice cookie goodness

Just because they are so tasty...

tasty apple spice cookies
Apple Spice Cookies (found via Amy a la Mode). Soooo good!

And, in case you want it (which you may, because it's really tasty on these cookies):

A Vanilla Drizzle

2 cups powdered sugar
2 Tablespoons butter, melted
1 teaspoon vanilla
1/4 cup 2% milk

Combine in a bowl and stir with whisk.

Thursday, October 29, 2009

Shot cotton love

Have you seen those gorgeous shot cottons from Kaffe Fassett? I thought I had, but let me tell you-- a computer screen does not do the fabric justice. I had not been so up close and personal with the fabric until Nichole sent some Thunder to use in her Snip.Sew.Send. block this month. I had heard people describe it as iridescent looking, but didn't really understand until now. It really is. WOW! LOVE I'm telling you!

Nichole requested a big block (16.5") with 1 to 3 individual flowers surrounded by the fabulous shot cotton background. She said she loves bright, bold colors, so that's what I tried to do:

Snip.Sew.Send. October block for Nichole
It was a fun block to make. I started by cutting out my flowers and then measured them to see how big they were. Then I used graph paper to help me figure out the sizes background pieces.

Nichole is planning on combining all of our blocks to create a "Midnight in the Garden" quilt. I have a feeling that it is going to be spectacular!

Wednesday, October 28, 2009

The cursed frog hat

The Boy's Halloween costume was going along splendidly, and I was all proud when late on Sunday evening I had finally finished it. Unfortunately, when the Boy tried on the hat portion of the costume the next morning, we found that it did not fit. Though I don't have a picture of him in it, let me demonstrate:

frog hat looking dorky on me
So, it doesn't quite fit me the same as it does him (my head is a little bigger), but you can kind of see that it sits in the middle of the back of my head. What you can't really tell from my lovely self-portrait is that it also poofs out in the back like a country bonnet. Not so cool looking on a little dude. It was also kind of tight around his face as well. Now, this was not entirely a surprise, as I had read in multiple critiques on Pattern Review that the hat ran small. I actually added some width when I cut out the Large size, just to be safe. But, I did not realize that it ran small in length as well, and I did not add for that. Ugh.

Here's the hat before any alterations:

frog hat before alterations
So I was completely stressing out about having to re-make the cursed hat (which I had already had to take apart once because I put the eyes on the back of the head instead of on top... the perils of late-night sewing!). But then one of the other preschool moms said to me, "Why not just cut out a crescent and attach it to the bottom?" Shazzam! That gave me the inspiration I needed.

adjusted patterns
I took my patterns and added about 2.5" of length to them (not at the bottom, but a little higher, to make sure that extra length would be added in the face area as well as in the back). I cut out the bottom section of those patterns and then cut my fabric.

chopping off the bottom of the hat
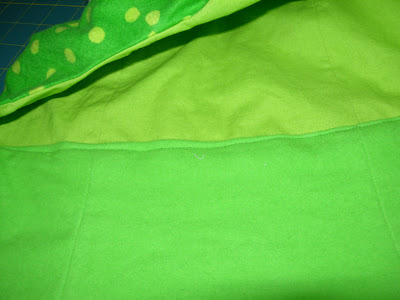
I basted a line where the new seam would be and chopped off the bottom of the completed hat, leaving a 5/8" seam allowance.

the new pieces stitched together
Next I stitched the new pieces together just as I had done in making the original hat. Then I stitched the outer to the lining right-sides-together but was careful to fold down the seam allowance on the lining (pictured above).

stitchin the new bottom to the original top
I turned it all right-side-out and pressed. Then I stitched the outer layer of the new bottom section to the original top, being careful to not stitch through the lining.

showing the fabulous double-sided tape
Then I used the uber-fabulous double-sided water-soluble tape to hold the lining to the seam. I wanted it secure to ensure that when I did the topstitching on the outside, that the stitching would catch the lining and fully enclose the seam.

the inside of the hat after topstitching
It's not pretty-- but it's on the inside (where no one is going to see it), and it worked!

And here's the new and improved (lengthened) frog hat:


And, just so you can get an idea of how it fits now:

me modeling the better fitting hat
So much better! And (big bonus!) I didn't have to re-make it all from scratch!

Of course, the real trick is going to be keeping it on the Boy's head for pictures and trick-or-treating!

Tuesday, October 27, 2009

Jane Stickle Quilt: LS-12

Jane Stickle block LS-12Block number/name: LS-12 “Button Hook”

Date completed: October 26, 2009

Number of pieces: 24

Notes on block: I am feeling a solid sense of accomplishment now that I’ve finished this block. The tiny little appliquéd diamonds, and the fact that I did some redrafting (so as to have a solid triangle at the bottom just as in the original block, instead of a pieced one as was in the book/software), caused me to feel rather intimidated. So much so, that I actually procrastinated starting for a few days. Tonight I decided to go for it.

I started by doing the appliqué on a rectangle of background fabric. I did needleturn using freezer-paper on top, and I finger-pressed along the stitching lines first (which I think made a big difference). After stitching, I used a template for the top section and a print-out of the full-size block to help me align the diamonds and cut the top section to the appropriate size/shape. The printout of the block had the diamonds positioned to the right of the seam just below. On the bright side, my diamonds are to the right of center, just as in the diagram. On the downside, in the original block, they were lined up directly above the seam. Ah, well. Overall, I’m still really happy with the block. Yay!

Sunday, October 25, 2009

Autumn House - Block 8

Last week I managed to complete block 8 of my Autumn House BOM. It is called, "A Perfect Home."


He's such a happy little squirrel!

Just prior to starting this block, I took a look at Carrie P.'s tutorial for bias stems, and saw that she recommended using the Clover 1/4" bias maker. It's funny, because I've had one for years, but had never used it. So I dug it out from the bottom of my closet and tried it. And it is AWESOME!!! I shall be using it in all of my future bias-making endeavors.

Eight blocks down, and only one block to go! Woo hoo!

Friday, October 23, 2009

Jane Stickle Quilt: G-4

Jane Stickle block G-4Block number/name: G-4 “Shutter Bug”

Date completed: October 23, 2009

Number of pieces: 29

Notes on block: Not my best work (to wit, the off-kilter center, the lopsided triangles, the wishy-washy points). Despite that though, I’m happy with it. And it’s another block checked off the list. Woo hoo!

Thursday, October 22, 2009

Jane Stickle Quilt: D-8

Jane Stickle block D-8Block number/name: D-8 “Dee Dee’s Delight”

Date completed: October 21, 2009

Number of pieces: 9

Notes on block: It seemed high time to try another block with two green fabrics. I was trying to decide what to do, and fell in love with this combination. The appliquéd melons get a little lost because they are so light, but I’m still happy with the end result.

Meanwhile, I continue to make progress on Logan’s Halloween costume. The body is complete, and I have the hat and feet to go. I think it’s going to be pretty cute!

Wednesday, October 21, 2009

Jane Stickle Quilt: F-7

Jane Stickle block F-7Block number/name: F-7 “Star Struck”

Date completed: October 19, 2009

Number of pieces: 21

Notes on block: A simple, happy block. Yay! I couldn’t help but use a sparkly star fabric in this star block. I’m a little worried because I’ve used a similar shade of fabric quite nearby in the quilt (H7—which also happens to be a star shape), but I think it will work out okay.

I’ve now completed 144 blocks, and am only 6 blocks behind That Quilt!

Tuesday, October 20, 2009

Projectus interruptus

I find myself having to set aside my various projects-of-the-moment.

Halloween costume 2009
No doubt, you can guess what I'm working on now.

Monday, October 19, 2009

Jane Stickle Quilt: D-9

Jane Stickle block D-9Block number/name: D-9 “Uncle Richard”

Date completed: October 18, 2009

Number of pieces: 35

Notes on block: In my drive to complete this block, I stayed up way too late last night. Ugh. But, it’s done! I had a few problems with this one. My seams were pretty much right on, so I think I cut some of the pieces a little large because I had to ease the pieced center sections to fit with the larger rectangles. It resulted in some puckered seams. Fortunately, the iron helped me out in the end, so now it’s not too noticeable.

I really love the marbled green print, not only because it is so pretty, but also because it was a gift from my friend Cindy.

Sunday, October 18, 2009

Jane Stickle Quilt: RS-6

Jane Stickle block RS-6Block number/name: RS-6 “Tumbling Blocks”

Date completed: October 17, 2009

Number of pieces: 27

Notes on block: Putting this block together was truly a pain in the patootie. Inset-seam-a-rama! Frankly, I’m a little surprised that it all worked out in the end. It is a fun looking block though, so it was probably worth all the effort (and profanity). On the brighter side, finishing this block has psyched me up for the next couple (with their simple shapes and straight seams). Hopefully, I’ll be able to build some momentum on this project again.

Saturday, October 17, 2009

Grey and drizzly

The recent spate of wet, grey days has kind of taken it out of me a little. I'm starting to get back on track though. You know what helps?


Oatmeal Cinnamon Chip Cookies!


The only change I made was to use dried cranberries instead of raisins. And they are sooooo good!

Thursday, October 15, 2009

Autumn House - Block 7

Doh!!! I've been so good and careful up to this point. But, alas, I finally goofed big on this one.


The finished block is supposed to be 12" x 14". And that's what I cut it to. And about 5 seconds after I trimmed the second side, I realized that the block's unfinished size should be 12.5" x 14.5". Sigh. Fortunately, I kept my scraps along the way for this BOM, and was able to find some extra to piece at the top and side. I think the top won't even be noticeable after quilting. The side on the other hand... I'm hoping that it just will kind of fit in with the sort of scrappy background feel of the quilt. I'm thinking that when I complete the block in the opposite corner, I'll add a strip on its outside edge for balance. We'll see.

Other than that-- Yay! I finished another block in my Autumn House quilt! This one is titled, "A Crow Came to Visit!"

Monday, October 12, 2009

With apologies for lateness...

Yesterday, I finally completed September's Snip.Sew.Send. block. Sufficit to say, I'm late. I have already sent some profuse apologies to the ever-gracious Lisa, and I should have her block in the mail to her on the morrow. Yay!

Lisa sent a variety of fabrics: red, blue, and green batiks, red and white prints, and some solid white. She loves scrappy quilts, and her fabrics really reflected an eclectic and fun style. Her block requirements: include each of the different fabrics in the 10.5" block, and include at least one star.

Sounds simple, right? Sigh... not for me. I felt overwhelmed by the array of fabrics and I just couldn't envision anything that seemed "right." But then one day, I ran across a post in Kathy Mack's Pink Chalk Studio blog that inspired me. She had recently made a wonky, free-form star block called "Maverick Star" AND she included some links to tutorials on how to do it. Perfect!

I used the Quiltville tutorial for "Maverick Stars!!!" and followed it pretty much to the letter, except that I used 2" squares instead of 2.5" (because I wanted smaller stars). It worked great. But then I kind of got stuck. I didn't have enough of the blue or green fabrics to make more stars, nor did I have enough of them to fill-in the surrounding areas (though that is what I had hoped to do). But I did have lots of red. So, I put red four-patches in the corners.


I think the result is kind of festive-looking in a crazy, scrappy kind of way. And I like the vibrancy of the red four-patches. I also like that I was able to push myself out of my comfort zone to make this. It is maybe not aesthetically perfect (at least, not to my mind), but I think it has a certain charm to it. Hopefully, Lisa will think so too.

Friday, October 9, 2009

Bloggers Quilt Festival-- Fall 2009

After participating in the first Bloggers Quilt Festival back in the Spring, and finding so much amazing inspiration from everyone's entries-- I knew I wanted to participate in the Fall one as well! If you haven't heard about it, or want to participate, check out the link below.


So I know I chose a bargello for the Spring festival too, but this is another one of the few quilts that I have designed myself, and I feel pretty proud of what I put together.

Forest Lights Bargello front view
Our friends Ryan and Kristi got married in June 2003. Of course, I had to make a quilt for them! They both have a love for the outdoors, so Keith (my husband) and I thought that earthy colors inspired by nature would be perfect. Keith helped me pick out fabrics, and we found ourselves gravitating towards greens and browns and some pretty oranges and blues. The palette made me think of sunlight coming down through a canopy of trees. And so it was named, "Forest Lights Bargello."

Forest Lights Bargello quilting detail 1
I quilted the center with waves following along the curves of the design. What I really love though is the borders. It looks like bark, and I just love it!

Forst Lights Bargello quilting detail 2
And here's the label.

Forest Lights Bargello label
I know it's hard to see (a mix of my poor photographic skills and an old camera). The label reads:
"Forest Lights Bargello"
For: Ryan and Kristi
May love help light your way in your new life together...
Care: Machine wash warm, gentle cycle. Lay flat to dry or tumble dry low.
Created by: Robin Zaback, June 2003.
The best part of this quilt experience for me was giving it to them. They really, truly seemed to love it. And they use it! Knowing that makes me so happy.

Many thanks to the fabulous Park City Girl, Amy, for putting this fabulous event together. You rock, Amy! And especially, thanks to all of you who are participating-- sharing your quilts and stories, reading the stories of others, and offering all sorts of fabulous inspiration. Thanks so much for taking time to visit here!

Thursday, October 8, 2009

Some much needed inspiration

Oh, wow! I've been taking time to stroll about the Bloggers Quilt Festival - Fall 2009, and have seen so many beautiful, amazing, wonderful quilts (and many of the stories are equally as special). I'm finding myself full of inspiration-- not only for some new projects, but also for some of those UFOs that have been languishing. If you haven't yet checked it out, I really encourage you to explore and wander through the Festival entries at Park City Girl. I know I'm looking forward to seeing even more of the Festival over the next few days (or weeks!).

Speaking of the fabulous Park City Girl, I was browsing through some of her recent posts and found even more inspiration. She had attended a Girls Night Out and met a designer named Natalia. I decided to check out her link and found the perfect design for my next baby quilt-- and it's a free tutorial to boot! How fabulous is that? The quilt is called "Tranquil Baby" and I think it is going to be perfect for little Felix, who was born on September 22.

I had really been struggling with what to make for Felix, thinking about it over the entire summer. I knew what fabrics I wanted to use (the prints are all from Hoffman's In the Wild collection), but just not what to do with them.

fabrics for Felix's quilt
Now I have a plan! And it feels so good. Blogland is awesome.

Wednesday, October 7, 2009

A little bit of prep work

Last night I took some time to prep some more Jane blocks. I'm 10 blocks behind at this point, but I usually only like to prep about 3 at a time, lest I start losing pieces or getting confused about what's what. (That, and I really am not big on the prep part, so 3 is about my limit.)


Usually my prep routine involves:
  • Printing out templates from the Dear Jane software. (I love, love, love that software!!!);

  • Using the Print > Rotary Cutting feature in the software to check on sizes of pieces that I can rotary cut (instead of using a template), and then noting those sizes on the appropriate template piece (rather than printing the whole thing out);

  • Choosing fabrics (the fun part!!!);

  • Cutting fabrics, using a combination of ruler/rotary cutter as well as templates/rotary cutter;

  • Applique prep (if required for the block);

  • Cutting out the picture of the block from the template sheet (I also color in the diagram so I know what's what);

  • Piling my pieces together on top of the picture and storing them in my sewing box until I'm ready to piece!
I sometimes think about trying plastic baggies and the like for storage of prepped blocks, but I don't really need them. At least, not as long as I only prep 2 or 3 at a time.

Of course, the real goal is to stay caught up with That Quilt so then I only ever have one block needing to be prepped at any given time. I'll get there some day... :)

Tuesday, October 6, 2009

Jane Stickle Quilt: F-1

Jane Stickle block F-1Block number/name: F-1 “Big Top”

Date completed: October 6, 2009

Number of pieces: 24

Notes on block: I really need to try another technique for these diamond shapes. I’ve been doing freezer-paper on top, and I always end up with a few concave edges. On the bright side, at least my points are getting pointier. :)

My little stack of ready-to-sew blocks is all gone now! Tonight I’m going to have to take some time and get some more blocks ready to stitch.

Monday, October 5, 2009

Jane Stickle Quilt: D-4

Jane Stickle block D-4Block number/name: D-4 “Crystal Star”

Date completed: October 5, 2009

Number of pieces: 17

Notes on block: Yay! Another block complete! I was feeling really good about how this one came together, and how well the melons in the corners worked out. Then I measured the block. It’s only off by 1/8”—but it is off, and I’m a little bummed about it. No worries though. The sashing will help offset the mistake. Did I mention that I’ve actually cut a whole bunch of sashing strips? Now I just need to start attaching them to blocks. It’s on the list.

Today I signed up to attend a quilt retreat in November with Evelyn. Woo hoo!!!! Three whole days of sewing freedom... it’s kind of difficult to imagine. It’s also my first-ever retreat, so that makes it extra exciting. I’m already figuring out what projects to bring along. I suspect some Stickle blocks (and sashing) will be among the luggage.

Sunday, October 4, 2009

Vacation and more

Last week, my family took our first-ever family vacation! Papa, the boy, and I drove down and spent four days on the Oregon coast. It was so much fun! I thought I'd share a few pictures. (But not to worry, there's a little craftiness to follow...)

papa and boy on the beach at sunset
We arrived on Sunday, just in time to walk to the beach and see the sunset.

boy checking out the ocean
It was the Boy's first time seeing the "big blue water" (aka-- the ocean). He was entranced. Rather, he was entranced until he fell into the very cold water the next day. After that, it was kind of a fascination best appreciated from a distance.

sleeping arrangements involved a little dude face-down on the family room floor
Sleeping arrangements were a challenge. The Boy had a tough time settling down in the new environment. Every evening pretty much ended sometime between 9 and 10, with a little dude face-down on the family room floor. At that point we could pick him up and put him in bed, where he would sleep fine. So, it worked out in the end.

boy eating ice cream at the Tillamook Cheese Factory
Mmmm... Tillamook ice cream!!!

mama and boy on beach
We didn't end up with too many mama/boy pictures (I think because I was the one taking most of them)-- but here's one of them.

I did manage to visit a couple of quilt shops on our trip. I only made a purchase at one of them though, Creative Fabrics in Wheeler, Oregon.

a little bit of quilty loot from Wheeler, Oregon
They had a sample of this pattern hanging in their window that was just spectacular. I wish I had gotten a picture of it. Actually, I was really impressed by just how many wonderful samples this store had hanging (and even more impressed at how current and fresh they were as well-- some of them featured brand-spankin' new collections). They also had a wonderful fabric selection. I just had to pick up a few greens. If you're ever in the area, this is a shop well worth visiting!

All in all, it was a wonderful vacation. It was so good to get away for a little bit, and be somewhere new. The weather wasn't ideal, but it didn't stop us from having a great time. When we came home on Thursday, I was tired but at the same time felt so refreshed and energized. It was awesome!

Today, I actually spent a little time at the sewing machine and finally got my Project Linus quilt top put together. I even got a back prepared and basted it all together.

Project Linus quilt all basted
Who knows? Maybe I'll even get it quilted soon!

Friday, October 2, 2009

Jane Stickle Quilt: LS-2

Block number/name: LS-2 “Barb’s Diamond”

Date completed: October 1, 2009

Number of pieces: 22

Notes on block: Huzzah! This is my first completed block in more than a month! I’ve just not been feeling the stitchin’ mojo lately. I had hoped to do some sewing on our family vacation over the last few days, but our evenings were not our own (a certain little boy was having a difficult time adjusting to the new sleeping arrangement and ended up staying up way too late each night). We got back yesterday and I was finally able to sit down and stitch. It felt so good to pick this up and put it together, I’m sure that I’ll be back in the swing of things again soon. I’m also really pleased with how well this one came together. If only the leaf in the appliquéd diamond was facing in its intended direction. Ah, well. No one will ever know but me (and you!), right?

Also—another big thank you to the fabulous Evelyn, who gave me this lovely leafy green. Yay!